What is an Audio Interface? A Comprehensive Breakdown
Introduction
In this article, we’ll delve into what an audio interface is, why you need one, and how to choose the right one for your needs. We’ll also explore the various features, from types of connectivity to inputs and outputs, AD/DA converters, mic preamps, and more.
We’re here to assist you in making sense of the technical jargon and abbreviations. So, let’s get started and uncover the mystery of the audio interface!
What is an Audio Interface?
An audio interface is a sound card that converts the analog signal from your microphone, instrument or line level into a digital signal that your computer can understand and vice versa.
It links analog devices like speakers, microphones, synthesizers, electric guitars, and other audio equipment with your computer.
Many modern audio interfaces have built-in mic preamps that amplify weak signals from microphones and instruments to line-level signals that can either be sent to an amplifier or processed.
As a result, you can:
- Record audio from your microphones and instruments onto your computer.
- Listen to your recorded and mixed tracks with headsets or monitor speakers.
- Process the recorded audio on your DAW (Digital Audio Workstation) or mixing console.
While the quality of the music largely depends on the quality of the microphone used, the instruments, and the mix from the recording software, the audio interface can still impact the sound quality through low latency monitoring, providing a pure signal during conversion and reducing noise.
Lousy audio interfaces will have high latency, bad converters, and mic preamps that introduce noise to the mix, and the built-in preamps might not provide enough gain for the mic.
A high-quality audio interface will make your recordings crisp and polished with little noise or distortion. Thus, investing in a good quality one makes sense if you’re serious about making music.
Why do you need an Audio Interface?
The simple answer is that it is a highly improved “sound card.”
Most laptops, tablets, and cell phones feature built-in sound cards that convert audio analog signals into digital signals. However, a computer sound card is rather basic, and the number of signals or channels it can handle is limited.
Internal sound cards are not for playback or high-quality audio recording. In addition, the computer likely needs more connectivity options for your devices.
A dedicated audio interface is thus necessary for connecting your computer to your audio gear, such as your studio monitors, XLR microphone, electric guitar, and other devices for music production, podcasts, etc.
If you are into mixing for music production, it is best to get a powerful interface and a pair of high-end studio monitors to get the most accurate mix for your music production needs.
How do you choose an Audio Interface?
These are some essential things to think about before choosing:
Budget
Money talks; when choosing an audio interface, your budget is the lead singer. You can go for the affordable ones that won’t break the bank or go all out and get the top-of-the-line models that will burn a hole in your wallet.
Either way, knowing what you want and how much you’re willing to spend is essential. Make a list of your must-haves, create a realistic budget, and stick to it. Remember, you don’t want to end up with buyer’s remorse or have to sell your soul to afford it.
The great thing is, we have some excellent recommendations for good-quality audio interfaces that won’t break the bank.
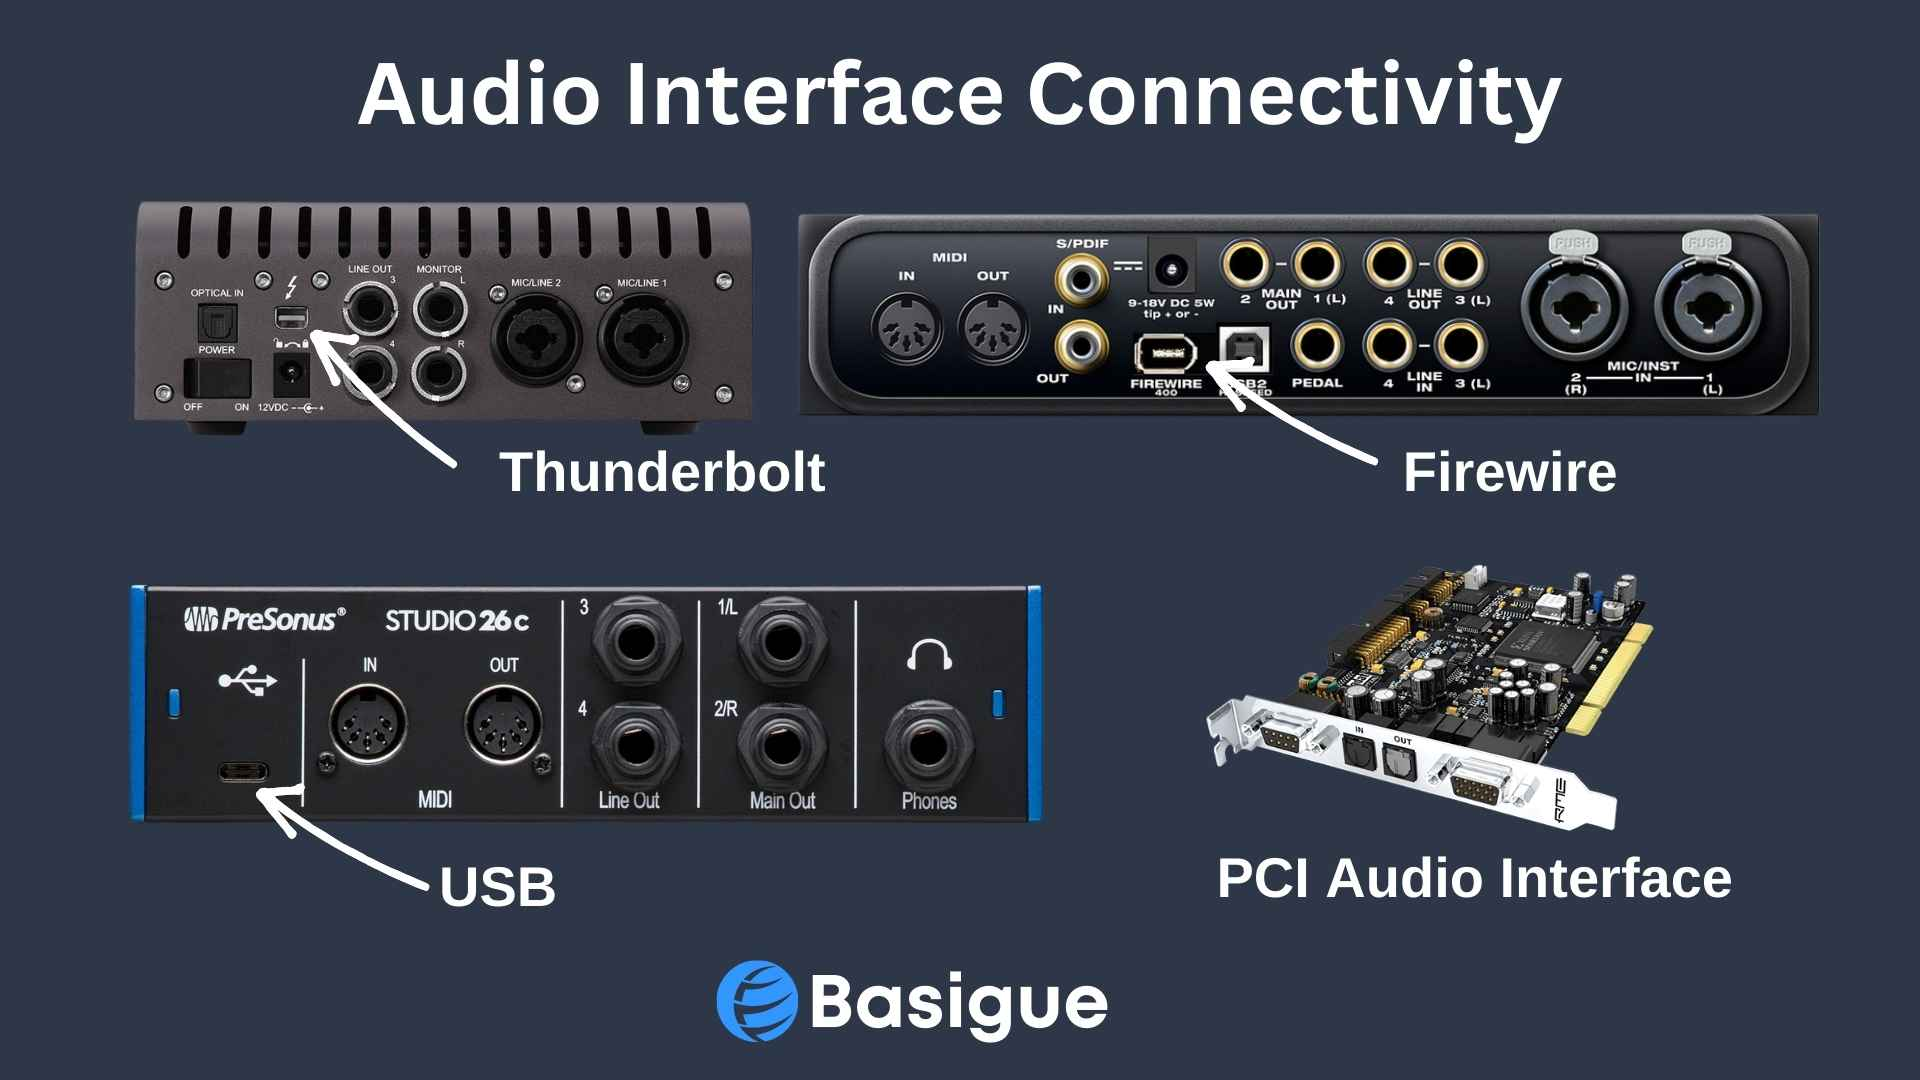
Connection Type
Next, consider the connection type that will benefit your arrangement the most. FireWire and Thunderbolt ports offer faster rates and lower latency for more demanding recording circumstances.
USB interfaces are the most extensively used and compatible with most PC. Thunderbolt 3 & 4 uses a USB-C connection, while Thunderbolt 1 & 2 uses mDP (mini DisplayPort) connection.
If you’re feeling brave and tech-savvy, you could try PCI interfaces, which require installation on your motherboard. However, PCI audio interfaces do not have inputs for microphones and instruments.
Number of Inputs and Outputs
Are you running a one-person acoustic show or in a full-blown band with an electric guitar, keyboard, singer, and drum kit? The answer will determine how many inputs and outputs you require.
If you’re keen on recording your own music, you’ll find many helpful tips in our article on recording acoustic guitars or making a cover song.
If you’re recording with a partner and both need to hear yourselves, it’s probably best to snag an audio interface with two headphone outputs.
Other Considerations
Finally, besides the physical features, other essential considerations are:
- Sample rate and bit depth
- Quality of pre-amps
- Quality of converters
- Included plugins
- Routing capabilities
- Meter display
- Build quality
Recommendations for Beginners
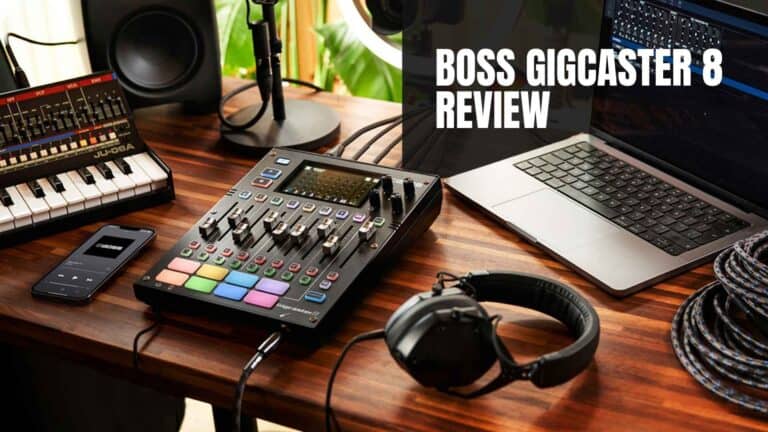
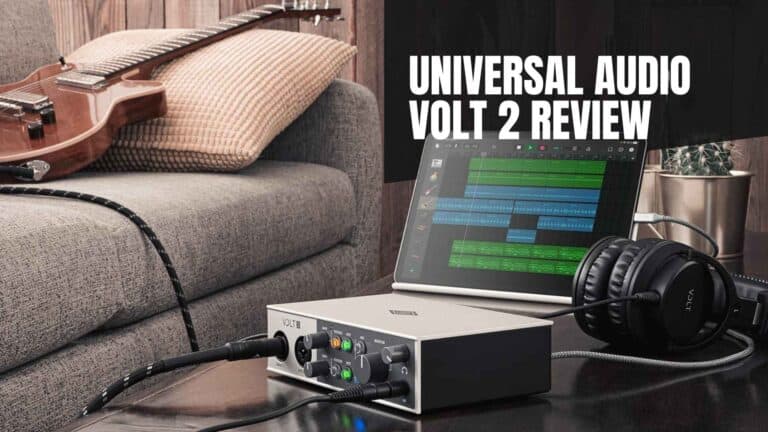
You don’t want to break the bank if you’re just starting. Some great beginner options are the Focusrite Scarlett 2i2, and the Universal Audio Volt 2. They’re tried and tested, loved by pros and beginners, and offer great bang for your buck. Plus, they have top-notch converters and mic preamps, so you’ll sound like a pro in no time.
Recommendations for Advanced Users
You need a bigger interface with more inputs if you’re recording an entire band or quartet. The M-Audio Profire 2626, for example, boasts 8 built-in preamps and allows for expansion. You can stack another one (or two) on top of it and have more than 24 mic preamps for recording audio simultaneously.
Features of an Audio Interface
Types of Connectivity
Different interfaces provide different connections to a computer, some more advantageous than others.
USB is the most common connection method, while Thunderbolt is becoming popular. FireWire is losing popularity; however, you may occasionally see outdated models that still use it.
USB interface
The most common connection types are USB 2.0, 3.0, and USB-C interfaces. The USB version is one of the most popular categories on the market. They feature a straightforward plug-and-play setup and are user-friendly.
The main benefits of audio interfaces with a USB connection are their accessibility and low cost, which makes them an excellent option for podcasting or home studio recordings.
Check out our article if you need help setting up a home studio.
FireWire interface
While using a different connection, FireWire audio interfaces resemble USB interfaces. High-quality audio can be recorded and streamed with FireWire since it has a quicker data transfer rate than USB 2.0.
FireWire 800 can transfer packet data at up to 800 MB/s with its high-speed serial interface, whereas USB 2.0 has a bandwidth of 480 MB/s.
Obtaining compatible gear and software may be more challenging because the current interface for FireWire is less widely supported.
Thunderbolt interface
Thunderbolt audio interfaces are gaining popularity due to their high-speed data transfer and low latency, almost eliminating any lag in recording and monitoring.
Thunderbolt connectors will have a small lightning icon and use USB-C or a mini DisplayPort interface.
A thunderbolt port is faster than a FireWire port or USB port. For instance, the newest Macs come with Thunderbolt 3, which is eight times faster than USB 3 and twice as fast as Thunderbolt 2. It can support up to 40 Gbps speeds and optical cable lengths of up to 100 meters.
PCI interface
PCI audio interfaces are meant to be installed onto a PC motherboard’s PCI or PCIe slot. These interfaces are the best for professional recording studios and audio engineers since they have the lowest latency and best performance.
PCI interfaces generally feature many inputs and outputs and can quickly handle high-resolution audio. PCI interfaces are typically more expensive, less portable, and user-friendly than USB, FireWire, or Thunderbolt connections.
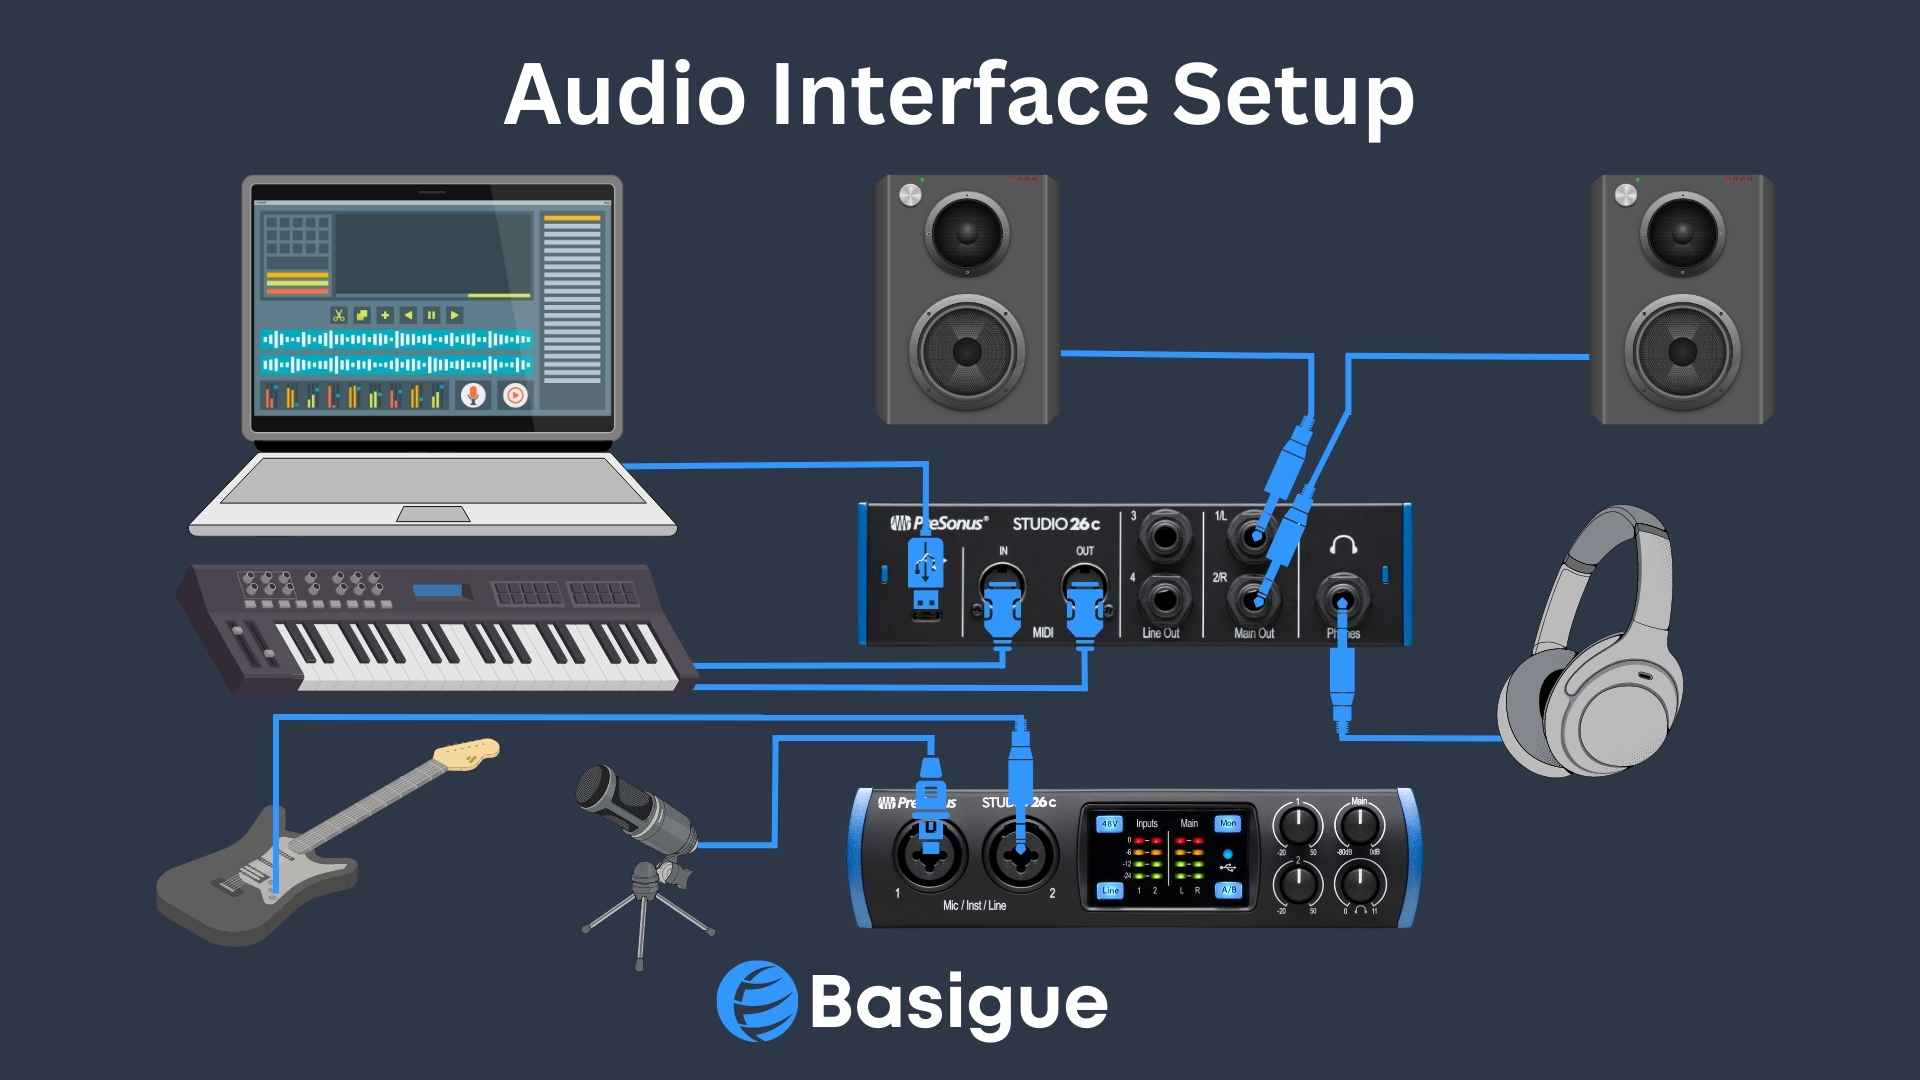
Inputs and Outputs
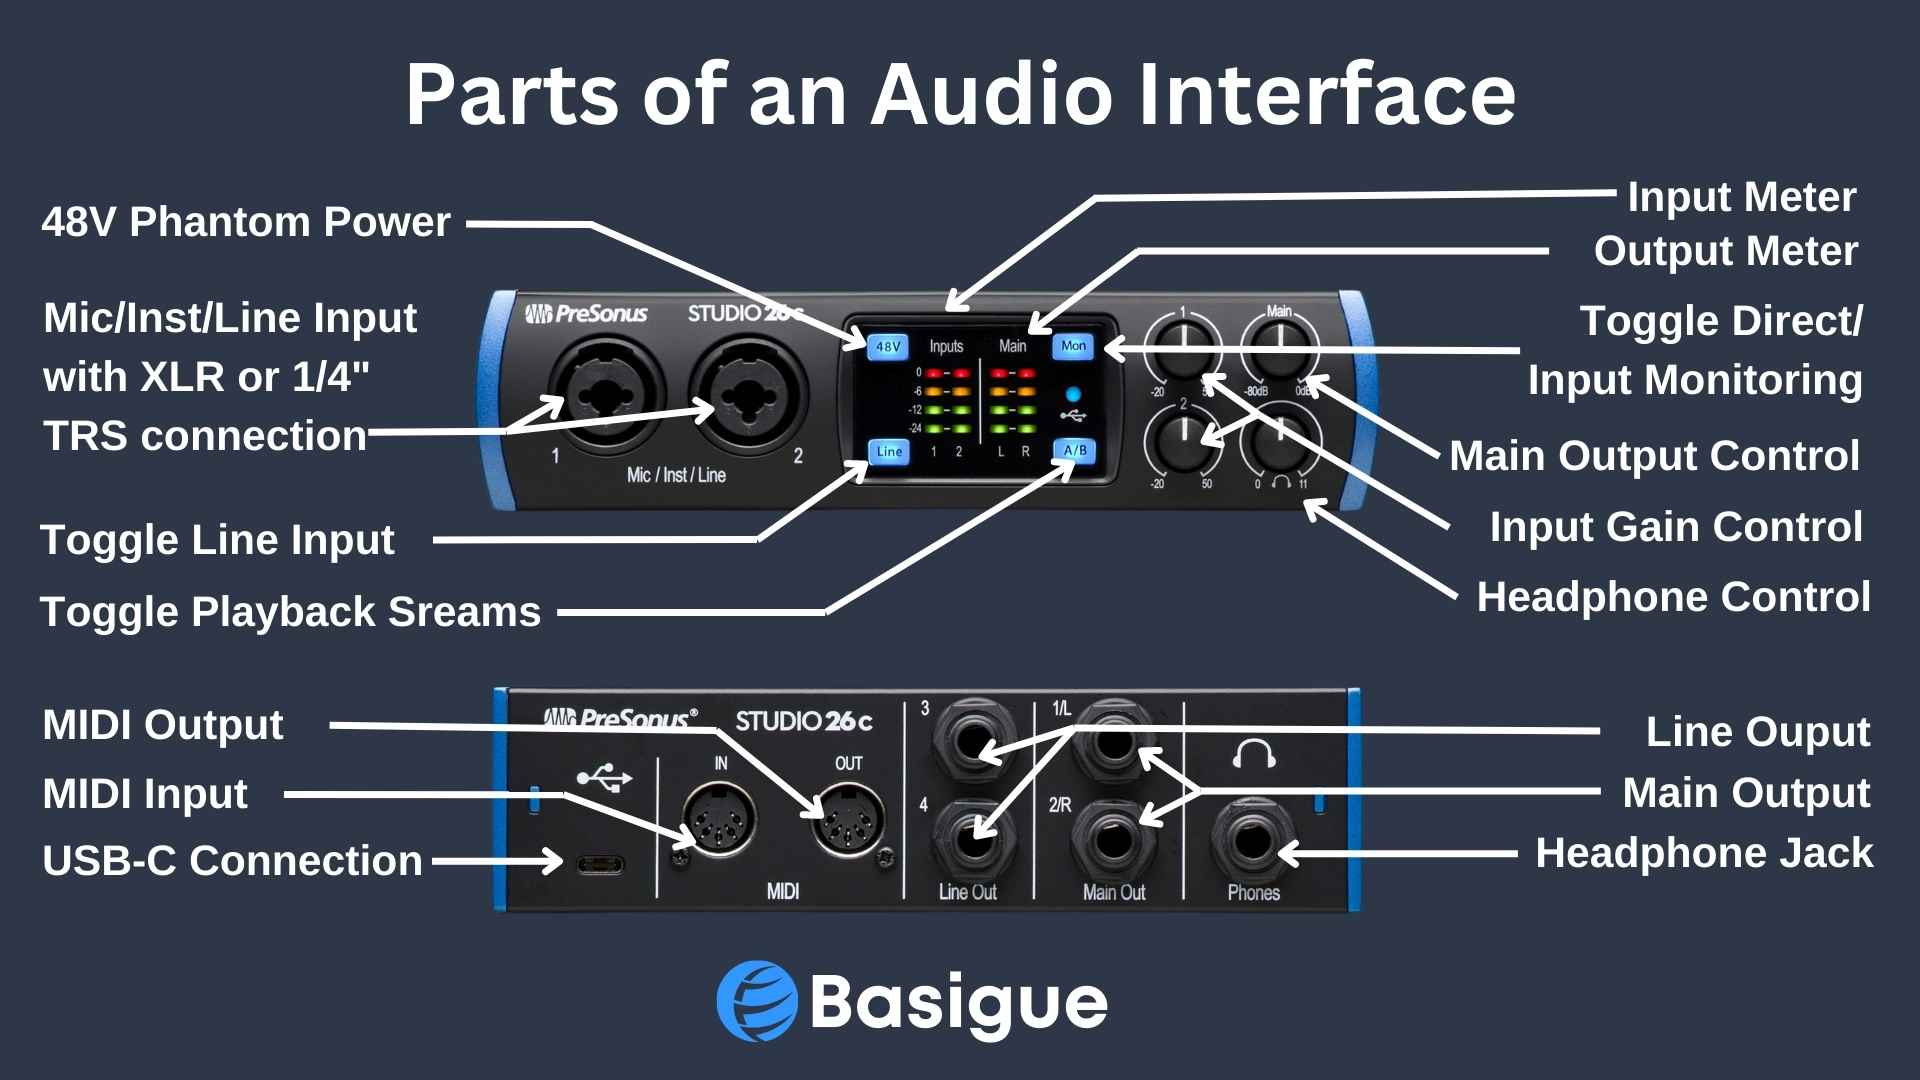
One of the major parts of an audio interface is the inputs and outputs, which allow you to connect your audio equipment. XLR, TRS, RCA, and MIDI connectors are some of the ports available on these devices.
Depending on how you intend to use your studio recordings, you will require a minimum number of I/O ports.
XLR and 1/4″ TRS Inputs
Most audio interfaces provide both XLR and 1/4″ TRS inputs. XLR inputs are usually meant for different kinds of microphones, such as a condenser mic or dynamic mic, while 1/4″ TRS inputs are typically used for instruments or line-level signals.
As mentioned, the more instruments you record, the more inputs you require.
Regarding inputs, it’s essential to consider the different types of signals an interface can handle:
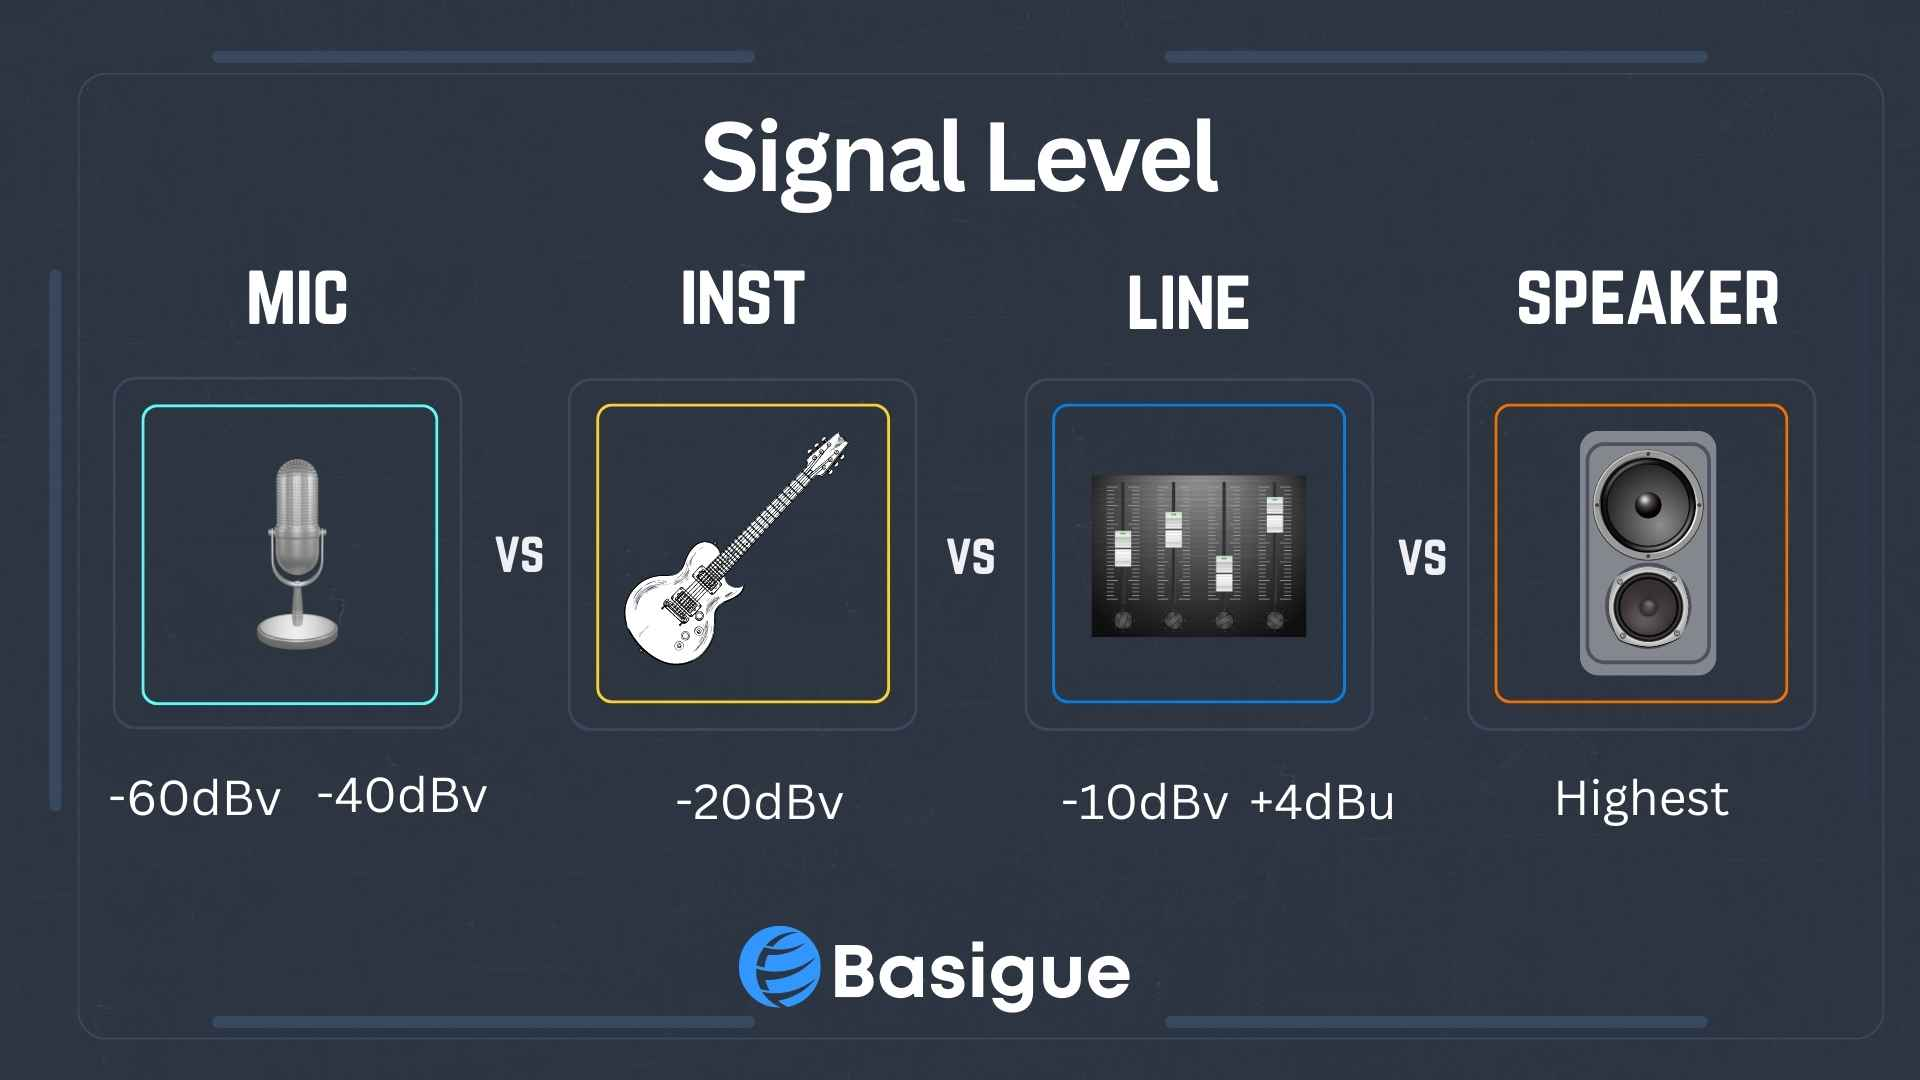
Mic-Level
The weakest signal level is the mic level, which is transmitted through XLR cables and must be amplified to “line level” by a mic preamp before it can be sent to an amplifier or processed by a mixing console.
However, we have some excellent recommendations for mixing consoles that combine a mixer, preamp, and audio interface. This allows not only for the boosting of mic levels, but also for multiple audio sources to be mixed and sent to your computer.
The mic preamps on the audio interface are the circuits that amplify the signal from any connected microphones. These preamps increase the voltage and gain levels of the audio recorded by mic-level inputs. The primary purpose of amplification is to bring the mic-level signal up to the line level.
Instrument-Level
Instrument-level signals are produced by instruments with a magnetic pickup, like electric guitars and basses.
Some interfaces provide dedicated 1/4″ inputs with high impedance (Hi-Z) for connecting instruments. In contrast, many offer hybrid XLR+1/4″ combo jacks that allow you to choose whether to connect a microphone or an instrument by selecting the INST button.

The INST button optimizes the input gain and impedance for those high-impedance magnetic pickups on your electric or acoustic guitar and bass guitar.
Line-Level
A line-level signal is the strongest signal that can pass through a TRS (Tip, Ring, Sleeve) jack connection.
Any instruments that output line level (synths, keyboards, drum machines, etc.) or non-instrument devices (such as an external preamp or processor) should be connected to your interface using the TRS jack.
Line-level signals are considered the “standard” pro audio signal level in the audio industry since most external devices, such as EQs, reverbs, and delays, are designed to handle line-level inputs.
Main and Line Outputs
A basic audio interface typically has two main outputs (or line outputs): one for the left and the other for the right speaker outputs of your studio monitors.
You might be wondering, why bother having additional line outputs on the interface when only two outputs are needed for a pair of studio monitors? Well, the truth is that these additional outputs can be pretty useful.
Extra outputs on your interface allow you to connect to a 5.1 or 6.1 surround sound system, or even to outboard processors such as a compressor, EQ, or time-based effects.
If your interface has 6 outputs, you could create a 5.1 surround sound system with five speakers and one subwoofer. While this is essential for film composers, you might find it unnecessary if you’re a singer-songwriter or a band.
Headphone Output
An audio interface usually has a headphone output with volume control. Better ones have a cue output and a toggle to change between various speaker output pairs. When there are numerous tracks recorded concurrently, this makes it possible to monitor the audio signal precisely.
The latency from input monitoring increases when a signal travels from an instrument through an audio interface to a computer and back again.
Direct Monitoring
Direct monitoring lets you hear the input signal from your microphone or other devices directly through the interface without a computer or digital audio workstation.
While using direct monitoring, the computer is bypassed, allowing you to hear the instrument’s dry sound directly with zero latency, making it useful for real-time monitoring and recording.
Virtual Studio Technology (VST) plugins and effects from your DAW cannot be heard using direct monitoring; input monitoring is required instead.
The more tracks and effects you have when using input monitoring to listen to effects, the worse the computer’s sound card will perform and the more delay there will be. To get around this, you’ll need an audio interface with an onboard DSP (digital signal processor), such as the UA Apollo Twin, that can process audio effects without CPU power.
If your audio interface only has one headphone output and you need dual headphone outputs, you will need a separate headphone amplifier to connect to one of its line outputs.
MIDI Connections:
Some interfaces provide MIDI connections to record music with your MIDI keyboard or controller.
A MIDI (Musical Instrument Digital Interface) input is required for recording MIDI data straight into your DAW, such as notes, pitch bends, and modulation.
MIDI data you recorded in your DAW can be “played” by an external MIDI sound source, such as a synthesizer or drum machine, when connected to an interface’s MIDI output. You can control multiple MIDI devices if there are multiple MIDI outputs.
AD/DA Converters (Audio converter)
Audio interfaces have analog-to-digital converter (ADC) and digital-to-analog converter (DAC) capabilities, and this is their main purpose that was mentioned at the beginning of the article.
The ADC converts analog audio signals to digital signals for computer processing, while the DAC converts digital signals back to analog signals for output through speakers or headphones. Simply put, the ADC transforms electrical signals from a microphone or other analog audio source into digital signals, while the DAC performs the opposite function.
The following specifications are important for the quality of an AD/DA converter:
Sample Rate:
The sample rate determines how often an audio signal is measured per second and is crucial in ensuring an accurate digital representation of the original analog signal.
Most interfaces operate at sample rates of 44.1 kHz, 48 kHz, 88.2 kHz, 96 kHz, or even 192 kHz. For example, an AD/DA converter operating at 48 kHz will measure the mic preamp voltage 48,000 times per second. Therefore, higher sample rates result in more accurate digital representation and larger file sizes.
The best vocalist in the world, the best vocal microphone, and the best microphone preamp will not help if your AD/DA converters are poor quality.
Professional engineers and audiophiles frequently shell out astronomical prices for expensive interfaces with immaculate, top-of-the-line converters for the best audio results.
Bit Depth:
Imagine if you only had two levels of loudness to choose from: whisper or shout. That’s not very nuanced, is it? The bit depth refers to the number of amplitude values that can be captured for each sample.
A higher bit depth allows for more amplitude values to be recorded, resulting in a higher dynamic range and a more accurate recreation of the original audio signal.

16 or 24-bit depths are the most common for audio interfaces. A 16-bit audio resolution offers 65,536 amplitude values per sample, while 24-bit provides a whopping 16,777,216 amplitude values per sample [1]. This means that 16-bit resolution provides a dynamic range of 96dB between the noise floor and 0dBFS, whereas 24-bit resolution provides an impressive 144dB of dynamic range between the noise floor and 0dBFS.
Some interfaces can support audio up to 24-bit and 192 kHz, but for most people, that’s overkill. These days, many people record using 24-bit/96-kHz settings, which offer sufficient quality and allow for smaller file sizes. It’s worth noting that the audio standard for CDs is 16-bit/44.1 kHz, which is less than the aforementioned settings.
But here’s the thing: while higher sample rates and bit depths can improve audio quality, they’re not the be-all and end-all. Some argue that beyond a certain point, the difference in audio quality becomes negligible to the human ear.
Latency:
The time it takes for an audio signal to get from the audio interface to the computer or digital audio workstation and get processed is known as latency. In other words, it is the delay between your audio signal and source replication.
If a device has excessive latency, it can significantly delay the signal flow, making real-time monitoring and recording difficult. That’s why having low latency is crucial. Most modern audio interfaces have a 1 to 10 milliseconds latency, but high-end interfaces can achieve even lower latency, around 2 milliseconds.
Setting the audio buffer (often referred to as “buffer size”) in your DAW to its lowest setting is one method of reducing latency. The buffer, measured in samples, regulates the time the computer permits for processing (64, 128, 256, etc.).
Lowering the buffer reduces delay. However, it also increases the computer’s workload, leading to clicks, pops, and a decrease in audio quality as a trade-off.
As mentioned, direct monitoring, also called “zero-latency monitoring,” is a more effective method of avoiding delay without adverse effects on computer performance.
Preamps
Before the Analog-to-Digital Converter (ADC) can convert an audio signal to digital format, it needs to be at a suitable level. The resulting digital signal will be noisy and unusable if the signal is too weak.
Preamps solve this problem by amplifying a weak microphone or instrument signal level to line level, ensuring the signal is strong enough for the ADC to do its job.
Some interfaces provide mic preamps that can give a microphone more gain (like Apollo Twin); this is useful for microphones that give weak signals, like Shure SM7B. Hence, you don’t need a Cloudlifter to provide extra gain.
Phantom Power
Beginner audio enthusiasts often overlook phantom power. It is a function of an audio interface that supplies condenser mics with +48V phantom power to function correctly and record sound faithfully. Without phantom power, condenser microphones would be unable to operate and produce no sound.
It is worth noting that professional-grade shotgun microphones like the Sennheiser MKH 416 are small-condenser capsule mics that require phantom power. However, there are other types of shotgun mics that can be powered by batteries or a DLSR camera’s mic input.
It is important to note that not all microphones require phantom power. For example, dynamic microphones and ribbon microphones do not require phantom power, as they do not have a charged diaphragm. Phantom power can even damage the fragile element of passive ribbon mics.
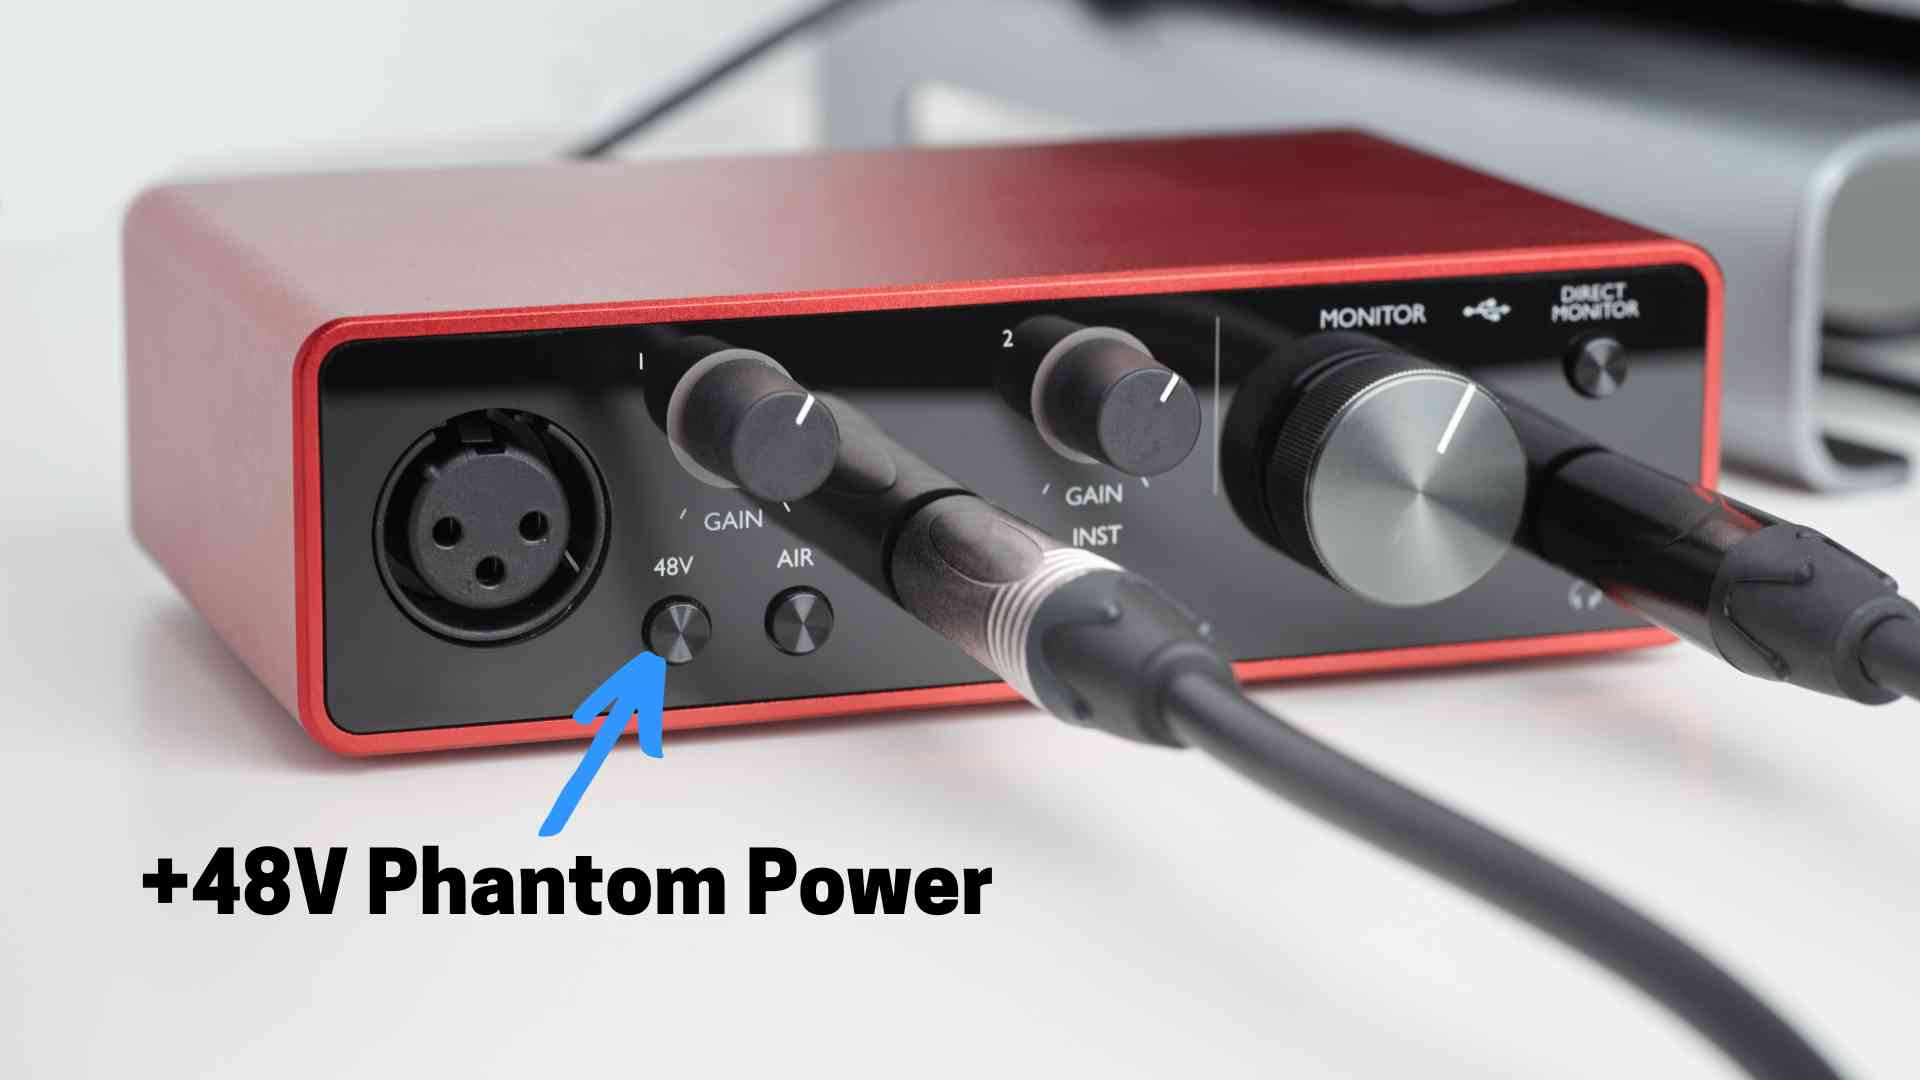
Most audio interfaces provide a switch or button with “+48V” to enable phantom power when using condenser microphones.
FAQ (Frequently Asked Questions)
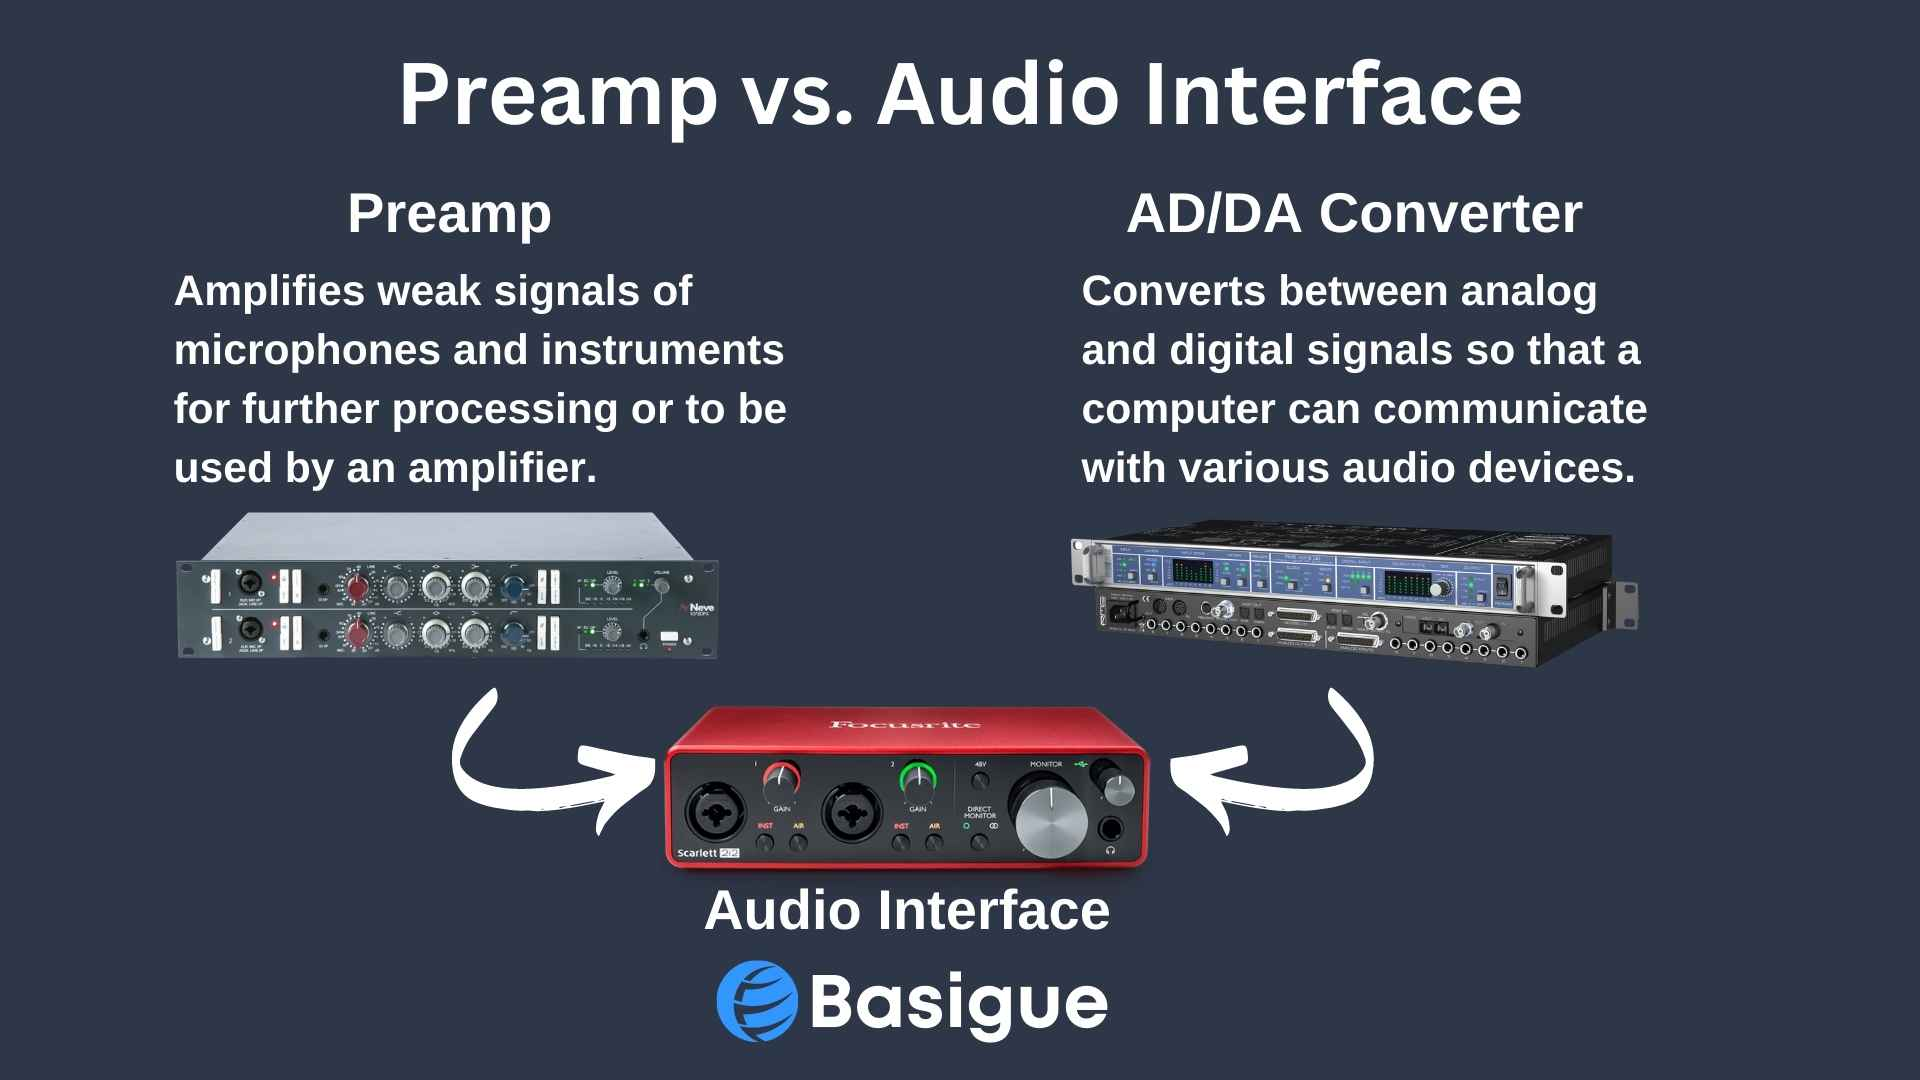
No, they are not the same. The purpose of a preamp is to amplify low-level signals from a microphone or instrument to the optimal line level that is clear and loud. It is also unlikely to have digital components like an ADC (analog-to-digital converter) or DAC (digital-to-analog converter).
An audio interface, on the other hand, has a DAC and ADC that converts an audio signal to a digital signal that a computer can understand and vice versa. It is also common for them to have built-in preamps.
Nowadays, most interfaces provide combo jacks with built-in preamps. These combo jacks imply that you can connect a guitar or microphone with the same input. Although you might only require one input, you’ll eventually need at least two inputs in your audio interface. You may want to record stereo outputs from vocals and guitar or vocals and keyboard.
No, it can’t. Since a USB mic has an analog-to-digital converter, it can be connected directly to a PC. And often, you can connect only one USB mic to your computer.
If you are not recording music and need only one microphone for streaming, podcasting, or ASMR, USB mics are the way to go. Our articles provide some recommendations for good streaming mics and ASMR microphones.
References
- (2021, September 2). Understanding Sample Rate, Bit Depth, and Bit Rate. Headphonesty. Retrieved March 29, 2023