How to Make a Cover Song WITHOUT Playing an Instrument!
Have you ever found yourself humming along to your favorite songs, only to realize you’re pretty good at it? Or perhaps you’ve always had a knack for singing, but the thought of learning to play an instrument seems daunting. Well, I’ve got some good news for you! You don’t need to be a virtuoso on the guitar or a maestro on the piano to make cover songs. In fact, you don’t need to play an instrument at all!
In this blog post, I’ll be showing you how to make a cover song without playing a single note on an instrument. We’ll explore everything from the basic equipment you’ll need, to setting up your recording space, and even some tips on how to make your cover songs sound professional for your YouTube channel.
So, whether you’re a seasoned vocalist or a shower singer ready to step into the spotlight, this guide is for you. And remember, the only instrument you truly need is your voice!
The Basic Equipment You’ll Need to Make a Cover Song
Embarking on creating covers for your favorite songs requires more than just a passion for music. It necessitates the right equipment to capture the essence of your performance.
Microphone

A microphone is an indispensable tool in the recording process. The choice of microphone can significantly impact the quality of the recording, making it essential to select one that complements your voice and the nature of the performance.
Condenser Mic
Condenser microphones are known for their sensitivity and ability to capture a wide and flat frequency response. This type of microphone can accurately represent the full range of your vocals, capturing every detail and nuance of your cover songs.
Condenser microphones come in two varieties: large diaphragm and small diaphragm. The large diaphragm condenser microphone is known for its natural-sounding, crisp, and clear capture of vocals and acoustic guitar. Its cardioid polar pattern helps reject background noise, ensuring the focus remains on the primary sound source. However, it requires 48V phantom power from a preamp or audio interface to function.
On the other hand, the small diaphragm condenser microphone has a fast transient response which is excellent for capturing the intricate details of a drum kit or the distinct sound of electric guitar amps.
Dynamic Mic
The dynamic microphone is the most robust among the different microphone types, capable of handling high sound pressure levels. While it may not be able to capture high-frequency details like that of a condenser microphone, it is perfect for recording loud sources such as drums and electric guitar amps.
Since the dynamic mic is less sensitive than a condenser microphone, it is better at rejecting background noises.
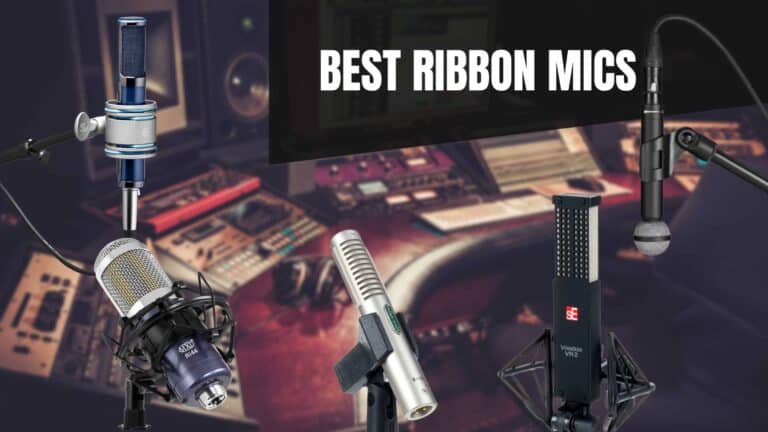
Ribbon Mic
Ribbon microphones are more uncommonly heard of. They have an incredibly warm, dark, and natural tonal quality. It is ideal for capturing a vintage sound in your vocals or instruments. However, ribbon microphones are delicate and expensive, which require careful handling. It is also important to note that phantom power will damage the ribbon element of most ribbon mics.
If you have the budget, we have some great recommendations for ribbon mics, from affordable ones to the most premium types.
Recommendations


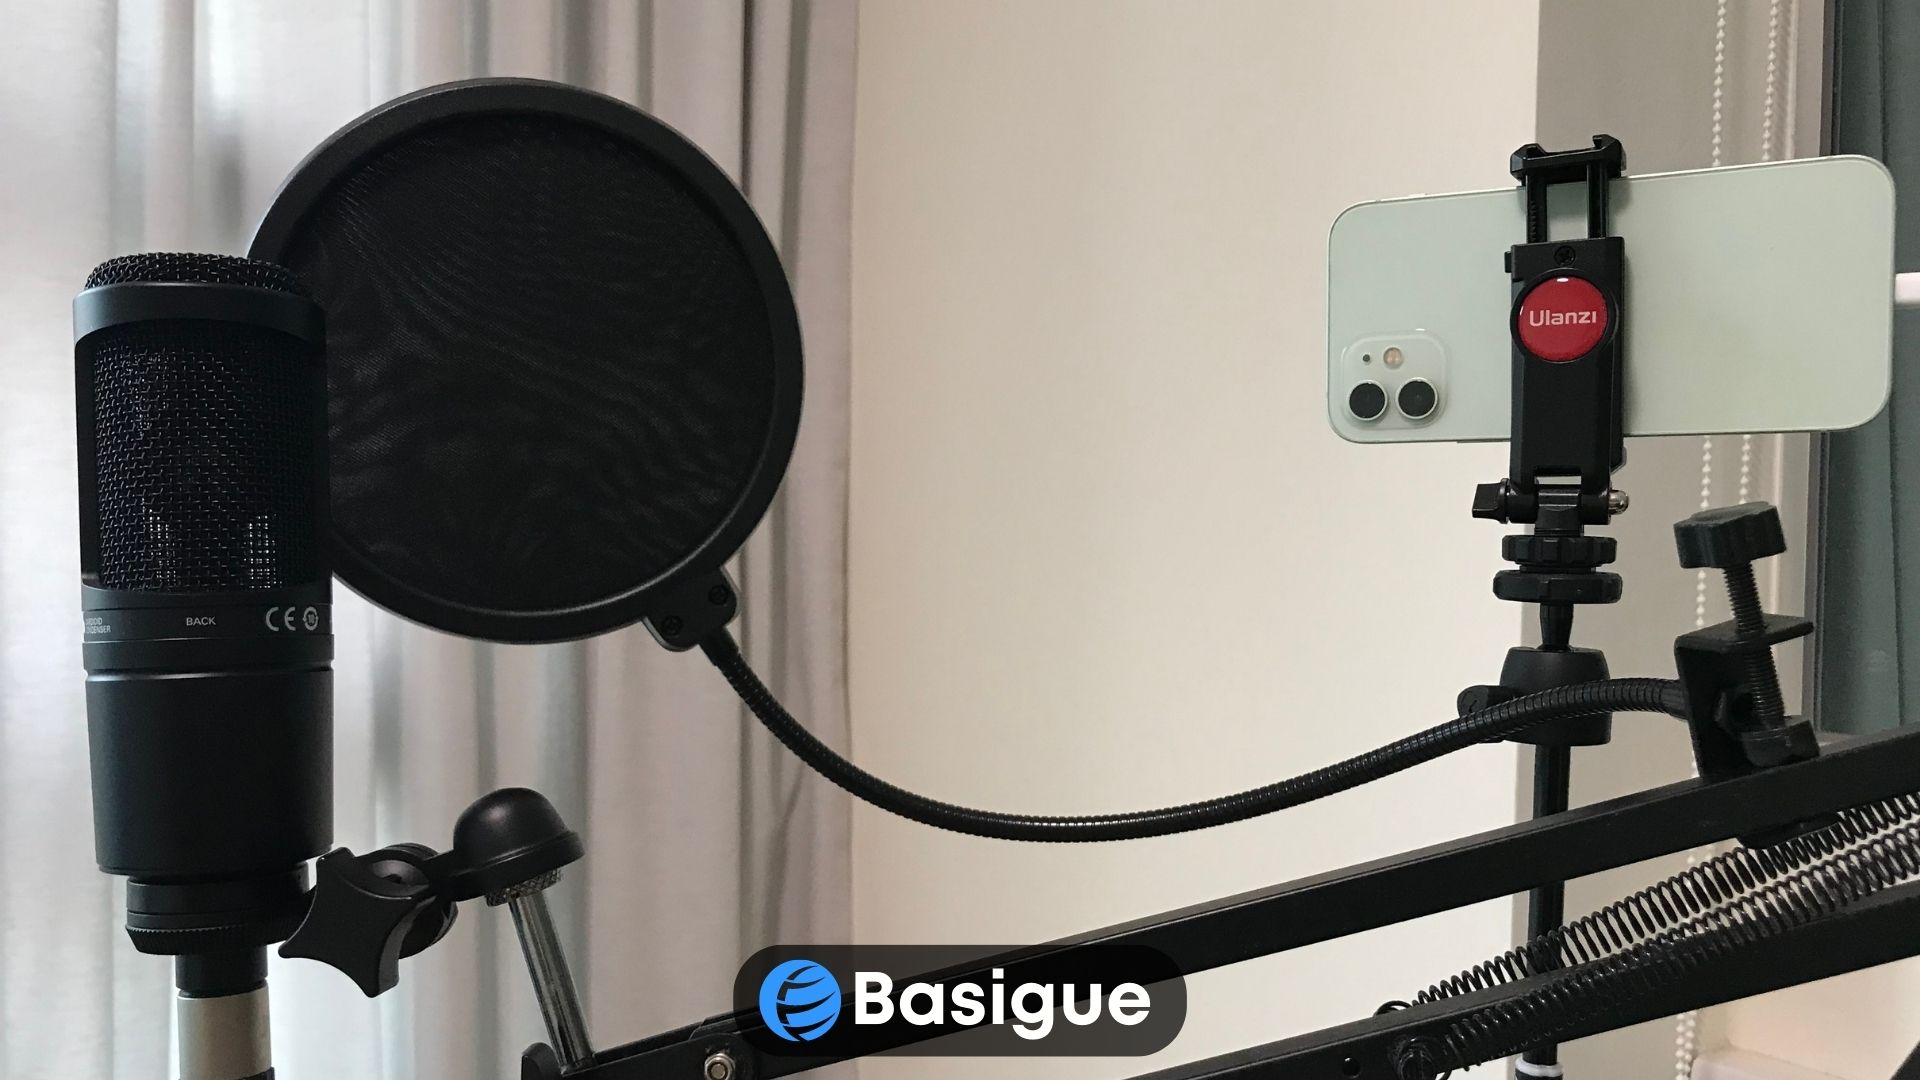
Pop Filter
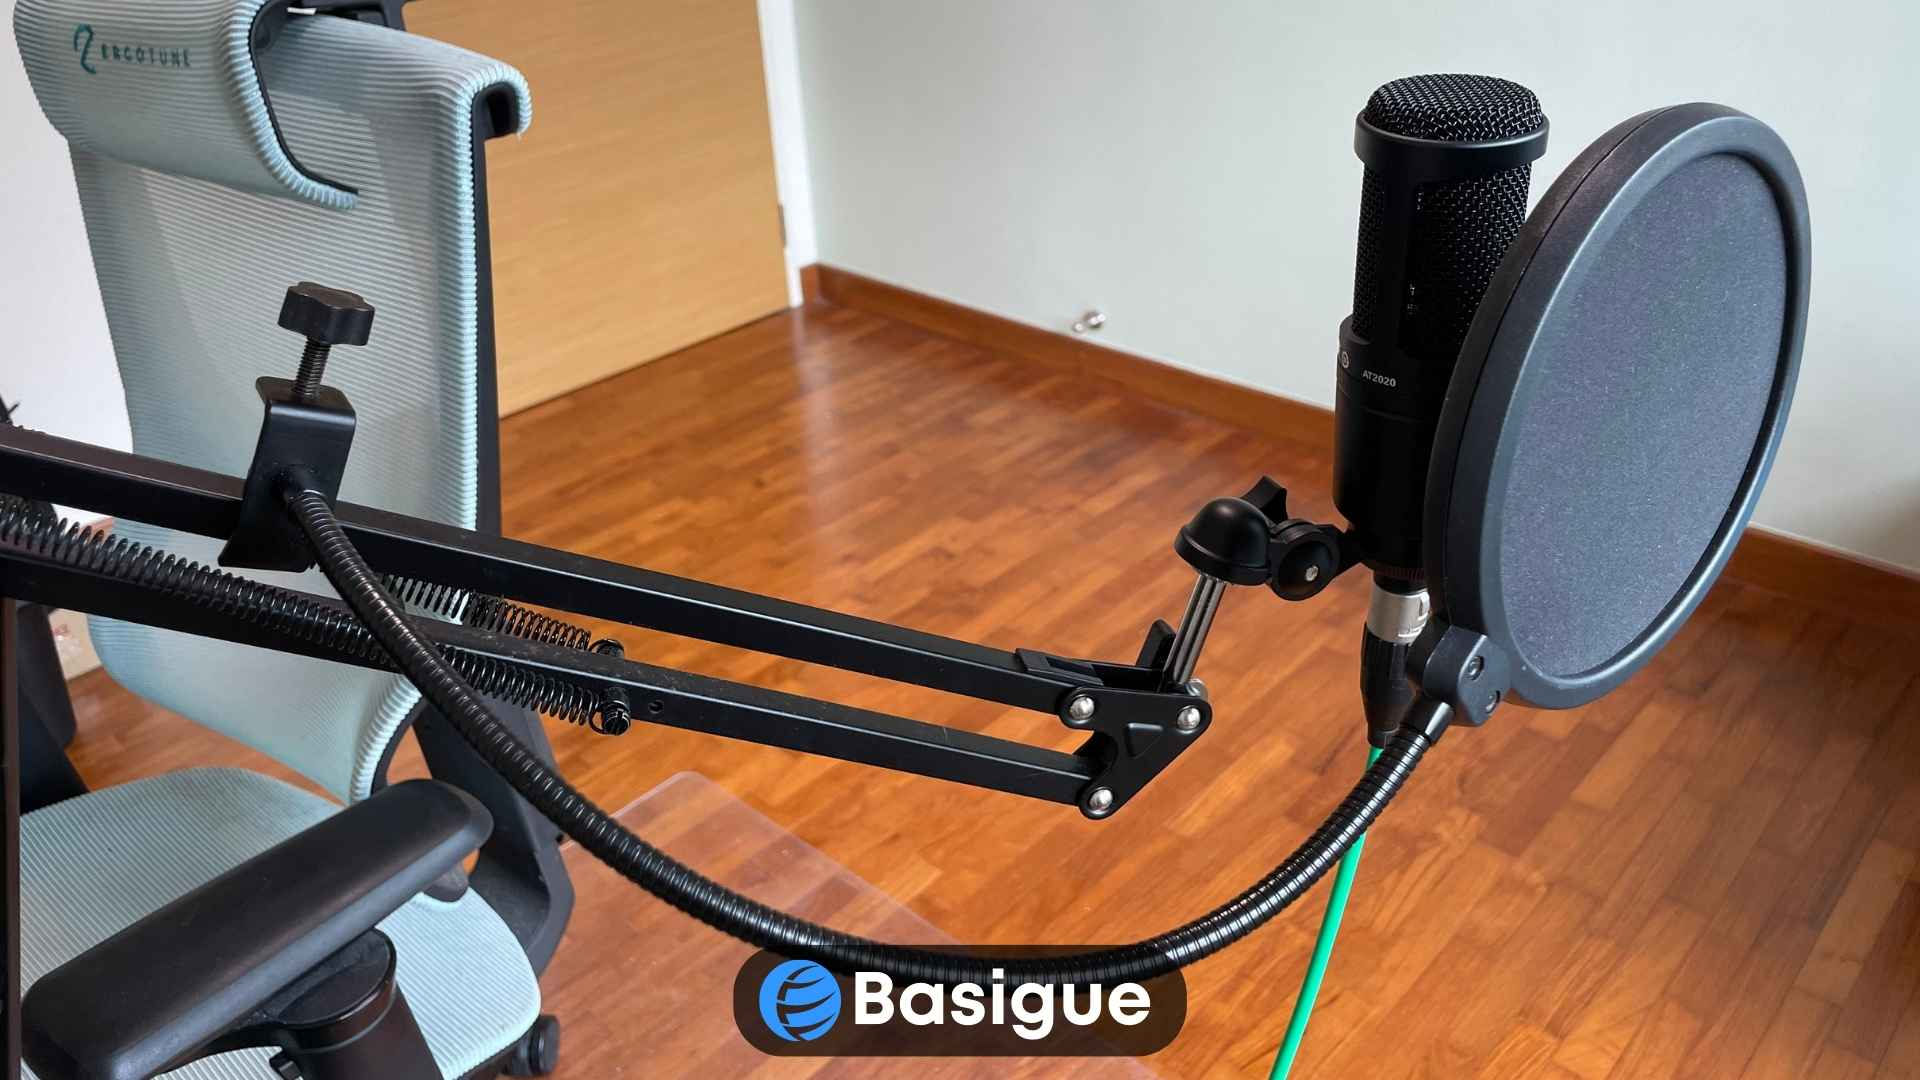
A pop filter is a device used in recording studios to mitigate the impact of plosives on the recording.
Plosives are the explosive sounds produced when pronouncing certain consonants, notably ‘p’ and ‘b’. These sounds can cause a burst of air to directly hit the microphone, resulting in undesirable popping sounds that can compromise the cleanliness of the recording.
A pop filter serves as a barrier to these bursts of air, effectively reducing their impact on the microphone. This seemingly insignificant tool can greatly enhance the quality of your recording by ensuring a clean, plosive-free recording.
Moreover, a pop filter gives your home recording setup a more professional look. It’s kind of like wearing lifting straps while doing deadlights at a gym; they significantly improve your grip, but many gym-goers like to use them to look more professional or ‘cool.’
Reflection Filter
The next piece of equipment that is often overlooked is the reflection filter. It serves as a protective barrier that prevents unwanted sound reflections from entering the microphone during recording.
When sound is produced, it does not travel in a single direction but disperses and bounces off hard surfaces in the room, especially walls and ceilings. These reflected sound waves can re-enter the microphone, causing undesirable noise and echo in the recording.
When a reflection filter is placed behind the microphone, it absorbs these reflected sound waves and prevents them from ruining the recording.
Just like a pop filter, including a reflection filter in your setup can improve the quality of the audio recording and make your cover song appear much more professional!
Audio Interface
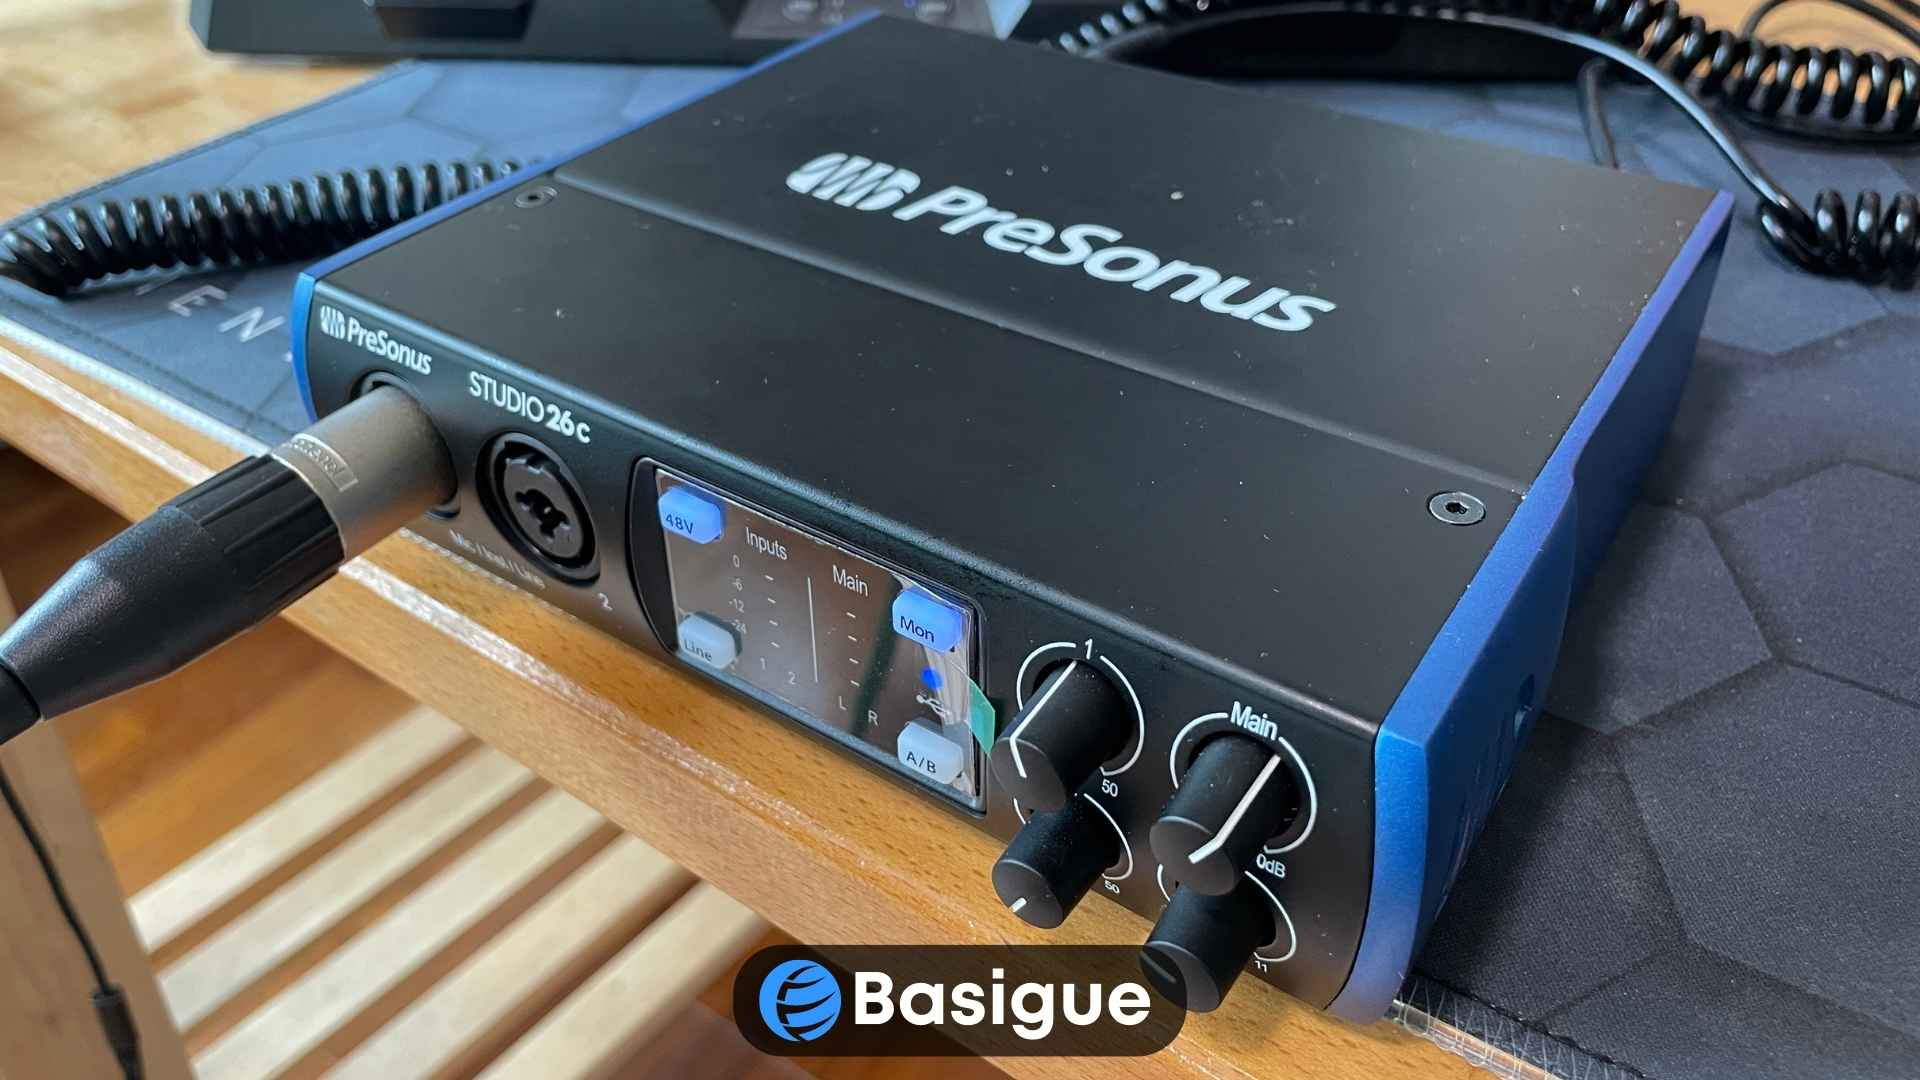
The audio interface is one of the most essential equipments for recording cover songs. It serves as a bridge between your XLR microphone and your computer, facilitating the conversion of analog signals into a digital format that your computer can process.
Modern audio interfaces often come with USB-C connectivity for rapid and reliable data transfer.
Moreover, most audio interfaces these days provide 48V phantom power, which is essential for the operation of condenser microphones. It also features a variety of Input/Output (I/O) ports to accommodate various recording needs. These include 1/4″ TRS/XLR combo jacks for microphones and instruments, and line outputs for speakers or headphones. Some interfaces even include MIDI ports for connecting MIDI keyboards or controllers.
A notable feature of many audio interfaces is zero-latency direct monitoring. This lets you listen to your performance in real time, without delay, providing immediate feedback on your recording.
If you’re looking for an affordable audio interface, check out our article on the 7 Best Budget Audio Interfaces. However, you do not need an audio interface if you intend to get a USB microphone that can be connected directly to a computer.
Recommendations


Studio Headphones
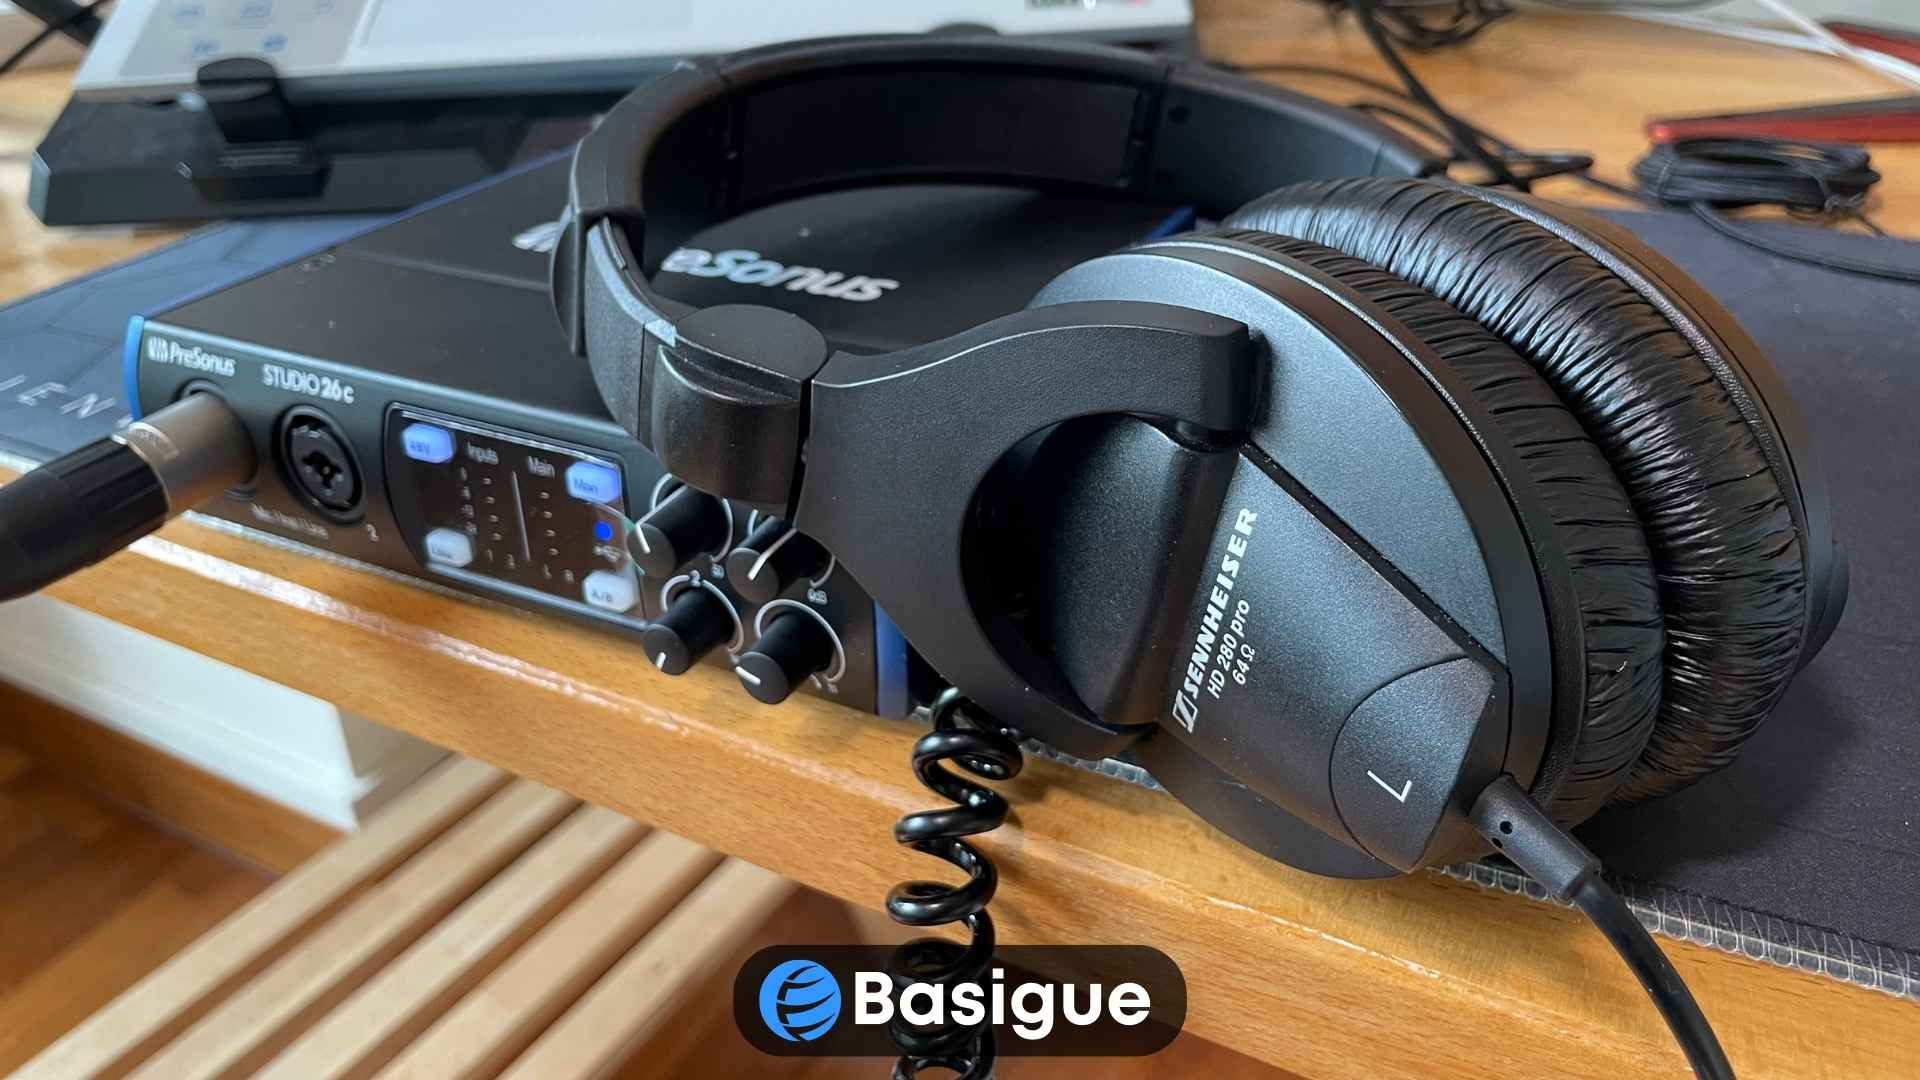
Studio headphones play an indispensable role in recording cover songs. They provide a flat frequency response, unlike regular consumer headphones, which often have boosted trebles or bass to enhance the listening experience. This means they do not artificially enhance frequencies, allowing you to hear the music exactly as it is. This unaltered representation is crucial in the recording process, as it provides an accurate reference for mixing and mastering.
Studio headphones come in two types: open-back and closed-back. Open-back headphones allow some sound to leak out and in, providing a more natural and spacious sound, akin to listening to music in an open room. Because audio is leaked through open-backed headphones, it is unsuitable for recording and used for mixing instead.
Closed-back headphones, conversely, isolate the listener from external noise, allowing for a focused and immersive listening experience. Closed-back headphones are suitable for recording because the sound does not bleed from them.
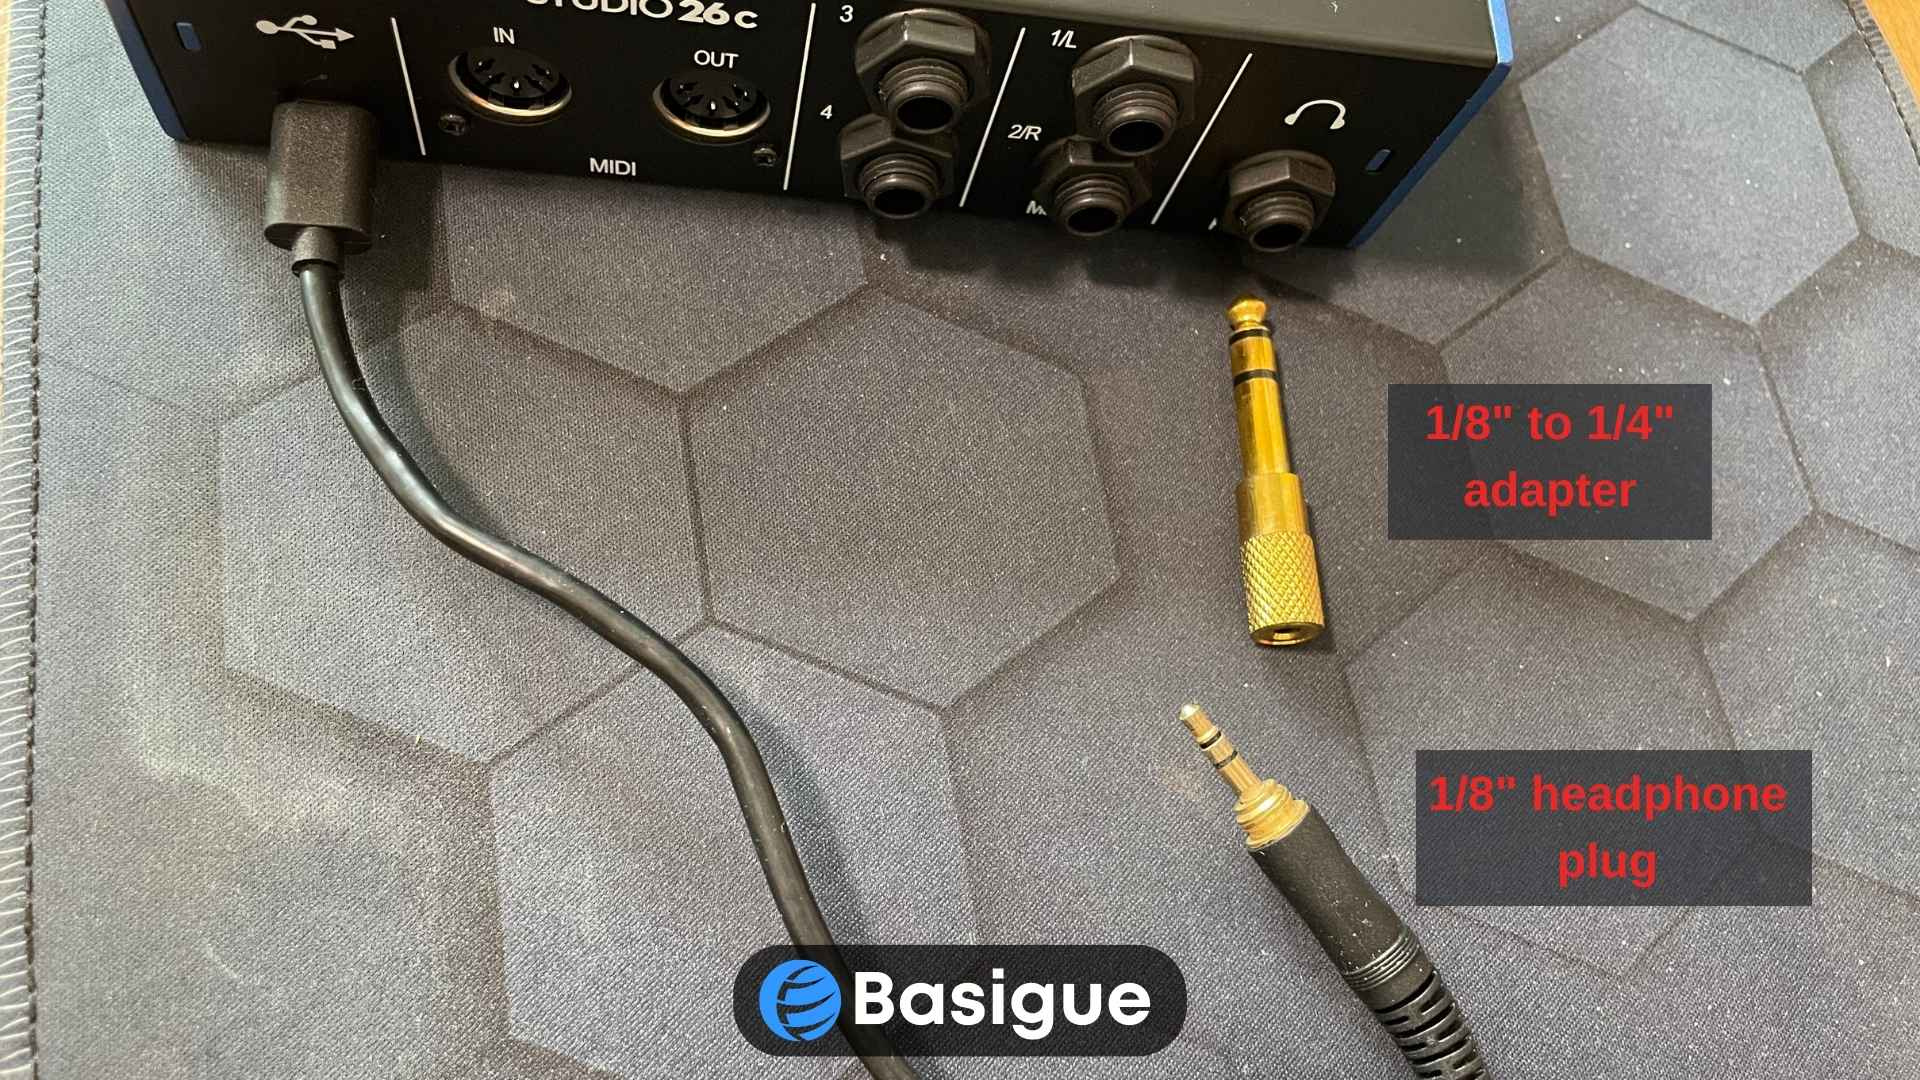
However, it’s important to note that many studio headphones utilize a 3.5mm (1/8″) headphone plug, while many audio interfaces feature a 6.35mm (1/4″) headphone output jack.
I once found myself in a situation where I thought I had all my gear ready for recording my cover song, only to realize that my headphones could not be plugged directly into the audio interface headphone jack. I had to go through the arduous trouble of hunting around my neighborhood in search of a shop that sells a 1/8″ to 1/4″ TRS adapter.
Recommendations


Camera
The visual component is as crucial as the audio in creating cover songs, especially if you are keen on doing YouTube covers. High-quality audio paired with subpar video can significantly detract from the viewer’s experience. Therefore, investing in a good camera, such as a high-quality webcam or a DSLR, is essential.
Minimally, your camera should be able to record with full HD 1080p resolution at 30 fps (frames per second) to get a crisp and clear recording.
A DSLR or mirrorless camera is a viable option for those seeking a more professional setup. These cameras offer superior video quality, greater control over settings, and the flexibility to change lenses for varied effects. Also, be sure to get a video capture card like the Elgato Cam Link 4K in order to use your DSLR camera as a webcam.
While webcams are usually associated with poor video quality, there have been vast improvements in this technology over the past few years, with some webcams having the capability to record at 4K resolution!
One might question the efficacy of a smartphone for this purpose. However, modern smartphones are equipped with advanced cameras capable of recording high-quality video. Their compact size and user-friendly interface make them a convenient choice. Moreover, with the aid of a webcam app, a smartphone can also function as a webcam, adding to its versatility.
Recommendations


Video Recording Software
I understand that some individuals prefer to record everything separately – such as capturing video content on their smartphone or DSLR camera and audio on a device like the Zoom H6, then syncing the video, audio, and backing track in post-production. However, this process can be quite cumbersome.
In fact, I used to follow that method, recording my video content with my smartphone camera and capturing audio with a condenser microphone using Audacity, then having to transfer the video file from my mobile device to my computer, and syncing everything in post-production. However, why undertake such a laborious process when it’s possible to record video from your camera and audio from your microphone into one file?
This is where streaming or video recording software like OBS Studio comes into play. Although OBS Studio is primarily used for streaming, it can also be incredibly useful for recording videos. It enables you to add your camera as a video input and your microphone as an audio input. Additionally, it can record your computer’s system audio while you play a backing track from a YouTube video and sing along.
Video Editing Software
While it would be ideal to cover a song in a single take, let’s face it, we’re not professional singers and might require more than a dozen takes before we can cover a song perfectly.
Can you imagine almost perfecting your cover song when suddenly your mother calls you downstairs for dinner? Or your neighbor’s dog starts barking just as you nail that incredibly difficult riff? In such instances, you have no choice but to reluctantly hit the record button and start all over again (or after having dinner, lest you face your mum’s wrath).
However, my preferred method is to record sections of the cover song separately and assemble them using video editing software like DaVinci Resolve. This professional video editing software, which I personally use, offers a wealth of features in its free version that is more than sufficient for most content creators. The only drawback is that it has a steep learning curve, and mastering its use can take some time.
You can still use other video editing software like Final Cut Pro for Mac or Adobe Premiere Pro.
Preparation
Finding the Right Room & Acoustic Treatment
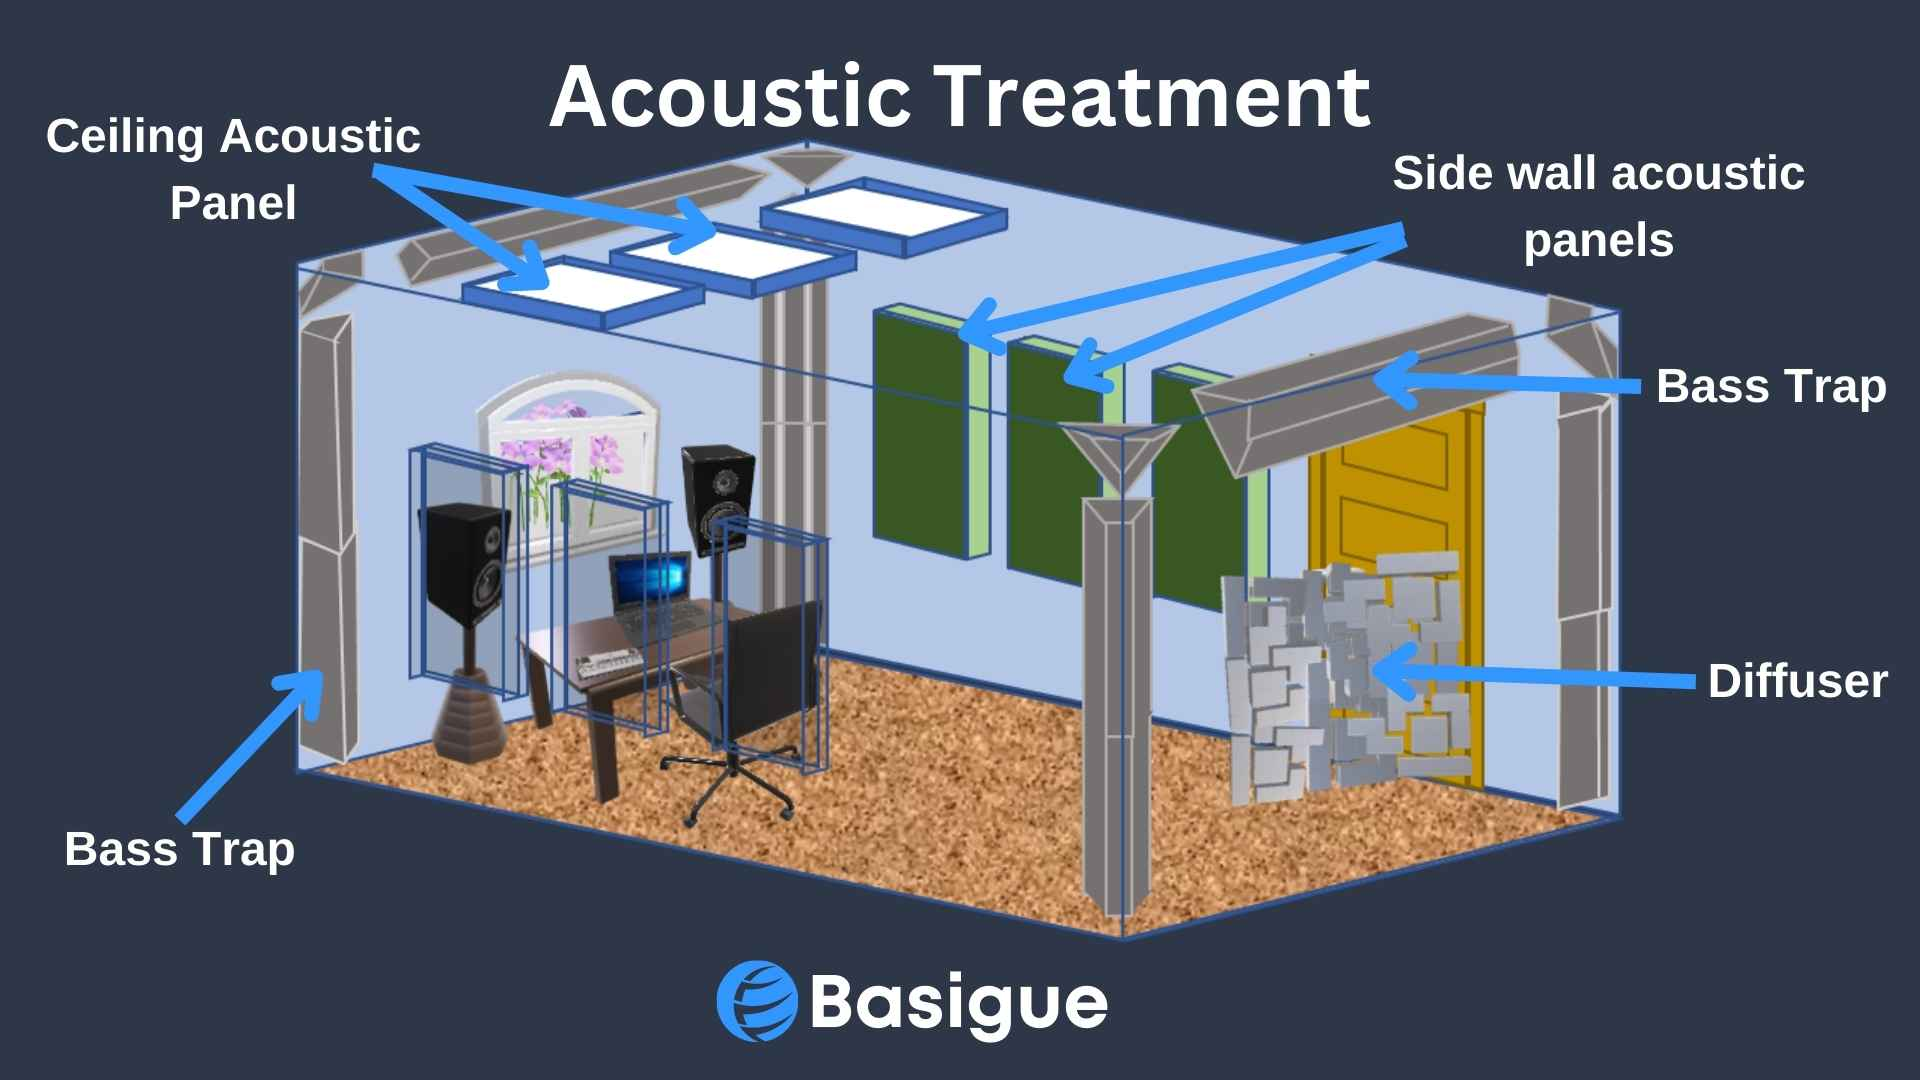
The ideal room for recording is essential for recording cover songs. The room’s shape, size, and acoustic treatment significantly influence the quality of the sound produced.
Initially, it is advisable to avoid a square room. This is because there tend to be large bass buildups in the corners of a square room. Also, the sound reflections will all return to the microphone simultaneously, causing a lot of reverberation. A rectangular room is a more suitable choice as it provides more space for sound waves to propagate without interference.
Consideration should also be given to the first reflection points, which are the locations where sound waves first bounce off the walls, ceiling, and floor. Acoustic fiberglass panels are effective in treating these areas, controlling the behavior of the sound waves, and enhancing the overall sound quality.
Low frequencies, particularly bass, can accumulate in the corners of the room, muddying the sound. Bass traps are a practical solution for absorbing these low frequencies and maintaining a clear sound.
While these acoustic treatments are beneficial, they may not be within everyone’s budget. However, soft furniture such as beds, sofas, carpets, and curtains can serve as cost-effective alternatives for absorbing sound.
Lastly, it is advisable to establish your recording space as far away from external noise as possible and to record during quieter times of the day. This minimizes disturbances and enhances the quality of the recording.
Setting Up Microphone
Setting up the microphone correctly plays a significant role in recording cover songs. It involves more than merely connecting the microphone and initiating the recording. Instead, it requires careful consideration of several factors to achieve an optimal balance.
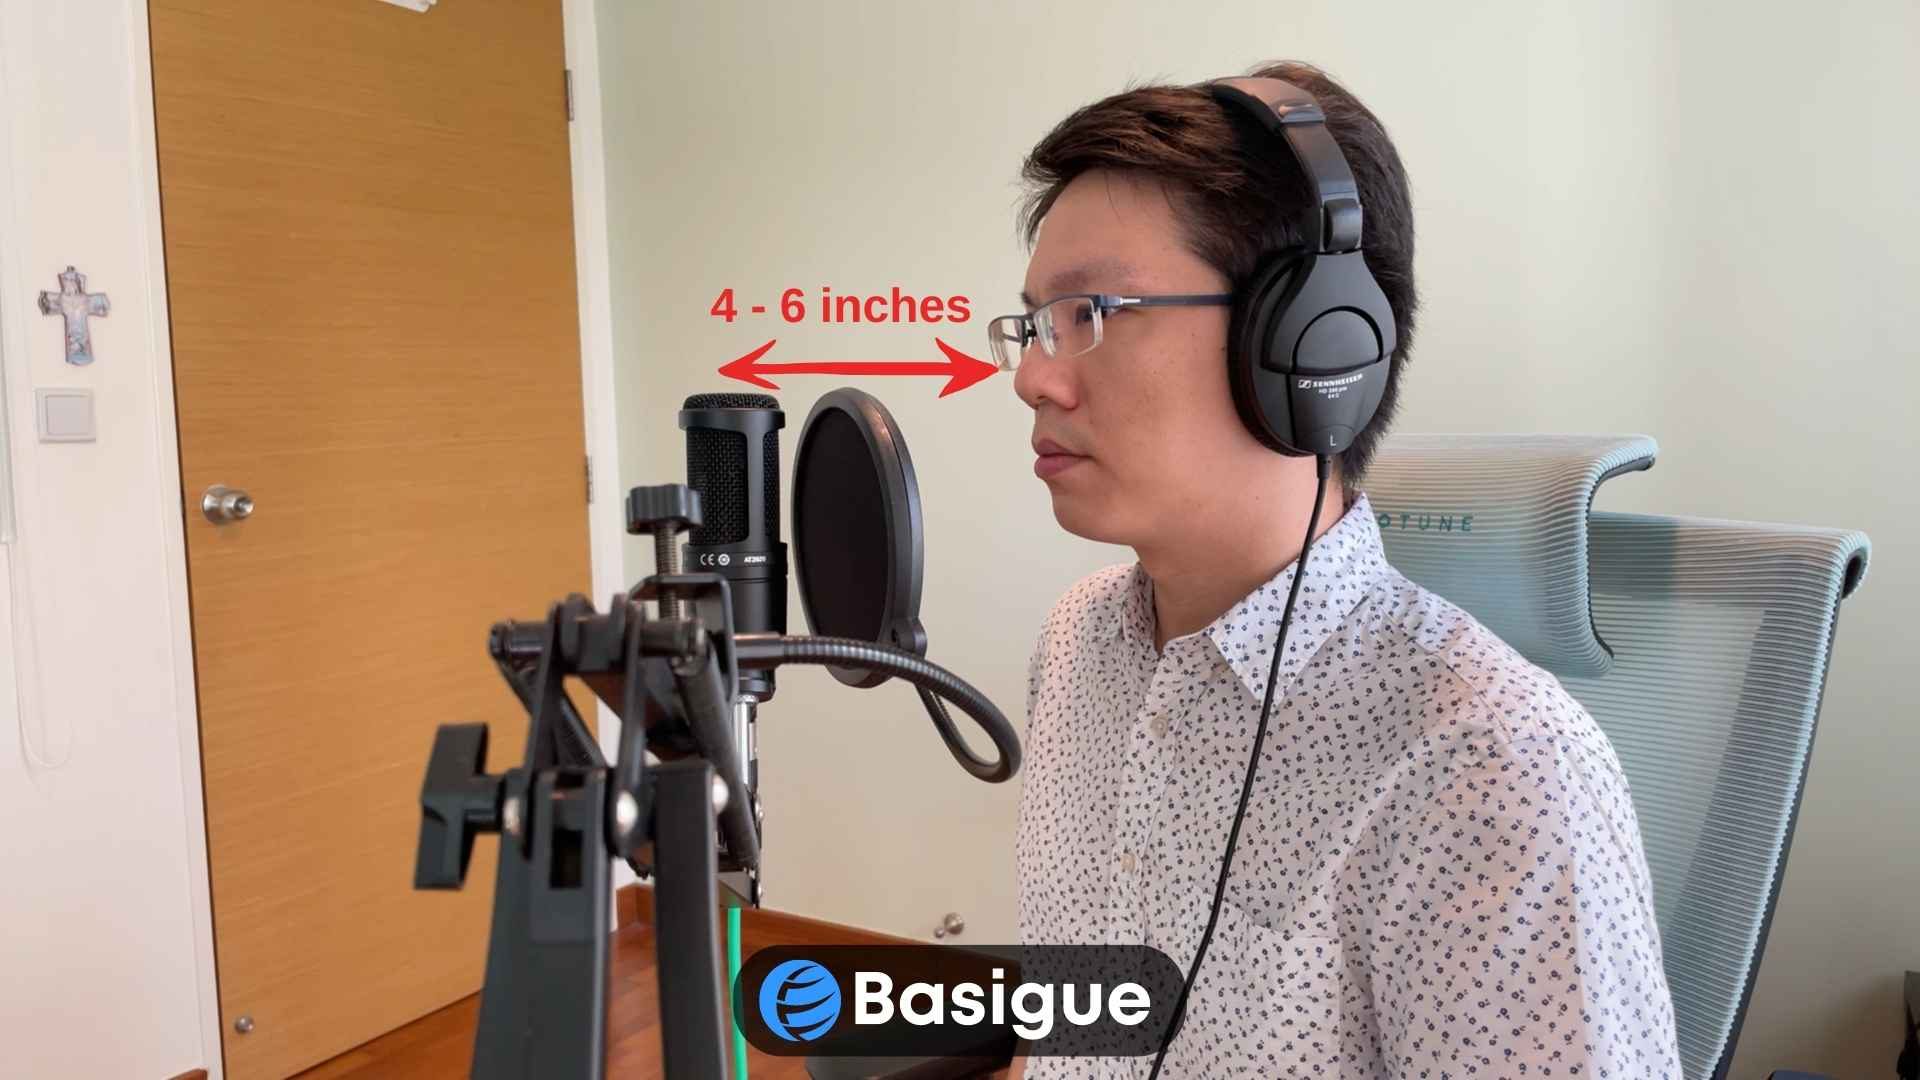
The microphone should ideally be positioned approximately 4 to 6 inches from the mouth. A closer proximity risks the proximity effect, which can result in a boomy sound, while a greater distance may result in a distant, less distinct sound. Also, be sure to have a pop filter in front of the mic and a reflection filter behind it, just like how we discussed previously.
The next consideration is the setting of gain levels, also known as ‘gain staging’. This involves adjusting the microphone’s sensitivity to the voice to avoid clipping, which occurs when the signal is excessively loud, resulting in distortion. I used to blindly turn up the gain knob on my audio interface, only to wonder why my cover songs always sounded so distorted, especially during belting. We’ll look at setting the gain later when setting up OBS Studio.
Depending on the audio interface you are using, some might come with ladder-style LED VU meters for monitoring your audio input levels, while others might just be simple clipping indicators; hence it is difficult to make precise adjustments to the gain. For now, just set the gain dial to somewhere in the middle.
Setting Up Camera
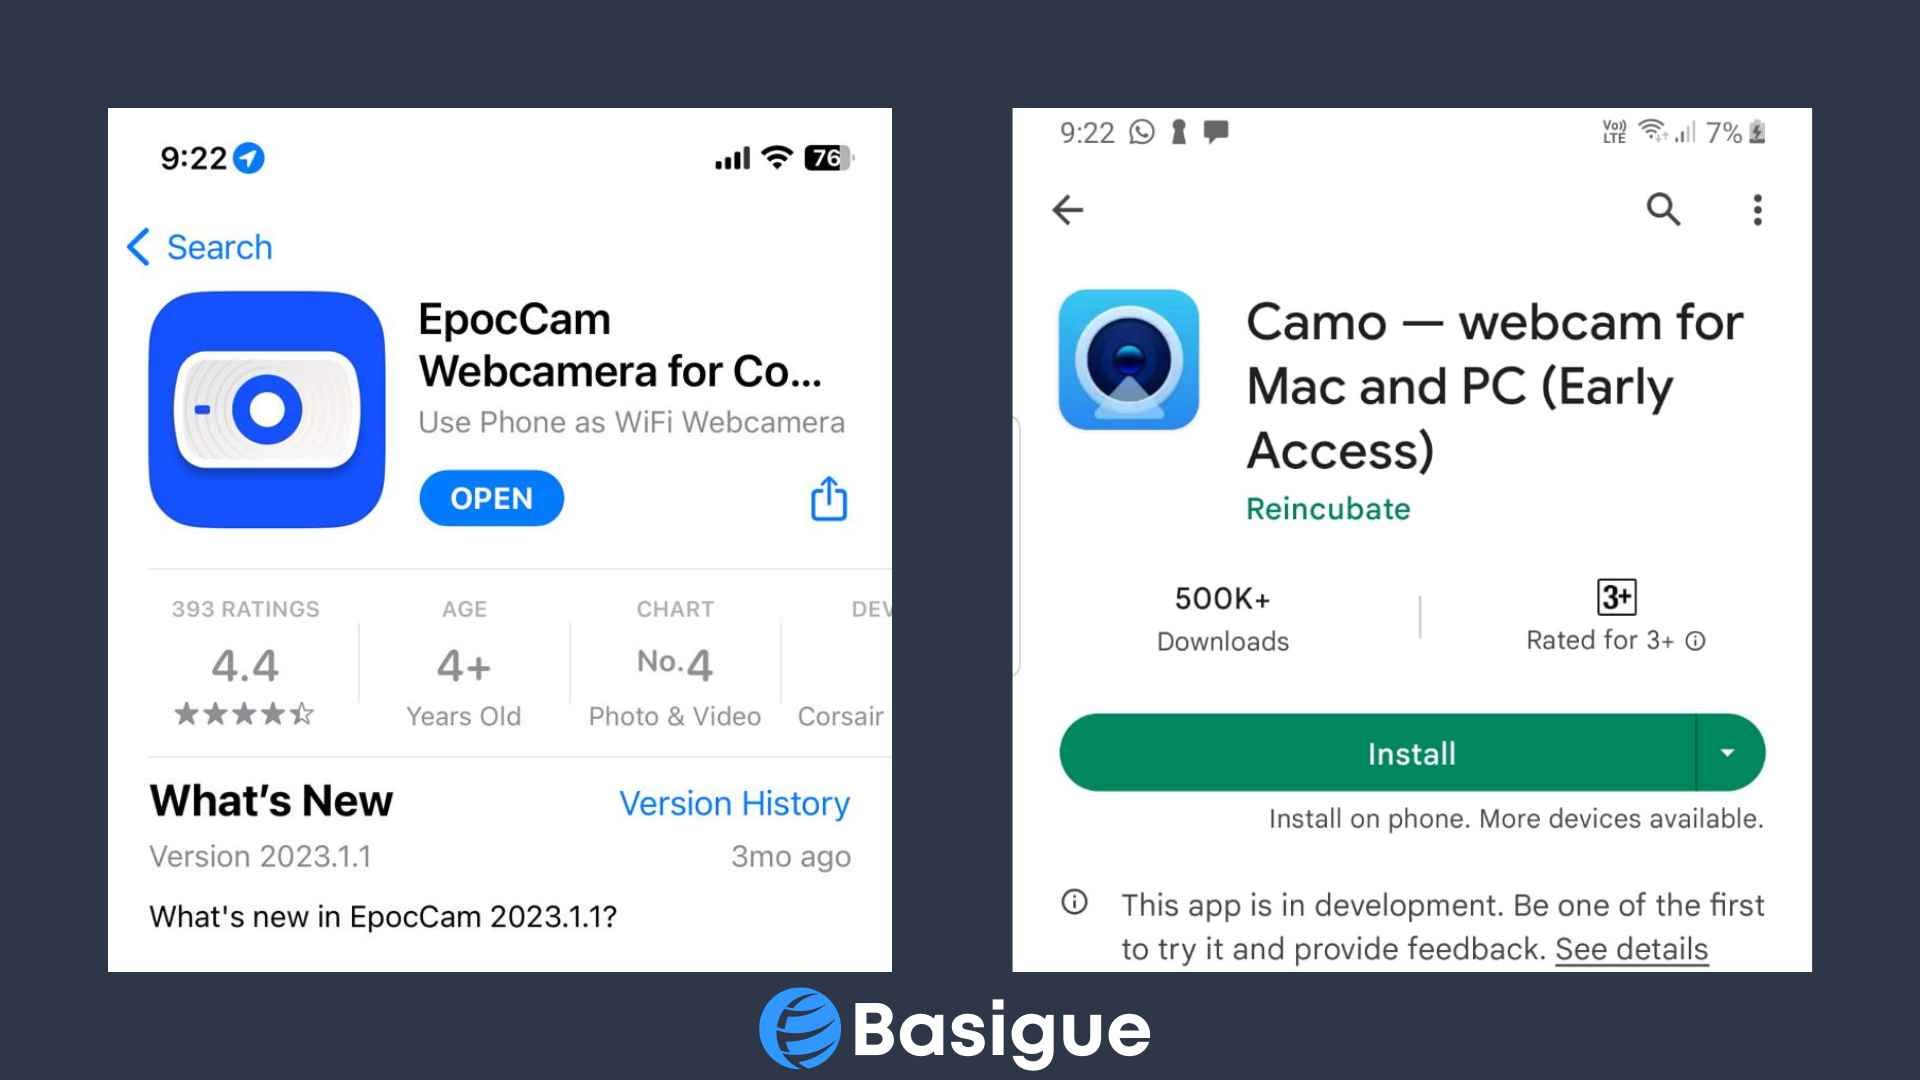
For this guide, we will be using an iPhone as the webcam. First, you must download the EpocCam app from the App Store. Unfortunately, EpocCam only works for iPhones, but you can consider the Camo app for Android users, which is just as good. Consider getting the paid version of EpocCam, as it is a one-time payment of less than $10 at the time of writing.
In order to use EpocCam on your PC or Mac, you will need to download Camera Hub from the Elgato Download Page. Also, you will need the latest version of iTunes on your PC in order to use EpocCam with a USB cable. Otherwise, without iTunes, you can still link EpocCam from your iPhone to your PC through WiFi.
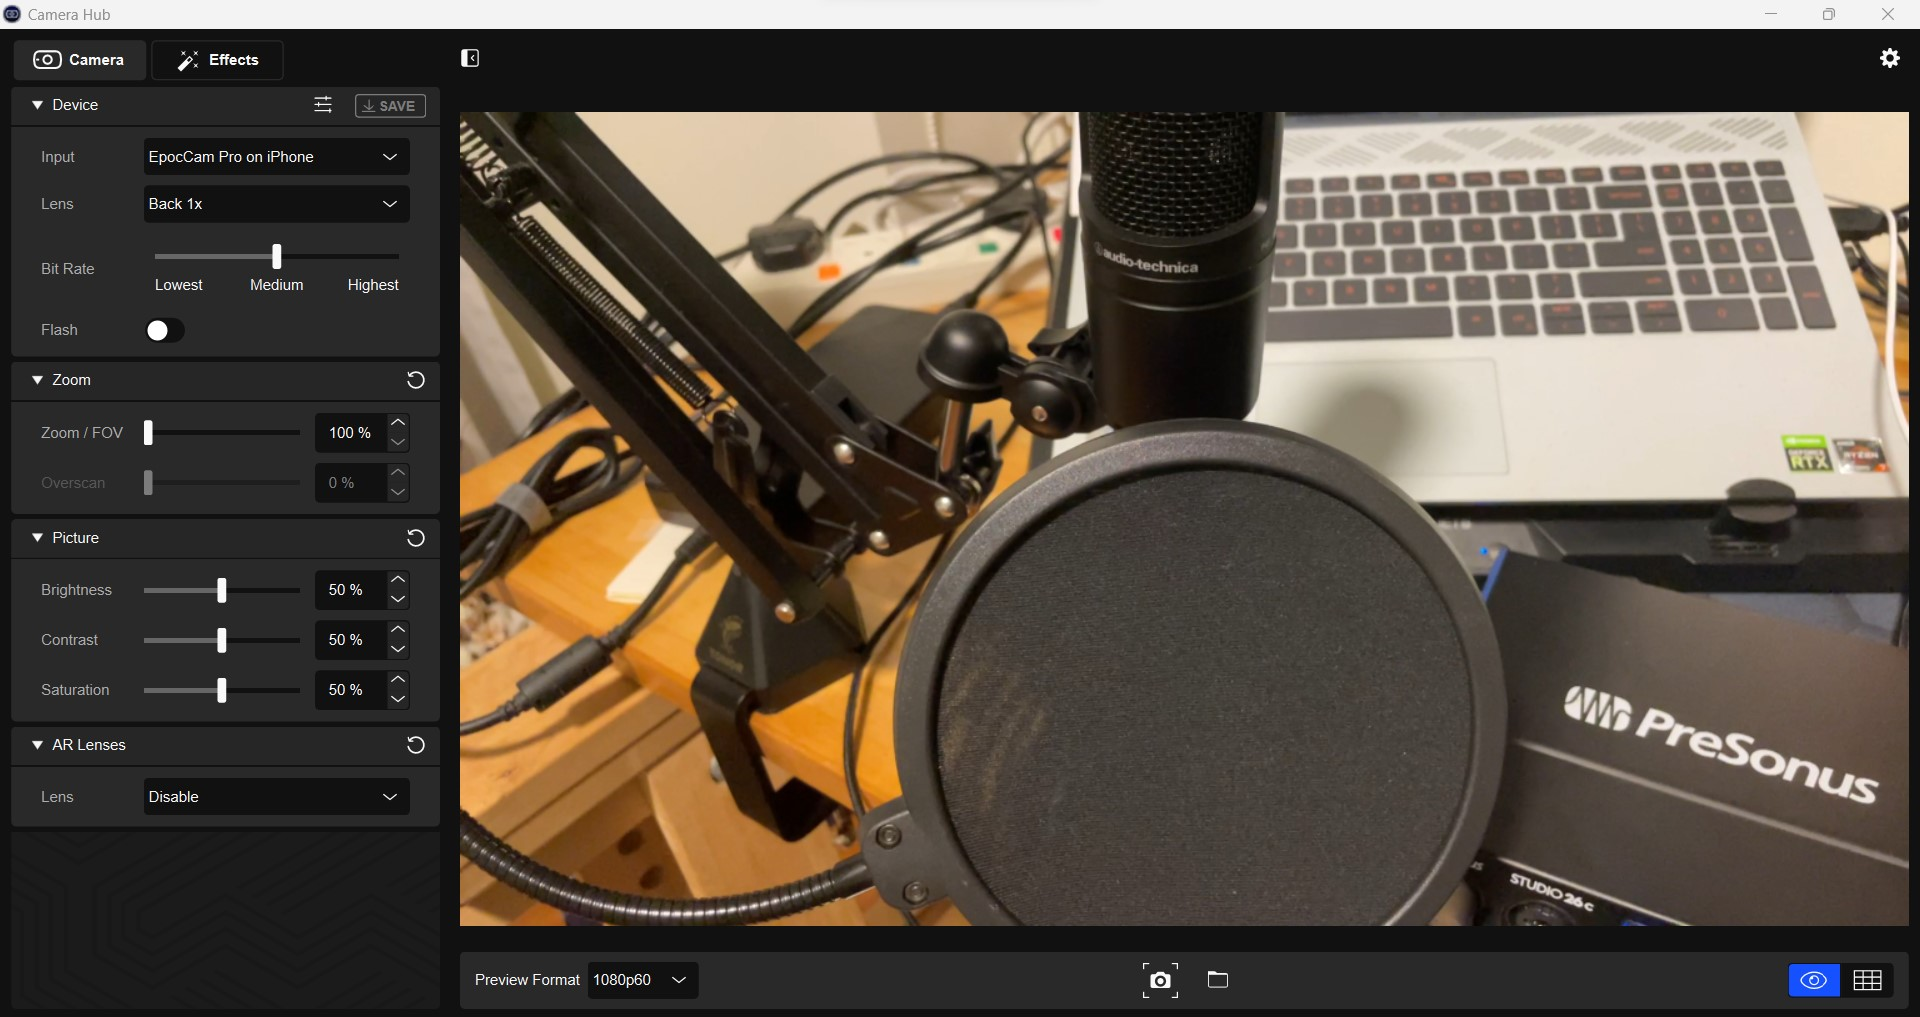
Connect your iPhone to your PC using a USB cable and open the Camera Hub app on the PC and the EpocCam on the iPhone. Both apps should sync up immediately, and you should see your iPhone’s camera view on the Camera Hub app. Otherwise, you’ll see a white screen with the message ‘Connect Your Elgato Camera’ on your PC monitor.
Once you’re done getting your smartphone to work with your PC, it’s imperative to mount your camera on a tripod stand. Stability is critical in video recording, and unless you have a friend who can hold the camera with unwavering steadiness, a tripod is your next best option. It provides the flexibility to experiment with various angles and elevations and eliminates the risk of shaky footage, which can be off-putting for viewers.
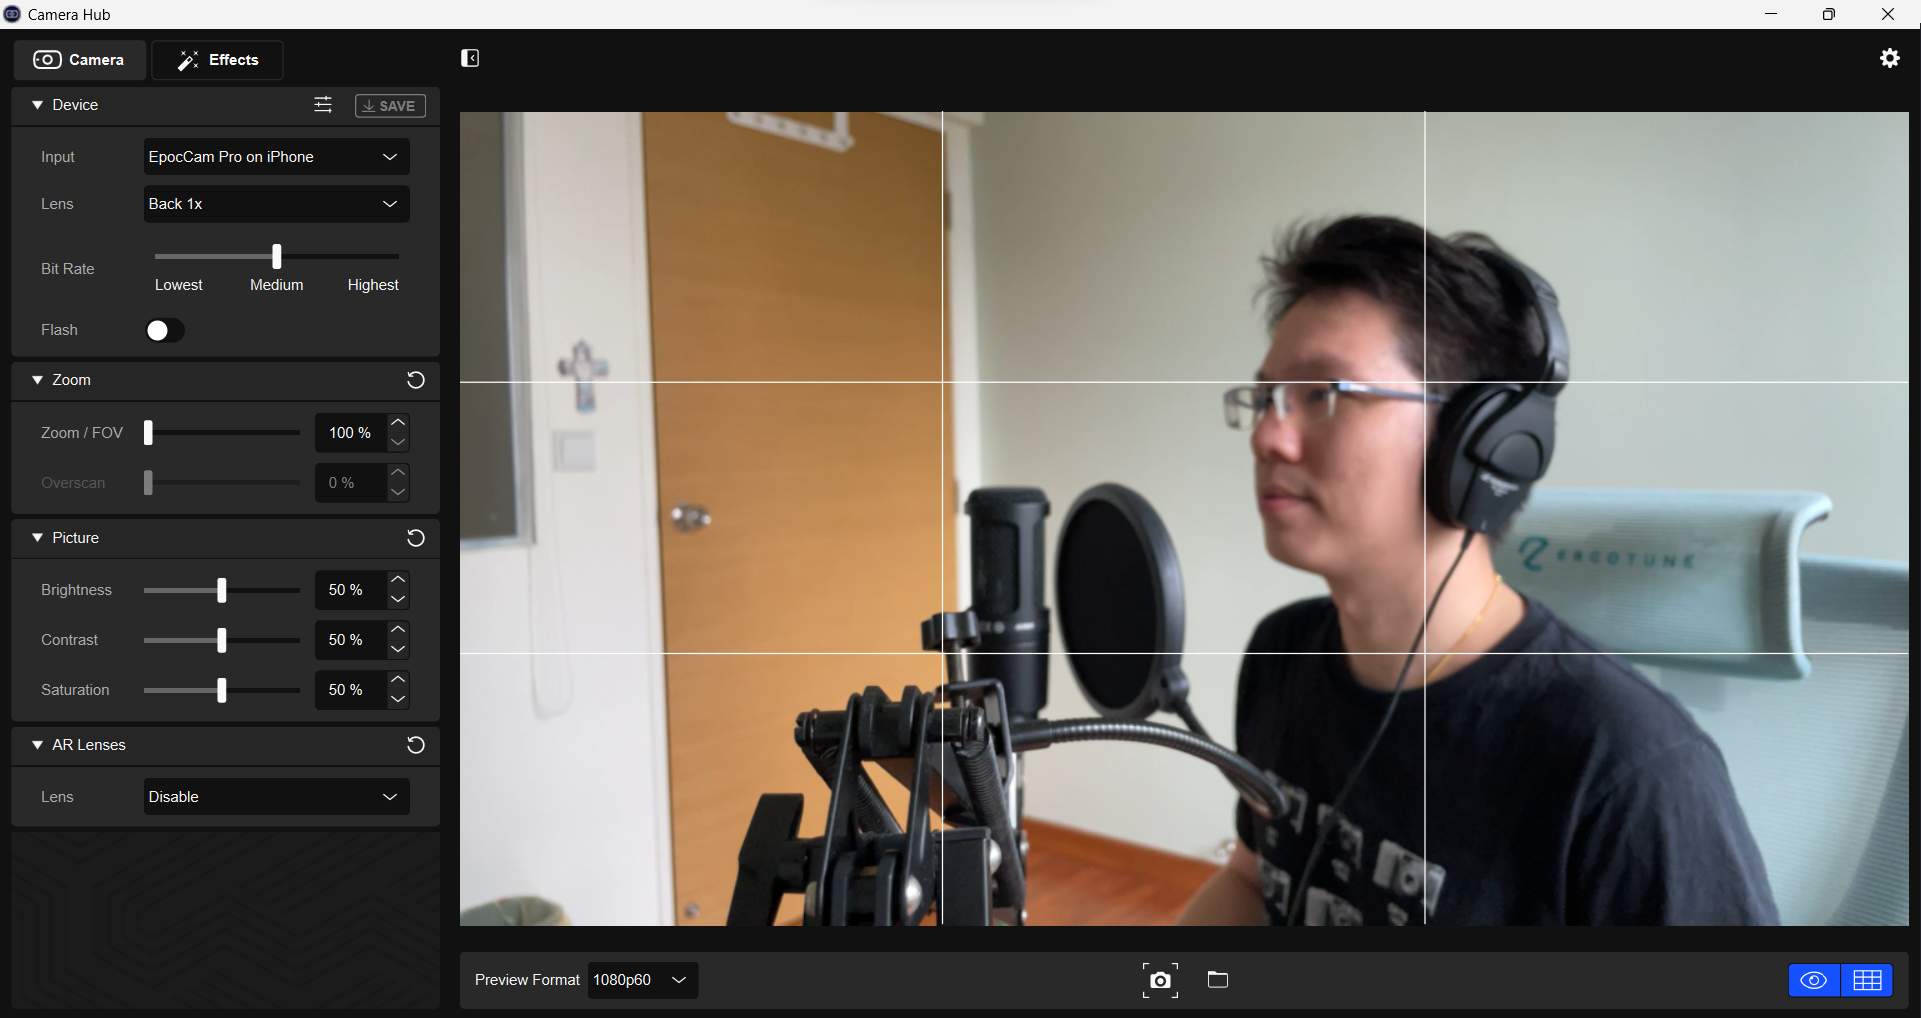
Next, consider the composition of your shot by employing the Rule of Thirds. This is done by dividing your video frame into thirds, both vertically and horizontally, creating a grid-like that of a tic-tac-toe board. When setting up your shot, aim to position yourself at the intersections of these lines. Ideally, the top horizontal line should align with your eyes, enhancing the composition further.
Pay attention to the background of your shot. Is it contributing to the overall aesthetic or merely a distraction? Be sure to tidy up anything in the background so it does not look messy.
Lighting
Once those elements are in place, ensuring proper lighting is essential. If you’re shooting during the day, consider using natural light from a window to give your shot a natural look. You might also want to add a ring light as a fill light to eliminate shadows from your face.
If your budget allows, consider using a three-point lighting setup with a key light, fill light, and backlight to give your shot a professional appearance. Be mindful not to use overhead lights from the ceiling, as they can create unflattering shadows on your face unless that is the specific effect you’re aiming for.
Setting Up OBS Studio Recording Software
When setting up OBS Studio, you want to use the best possible recording setting your PC would allow.
Adding Audio Input Capture
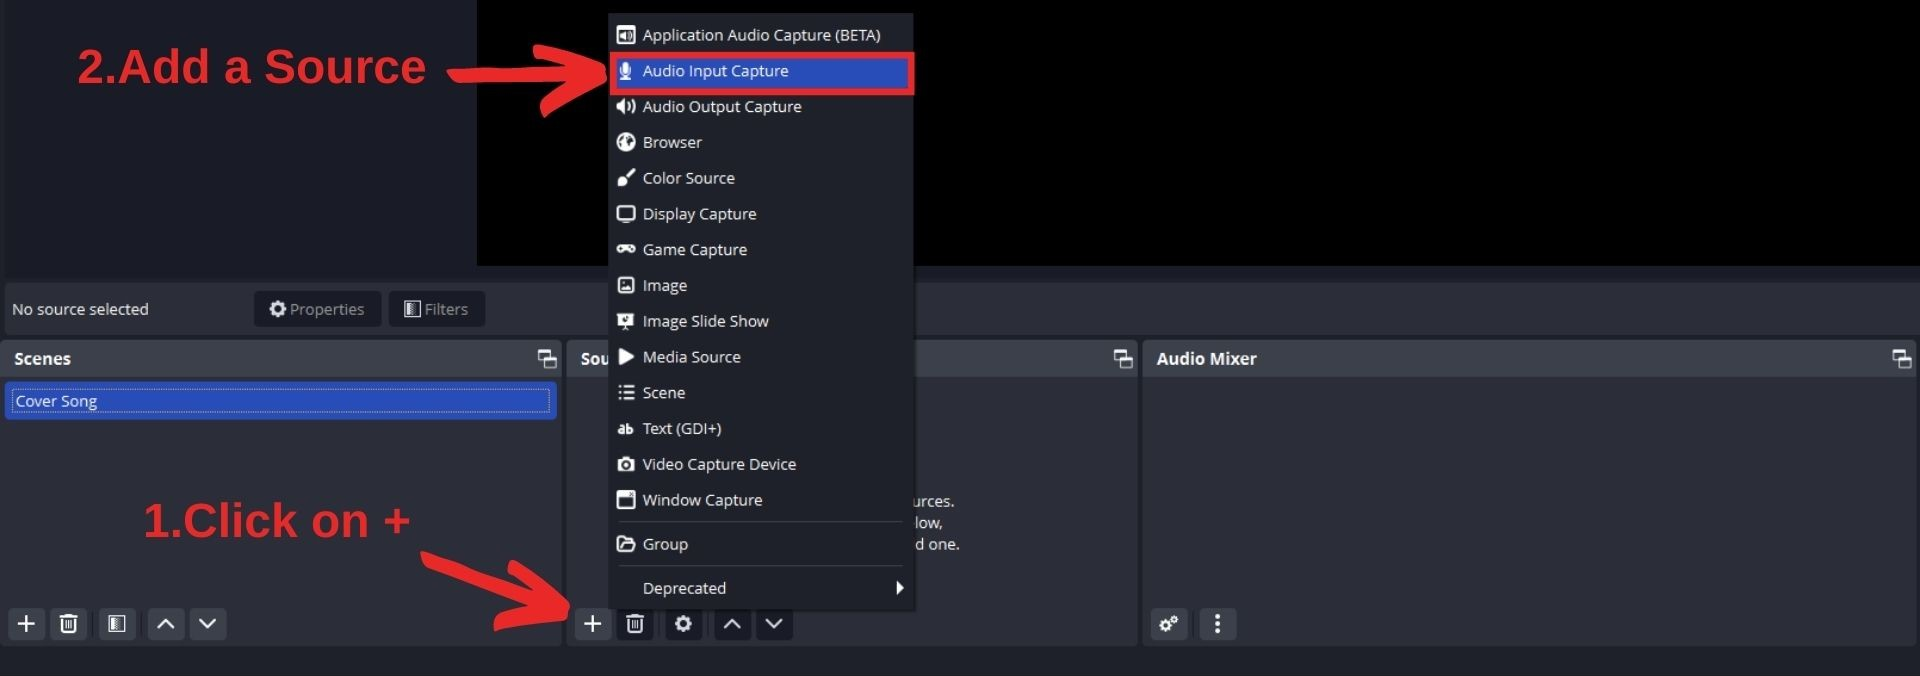
When you are satisfied with your settings, it’s time to add the input sources. Click the ‘+‘ icon at the Sources table’s bottom to open the Source menu. Select Audio Input Capture.
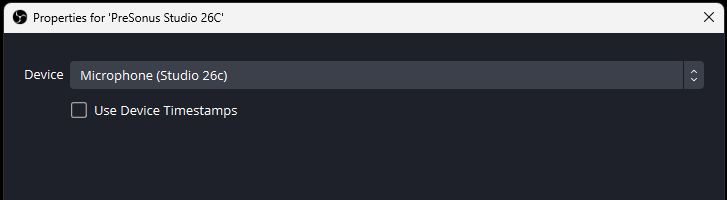
A popup will appear, asking you to name your audio input source. In my case, I will name it ‘PreSonus Studio 26C’ since my microphone is connected to that audio interface. You will then be asked to select the audio input source. In my case, it would be ‘Microphone (Studio 26c).’
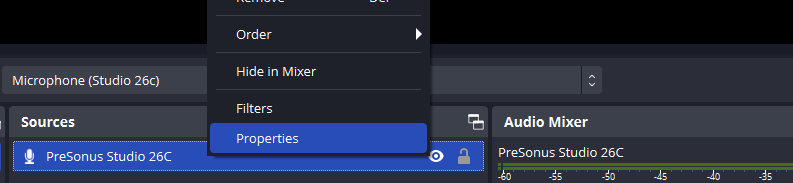
Don’t worry if you made the wrong selection, just right-click on the audio source name and select Properties, and you’ll be able to make the selection again.
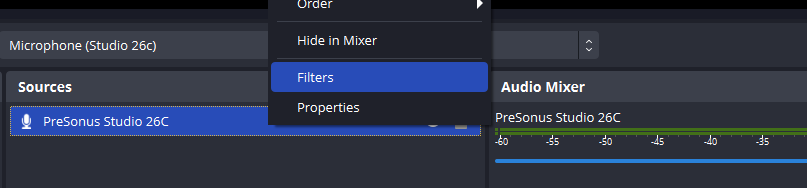
We need to add some simple audio processing to keep the audio clean and the volume range balanced. Right-click on the audio input source and click on Filters.
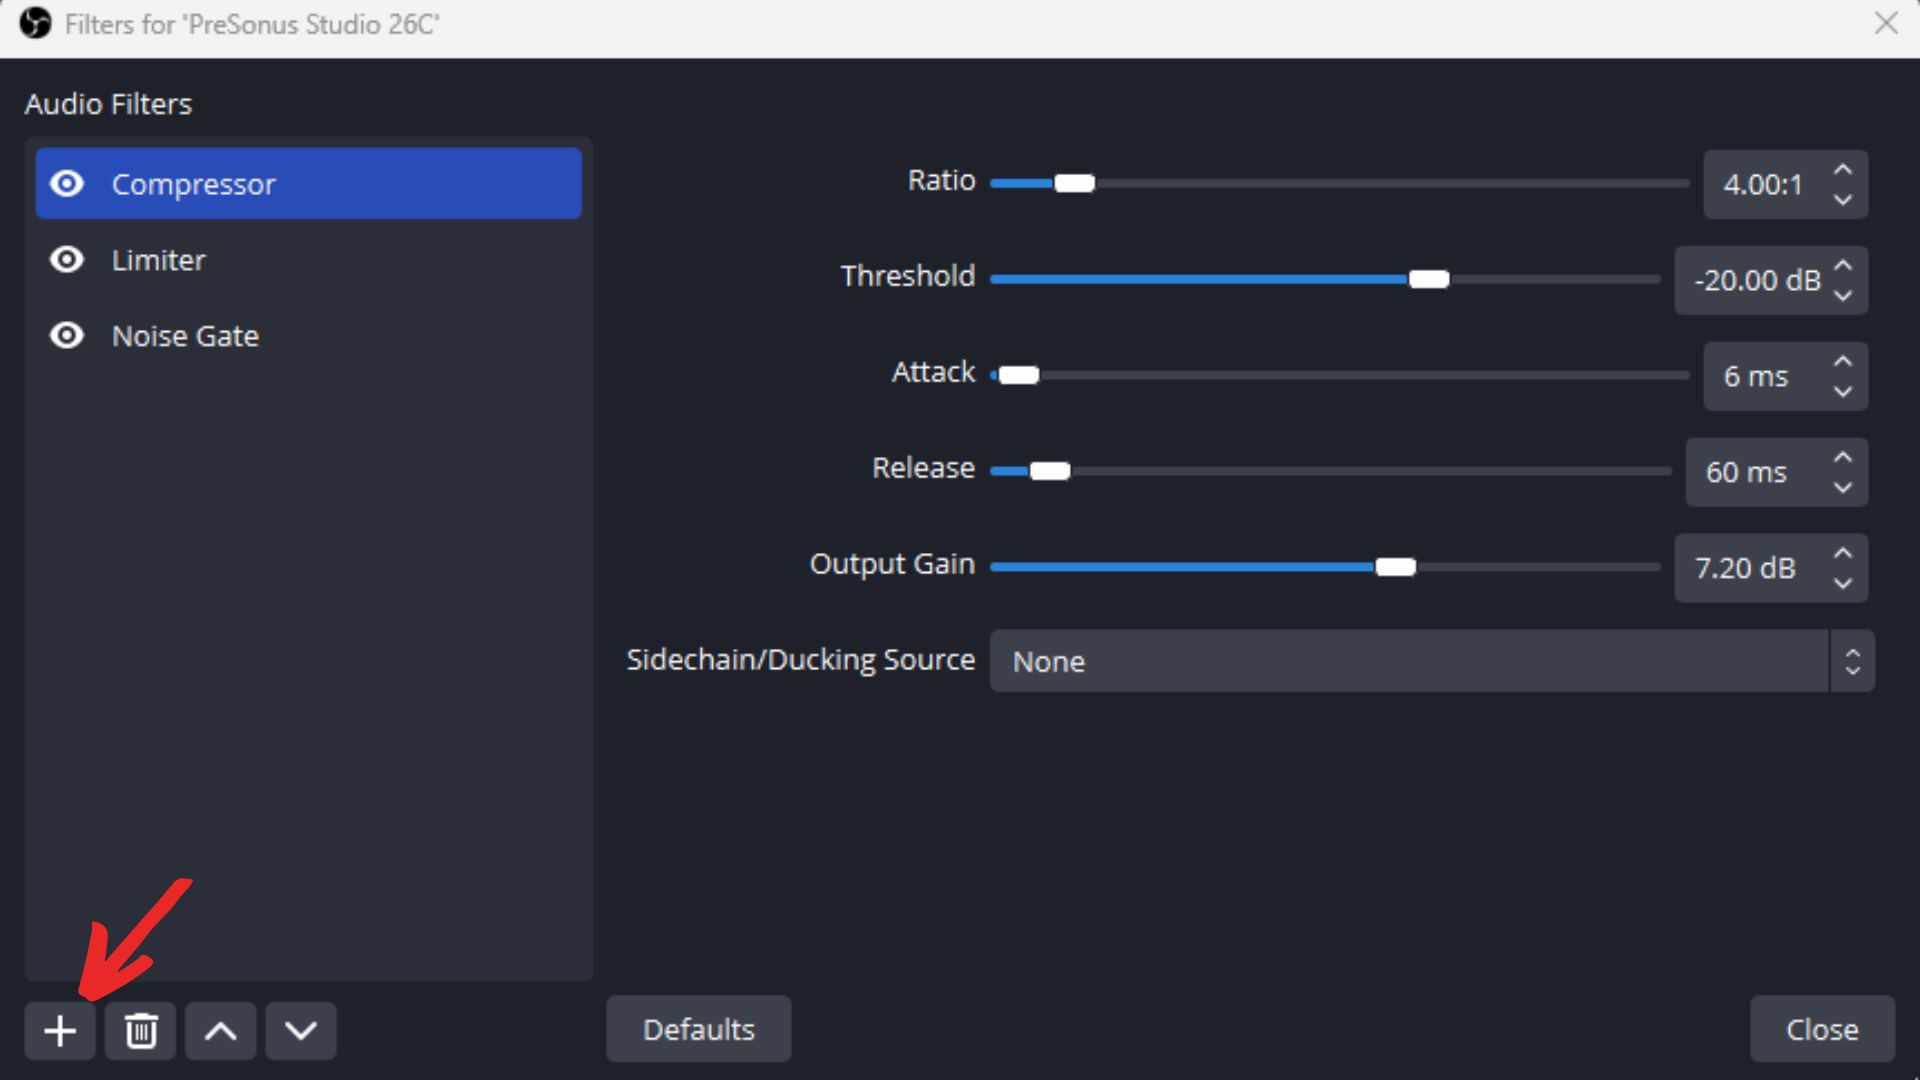
Click on the ‘+‘ icon and add the filters Compressor, Limiter, and Noise Gate. For the Compressor, change the Ratio to 4.00:1, the Threshold to -20 dB, and the Output Gain to 7.20 dB. For the Limiter, you can have the Threshold between -6 to -3 dB. You don’t need to make any changes to the Noise Gate.
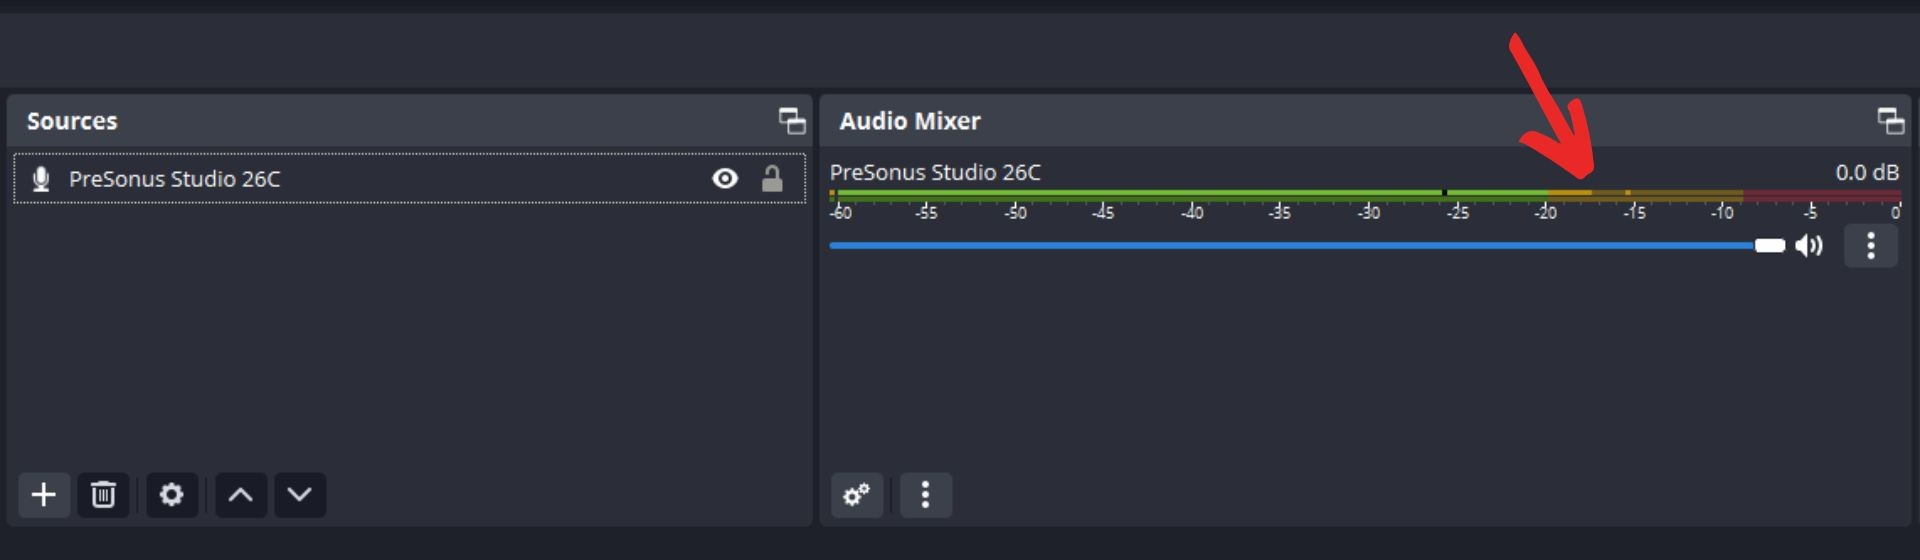
Subsequently, you will need to adjust the microphone input gain from your audio interface. As you sing into the microphone, simultaneously adjust the input gain dial on your audio interface, while observing the level meter on OBS Studio.
Here’s a useful guideline for setting gain levels:
- Lowest around -24dBFS
- Averaging around -18dBFS
- Peaking around -10dBFS
- Never peaking higher than -6dBFS
Adding Audio Output Capture
Next, we need to add an audio source so that OBS Studio can record the karaoke backing track you will be playing from YouTube.
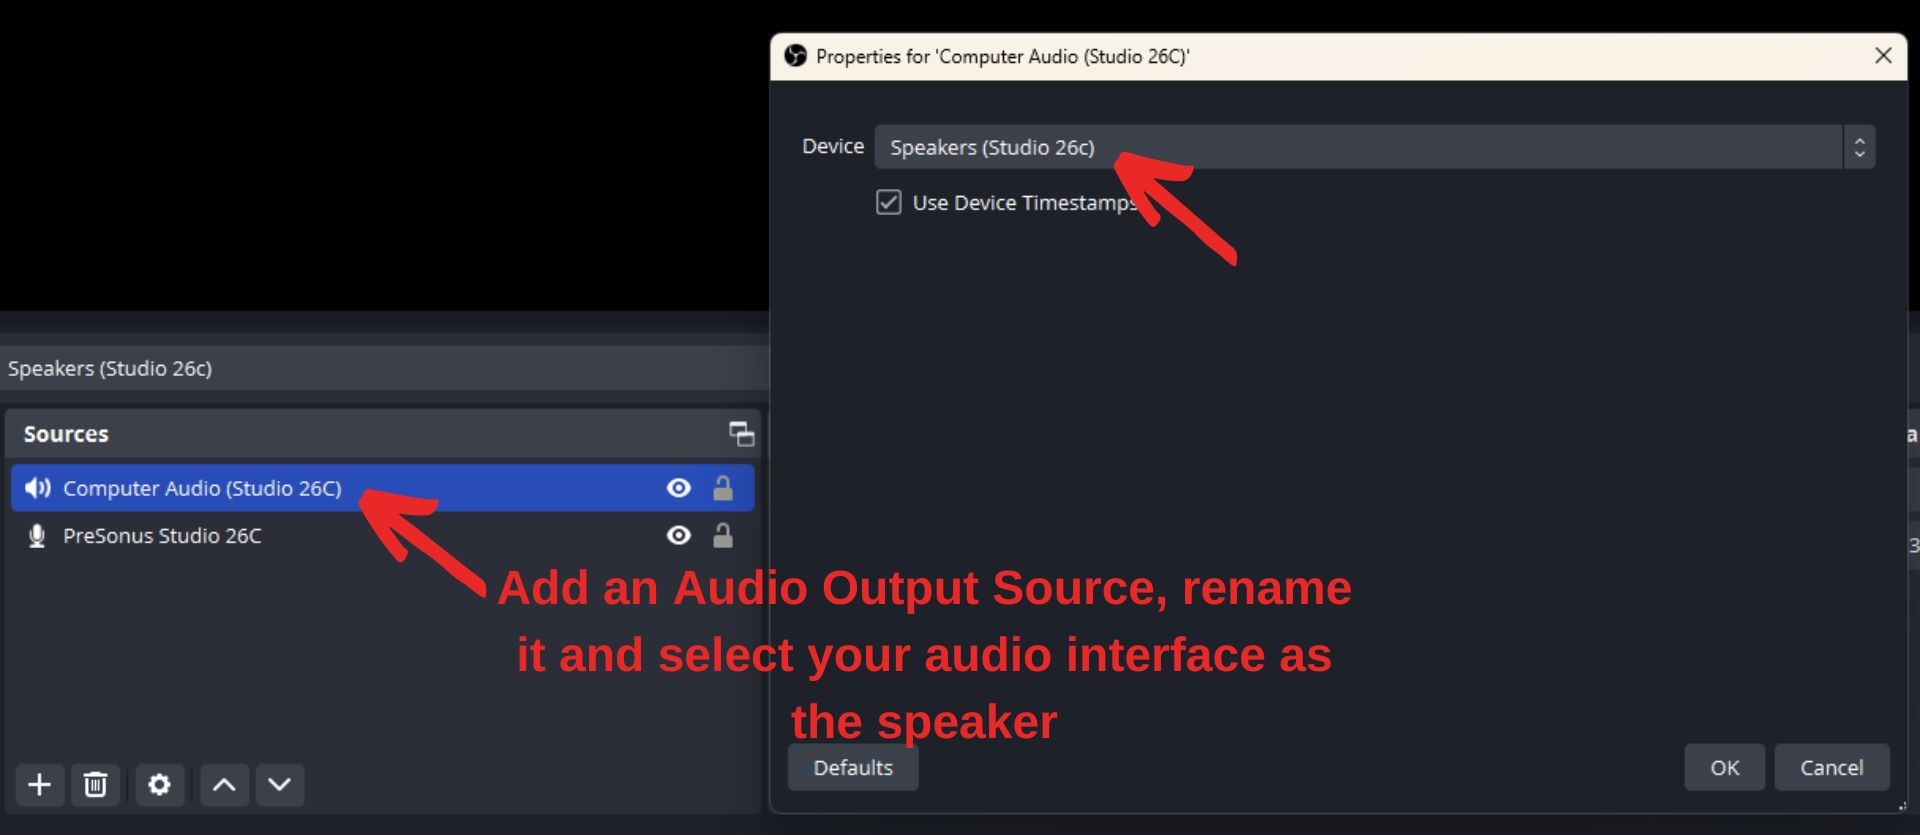
In the same way you added the Audio Input Capture, click the ‘+‘ icon below Sources and click on Audio Output Capture. I’ve renamed the source as ‘Computer Audio (Studio 26C)’ since my computer audio will be recorded through my Studio 26C audio interface. Then, select your audio interface as the source.
Next, you’ll want to adjust the levels of your computer audio so that the backing track almost matches your microphone levels, but is slightly softer, around -20dB.
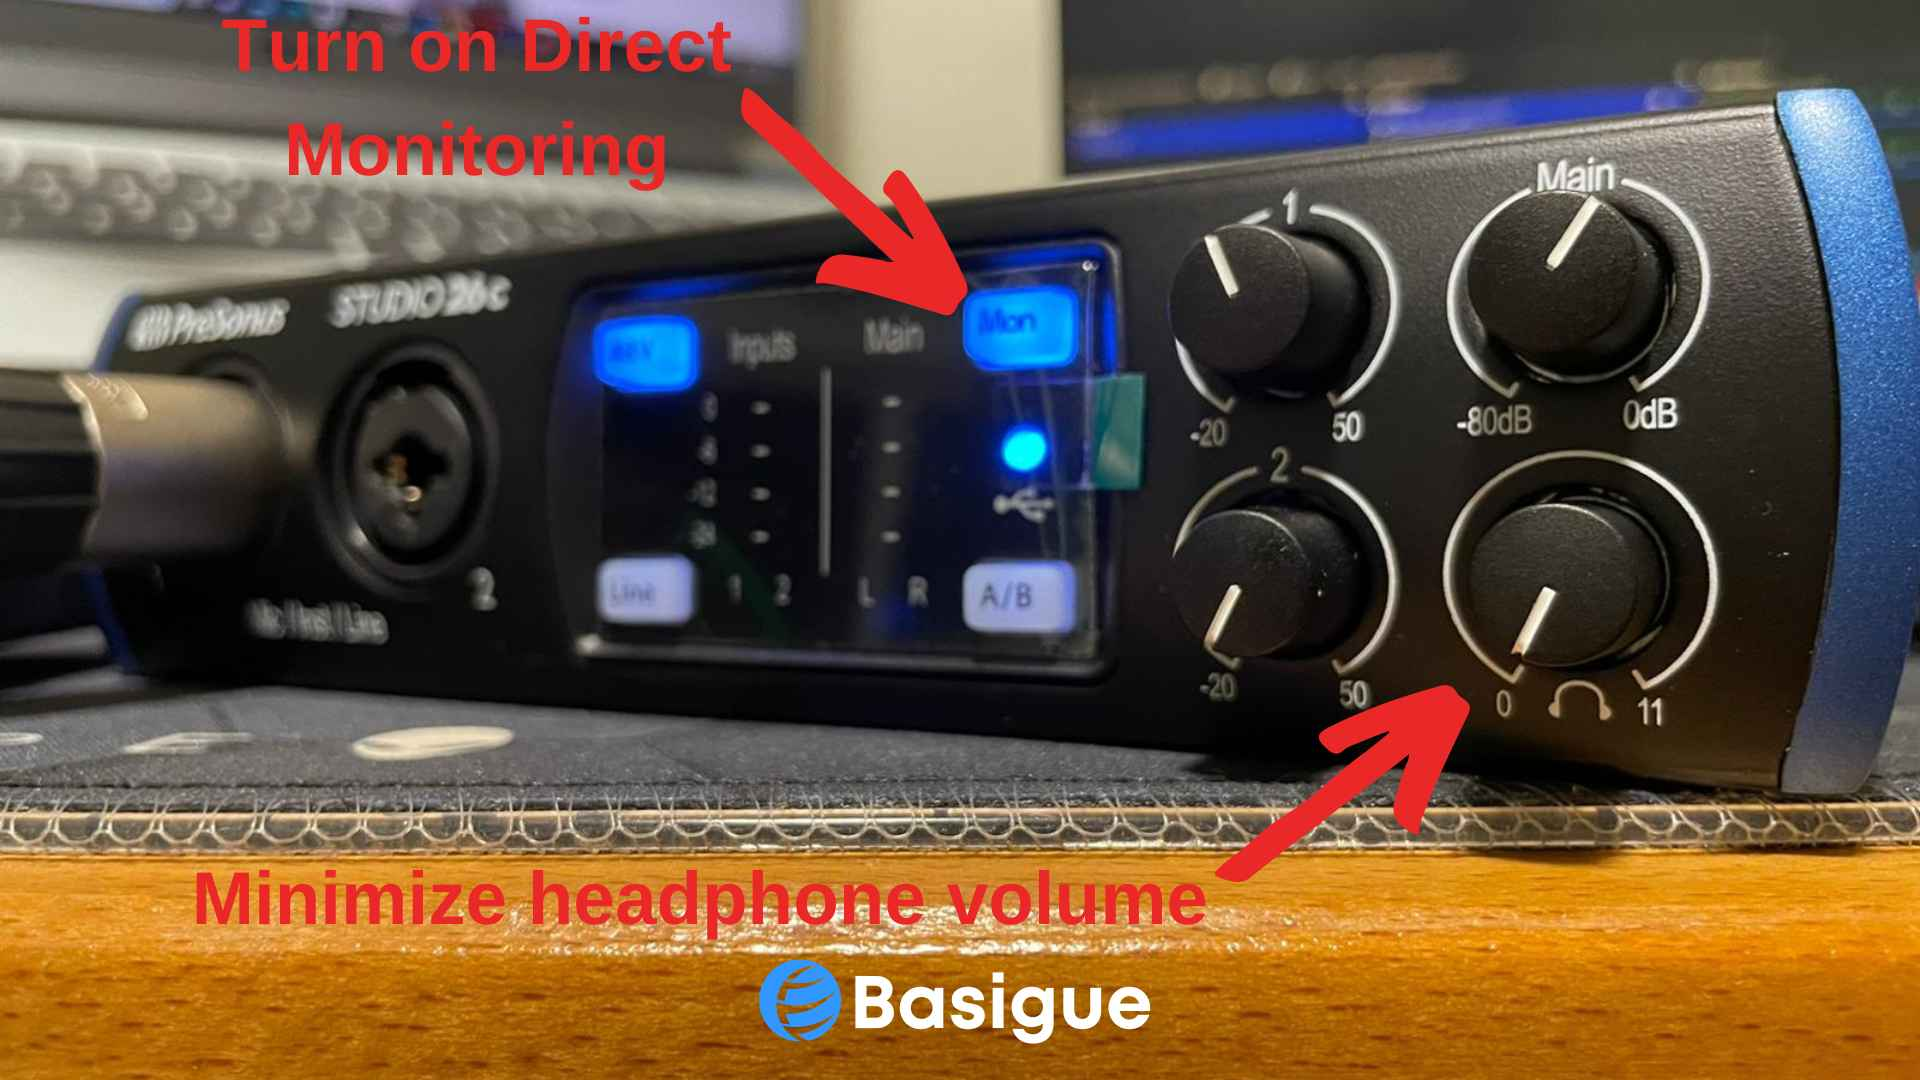
But first, you should reduce the headphone levels on your audio interface to 0 and turn on ‘direct monitoring.’ You don’t want the computer audio blasting into your ears as you are turning them up.
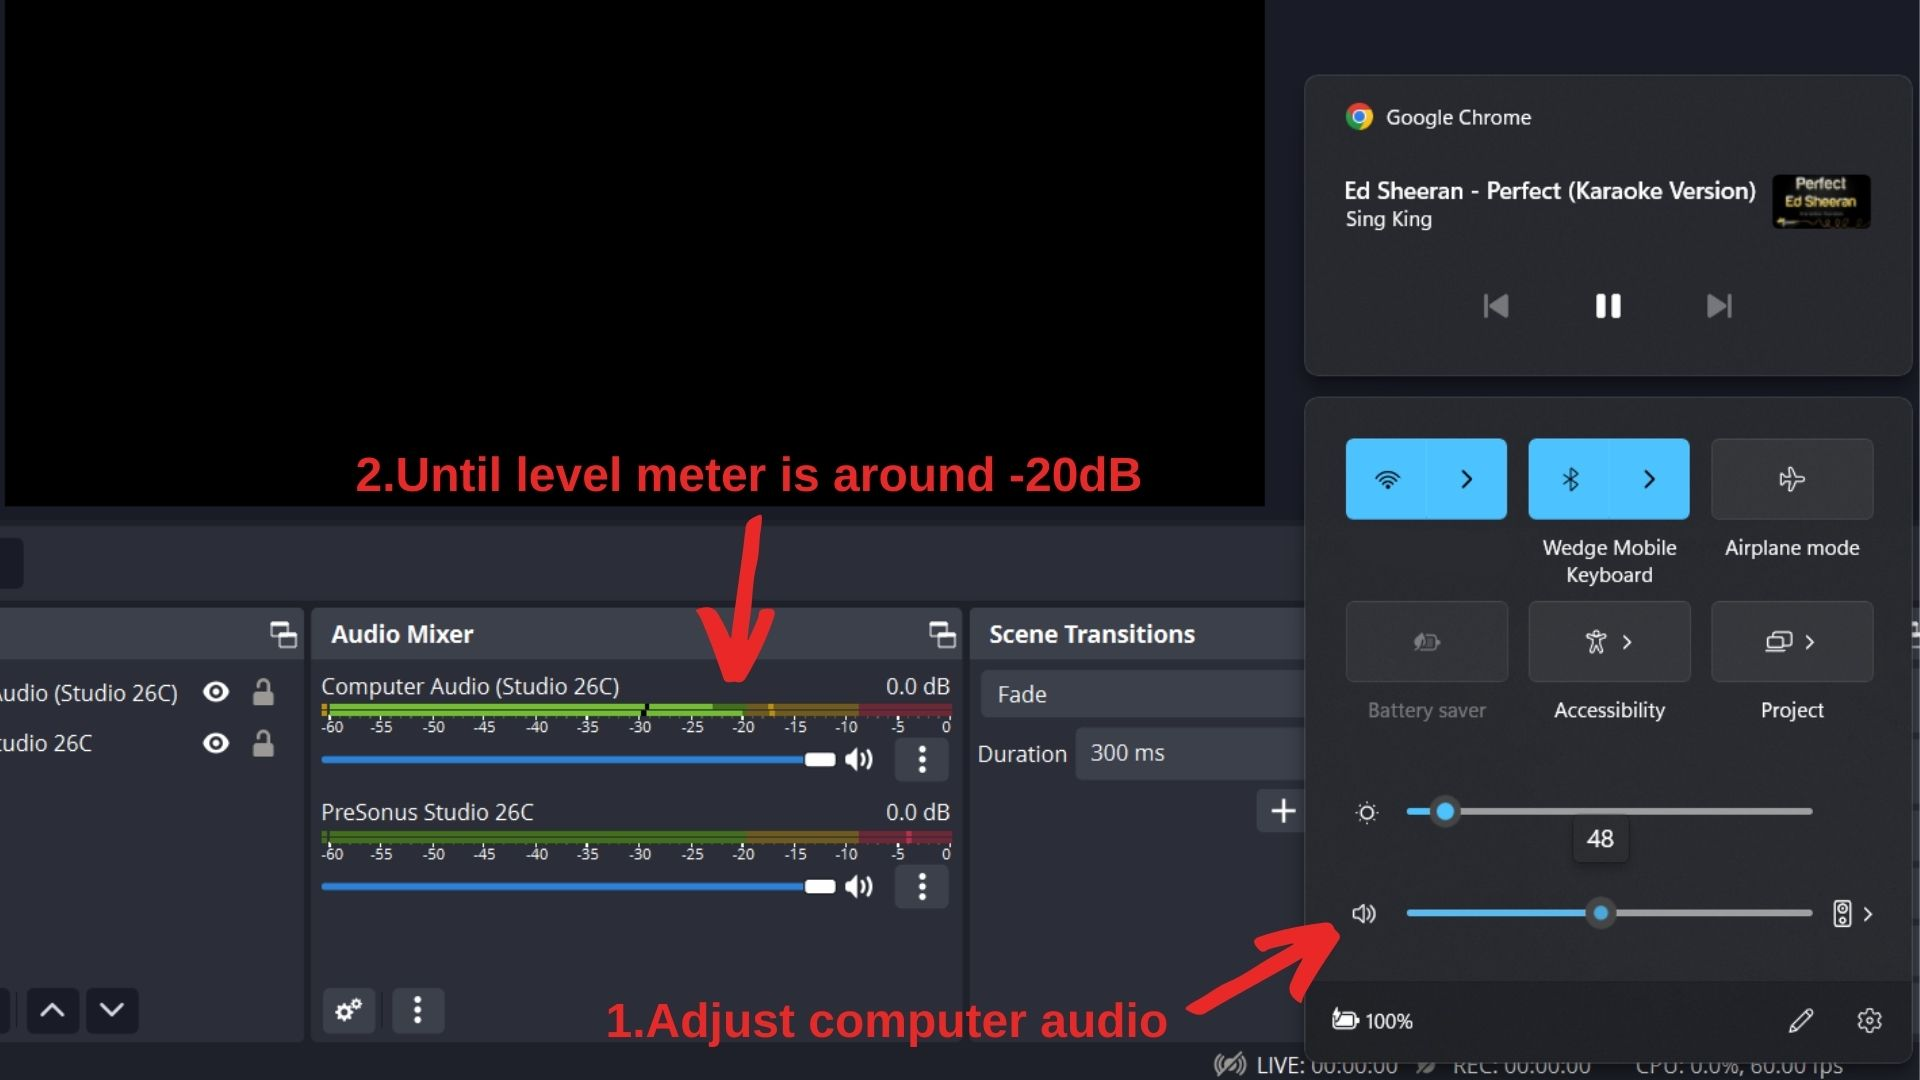
Next, play your chosen karaoke backing track on YouTube and slowly increase your computer audio levels until the level meter of your Output Audio Capture source on OBS is around -20 dB. After that, slowly increase the headphone volume levels on your audio interface to a comfortable level.
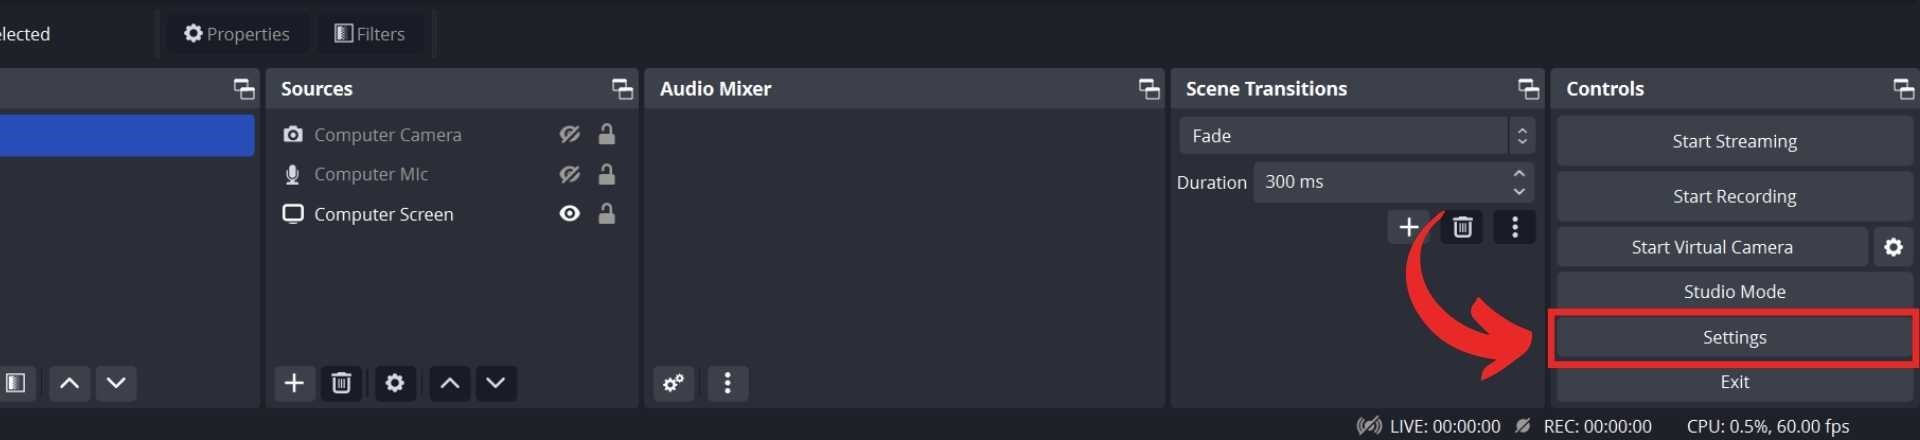
Next, we’ll have to split the audio tracks between your microphone and the computer audio. This is crucial for post-production editing, especially if you don’t want to perform numerous full takes to achieve the perfect recording. First, click the Settings button at the bottom right to open the settings menu.
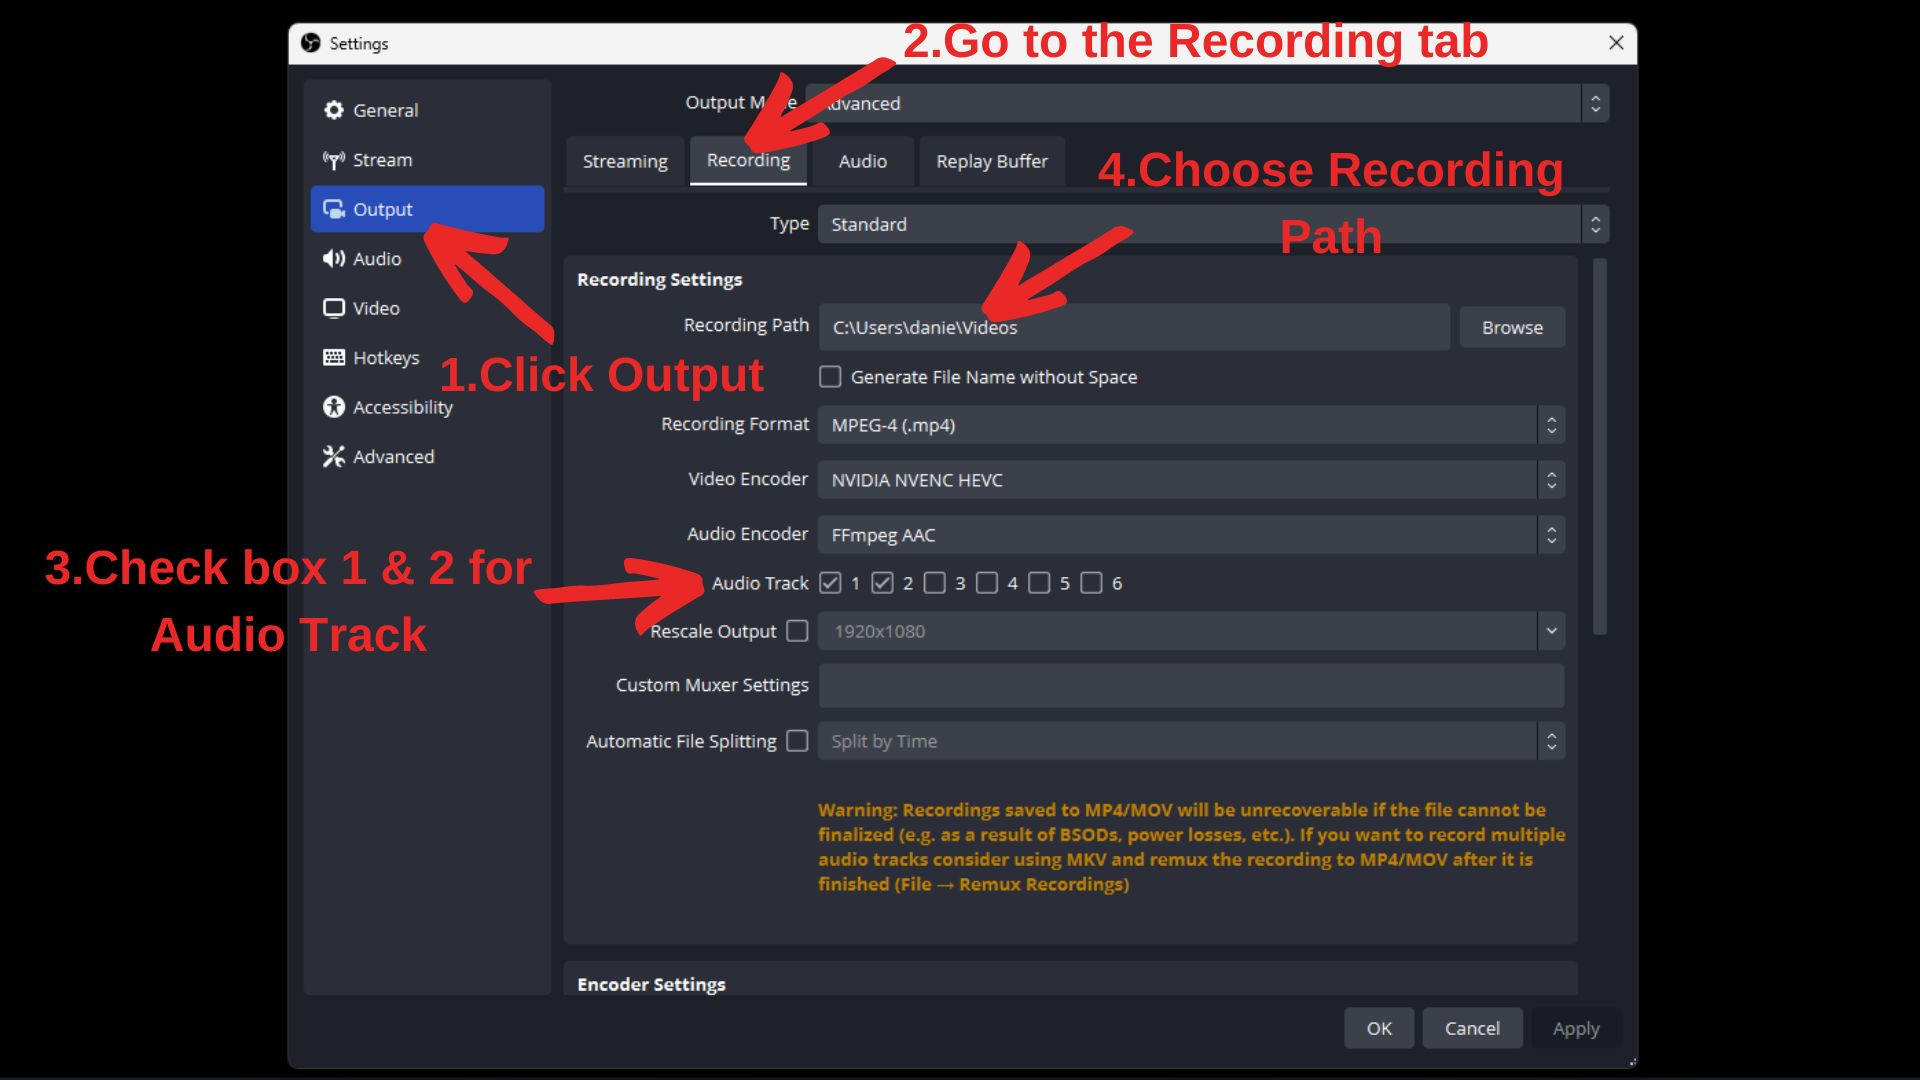
Click Output on the left menu, then click on the Recording tab. Look for Audio Track and enable Track 1 and Track 2. You don’t have to enable the other tracks; otherwise, when you import the video, you’ll see the other redundant tracks in your editing software. Also, choose the Recording Path you want your mp4 video file to be sent to.

Next, click Edit at the top menu bar, and click Advanced Audio Properties. A pop-up will appear; check boxes 1 and 2 under Tracks to split your mic and computer audio tracks. At the same time, look for your microphone source and check the box with the word Mono. This will allow you to hear your voice on your headphones’ left and right channels when you record. Otherwise, you will only hear your voice on the left channel.
Adding Video Capture Device
After this, we’ll have to add the Video Capture Device, which is your smartphone using EpocCam or another webcam app.
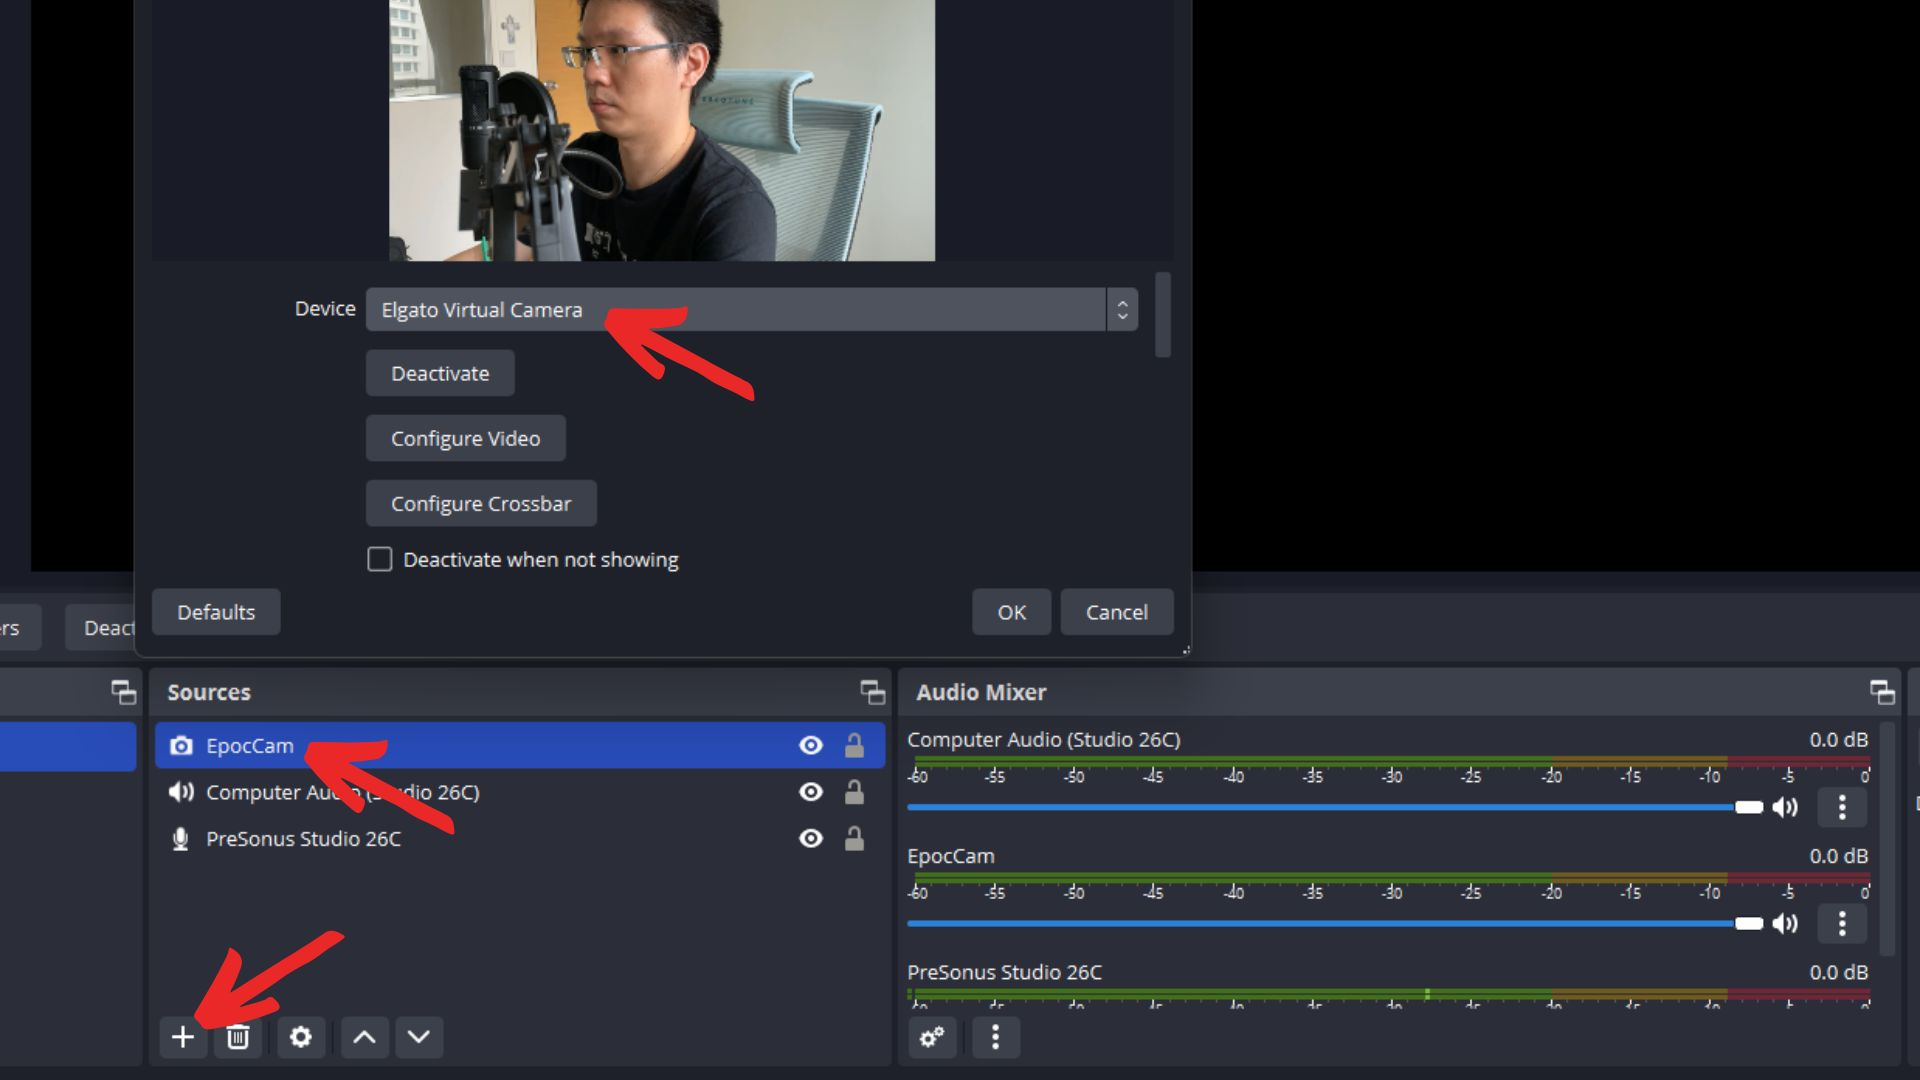
In the same way we added the audio sources, we need to go to Sources, click the ‘+‘ icon, and click Video Capture Device. In my case, I will rename it to ‘EpocCam‘ and select ‘Elgato Virtual Camera.‘
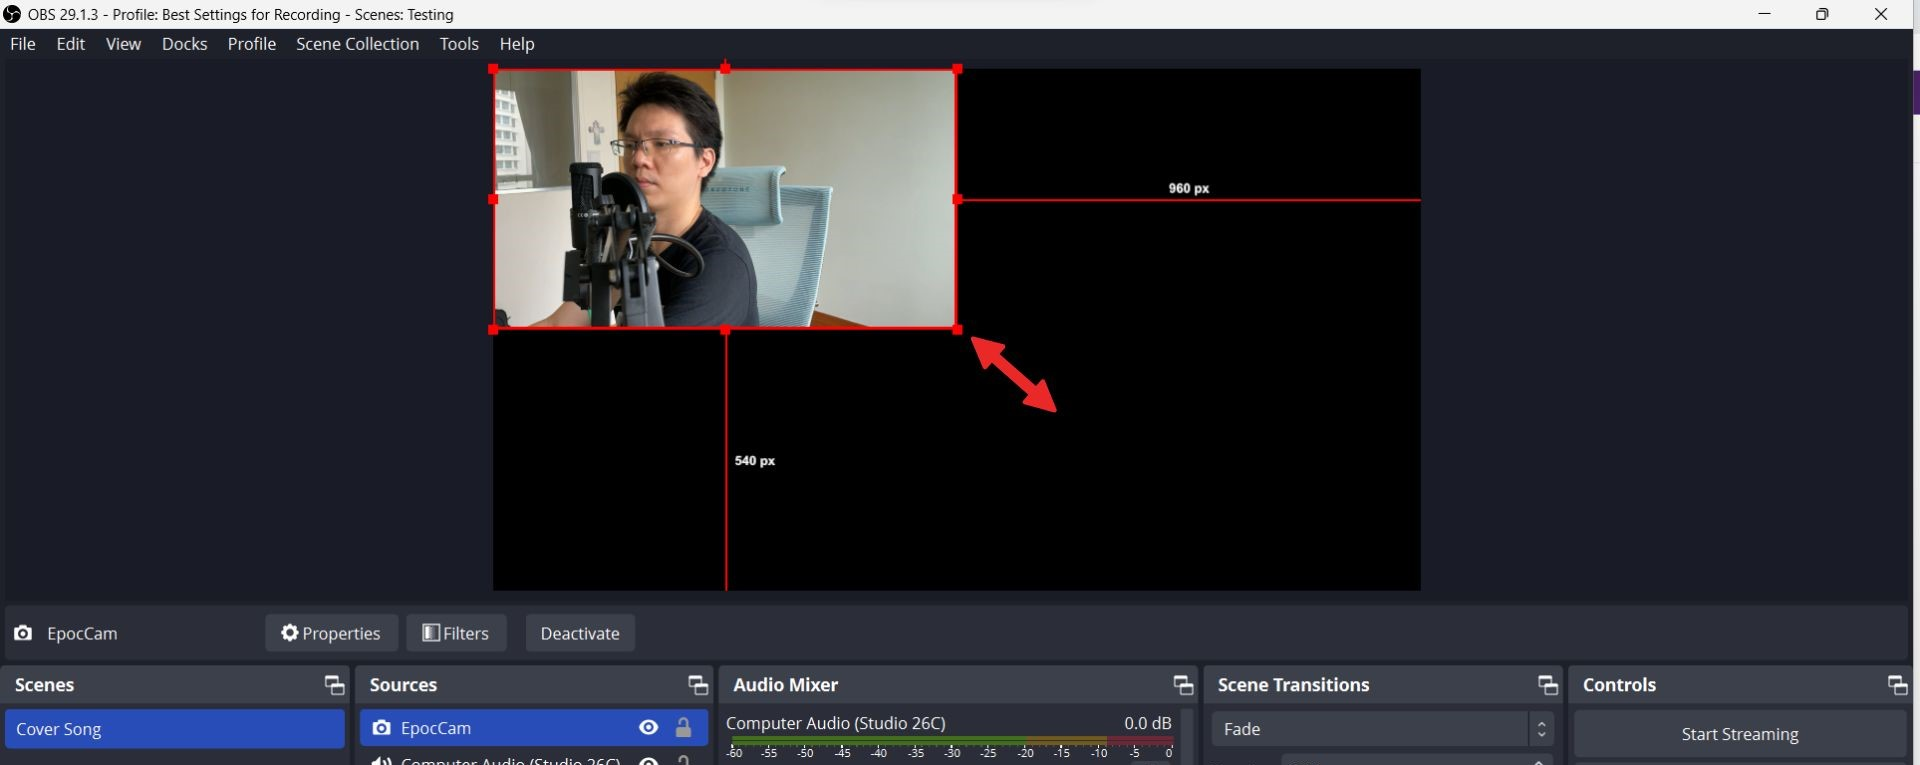
Remember to drag the video to fit the entire screen.
Recording the Cover Song
Now that you have everything set up, you can heave a sigh of relief and get to the part everyone’s waiting for, recording your cover song! Practice the song several times to ensure you can do it in one take and warm up your voice a little.
There are several methods for recording a perfect song; some would advocate recording around five full takes, importing them into your DAW or editing software, then slowly listening to every small section of each of the five tracks and cutting out the part that sounds the best.
While that might get you the ‘best sound,’ it’s a real hassle to go through so many takes and might even sound unnatural because you are cutting and joining so many parts.
My Recording Method
The method I prefer to do is to record one full take first. If I am not satisfied with the overall performance, I will do another full take and repeat this process until I am about 80%-90% satisfied with the overall take. And don’t worry, it does not have to be perfect if there are pitching or rhythm issues at some parts; they can be fixed later.

When you are ready, click the Start Recording button under Controls and play the YouTube karaoke backing track.

As you are singing, check the level meters for your microphone and computer audio to ensure that there is audio being played. Sometimes, you might have accidentally switched the output audio to your computer speakers instead of using your audio interface.
When you have completed singing your cover song, click the Stop Recording button, the same as Start Recording.
Go to your folder to check if your video has been saved. If you play the mp4, you might notice that your vocals are missings. Don’t worry because your media player might only be able to play Audio Track 1 and not the other audio tracks, but your editing software would be able to play all the audio tracks.
Editing the Cover Song
It will be challenging to go through every step of the video editing process in this blog post, but there are many helpful video tutorials on YouTube. However, I can still go through some main pointers.
Be sure to set your Timeline frame rate and Playback frame in your editing software to match your Common FPS Value in OBS Studio. In this case, my Common FPS Value is 60, so that is the frame rate I should set in my editing software.
Import your cover song video into your editing software and listen to the whole song, marking places where you were off-pitch or off-beat.

Next, go to OBS Studio, record clips of those problematic parts, and import them into your editing software. Go to the marked spots on your video editing timeline and replace the problematic part with the newly recorded clip. You only have to replace the audio part, not the video, because it will still look natural when you mouth the words even though it is from a different audio clip.
Once you clean up the problematic parts, render your video in Full HD 1080p format, and your cover song is completed! Now you can upload it to your YouTube channel and send the YouTube video to your friends to admire!
Cover Song Licensing
Licensing Music Streaming Platforms
When it comes to having the rights to upload an original cover of someone else’s song on streaming platforms like Spotify and Apple Music, it’s all about understanding the ins and outs of obtaining mechanical licenses and performance royalties. A mechanical license gives you legal permission to record and distribute a cover song.
This license is typically obtained from the publisher of a popular song or through an agency like the Harry Fox Agency or Songfile.
Once you’ve secured a mechanical license, you can distribute your cover song on various platforms and earn mechanical royalties from streams and downloads. However, it’s important to remember that these mechanical royalties are often split between the copyright owner and the cover artist, so it’s crucial to understand the terms of your license agreement.
Alternatively, you can also go through a distributor like DistroKid that simplifies getting the mechanical license, uploading your cover song onto different streaming platforms, and splitting the performance royalties with the song owner.
Licensing on YouTube
Monetizing a cover video on YouTube is a bit more complex due to the platform’s strict copyright laws and Content ID system. You’ll need a sync license from the copyright holder to legally post a cover version of someone else’s song on YouTube and potentially earn revenue. This license allows you to pair their composition with moving images in your cover song video.
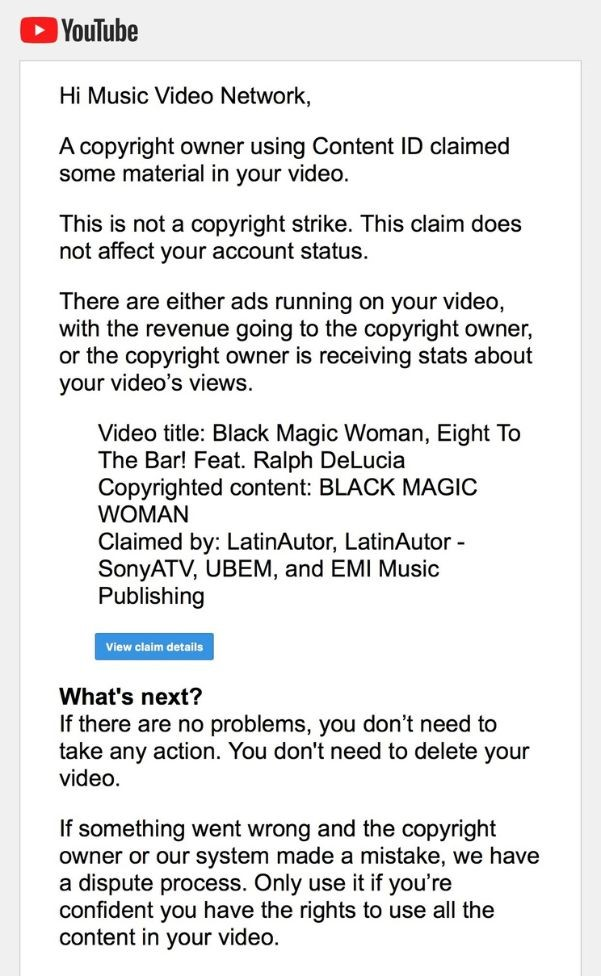
However, obtaining a sync license can be challenging and time-consuming, and many artists use YouTube’s Content ID system instead. This system automatically identifies copyrighted material in uploaded videos and places a copyright claim on the video on behalf of the rights holder. Any video-generated ad revenue is then paid to the copyright holder.
While this system can be a convenient workaround, it’s not without its drawbacks. For one, the rights holder can block, mute, or restrict viewing your video in certain territories. Additionally, you won’t be able to monetize your video directly, as the ad revenue will go to the rights holder.
However, getting a copyright claim is still better than getting a copyright strike which can negatively affect your YouTube channel. Moreover, despite these challenges, your YouTube cover song can still serve as a valuable tool for gaining publicity.
Also, you would want to check if a popular song on YouTube is cleared for monetization, and you can use the app We Are The Hits. And when you’ve done a cover of that original song, you can upload the YouTube URL to that website which will inform the relevant record label or original artist that you are covering their song.
This is a safer way of monetizing your YouTube cover song, and you are less likely to receive a copyright strike.
Conclusion
Now that you’ve just learned to make a cover song without playing an instrument, who knew that with the right tools and a little bit of know-how, you could create a cover version of your favorite song from the comfort of your home? However, if you know how to play an acoustic guitar, we have a great article on methods for recording an acoustic guitar.
Remember, the journey of creating your own version of a cover song is not just about the end product, but also the process. It’s about discovering your unique voice, experimenting with different sounds, and, most importantly, having fun. So, don’t be afraid to make mistakes or try something new. After all, some of the best cover songs were born out of experimentation.
So, what are you waiting for? Grab your microphone, set up your camera, and start belting out your favorite tunes. Who knows, you might just kickstart your music career and by adding a bit of your own personality, you might be the next big thing on YouTube! And remember, in music, there are no wrong notes, only interesting interpretations.