The Home Studio Acoustic Treatment Guide for a Balanced Audio Environment
Introduction
It can be challenging and requires specialist knowledge to know where to begin when it comes to acoustic treatment. Audio pros, however, can spend years honing their hearing to pick up on this by training them to understand how (or why) to do so. Despite this, it can be easy to make sizable improvements without going over your budget.
Acoustic treatment has a much more significant impact on the caliber of your work than you believe and is the one aspect of home studios most likely to be undervalued and ignored.
Artists frequently overemphasize the importance of their instruments and recording gear. In contrast, they ignore the more crucial question of how those instruments would sound when recorded in the home studio.
However, the downside is that home studio acoustic treatment comes at a cost, which may deter some.
Why even Bother with Audio Quality?
To ascertain the effect of audio quality on listeners’ judgments of the content, quality, and presentation of information, research led by Eryn Newman from the University of Southern California and Norbert Schwarz from the Australian National University carried out two tests.
According to research conducted by USC and the Australian National University, audio quality impacts how much individuals trust the source of information and how much they believe what they hear.
Norbert Schwarz, co-director of the Mind & Society Center at the USC Dornsife Faculty of Letters, Arts, and Sciences, stated that the findings are noteworthy in light of the recent increase of false news and widespread mistrust of science.
The study, titled “Good Sound, Good Research: How Audio Quality Influences Perceptions of the Research and Researcher”, was written and published in the Science Communication Journal, dated March 20, 2018.
High-quality audio is not simply a “nice-to-have” but impacts people’s perceptions of you and your business. High-quality audio boils down to several factors such as the type of recording gear used, the acoustic treatment of the studio, the skill of the musician, the techniques used for recording instruments like an acoustic guitar, etc.
And the advice is: Next time you are in a recording, make sure you have good sound quality, they wrote. Your credibility depends on it.
Understanding Acoustics
Before we begin with home studio acoustic treatment, you should understand acoustics and how sound travels throughout a room. There are a few things to consider when making a sound in a room, no matter how loud or soft it is:
Direct Sound vs. Reflected Sound: What’s the Difference?
When you make a sound in a room, here’s how it ultimately reaches the microphone:
- The waves will emerge from the sound source and move in all directions.
- The direct sound coming from the sound source to the desired source in a straight line (e.g., a vocalist singing directly into a microphone).
- The reflected sound (the other source component) will randomly reverberate around the recording studio.
Depending on the room’s size, the sound will bounce off multiple sources and return to the original place of the direct sound a few milliseconds later. (e.g., the sound of the vocal will bounce off the back wall and back into the microphone).
Room Modes
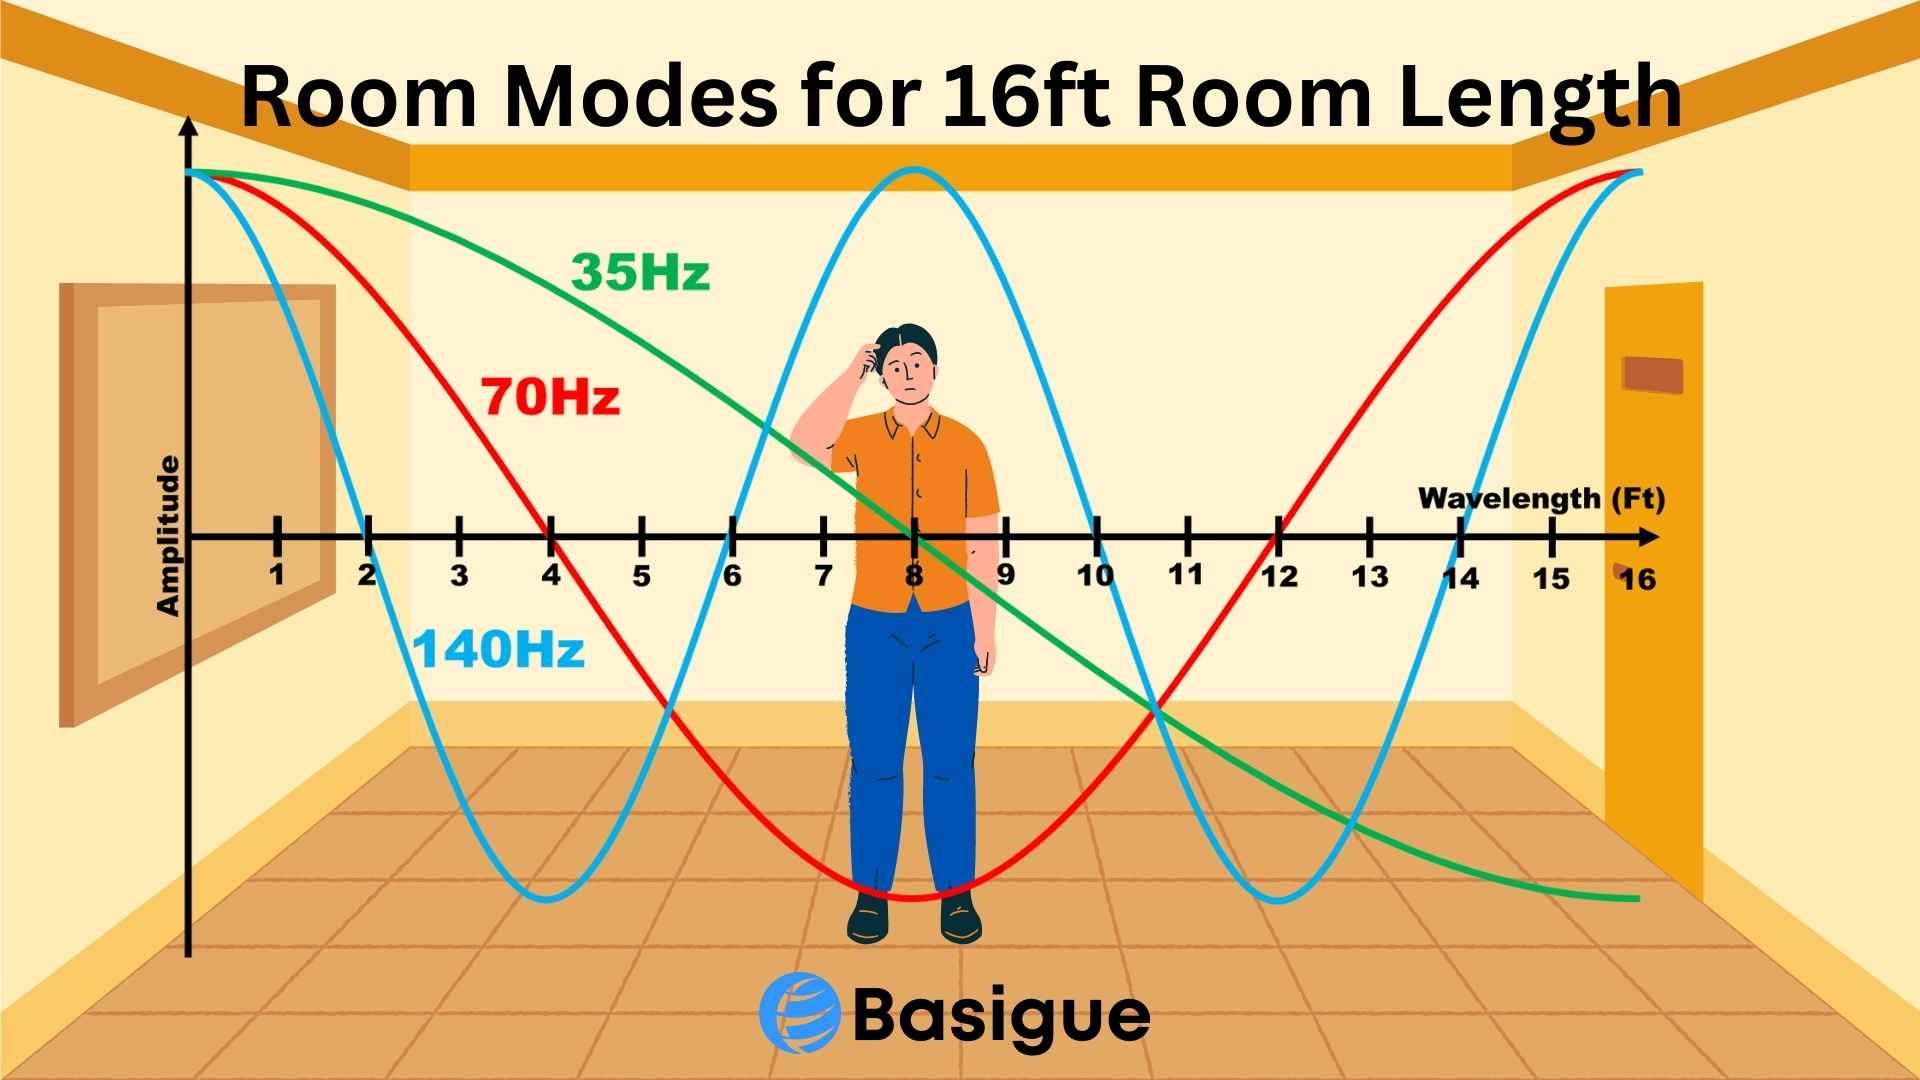
Room modes are sound waves of specific frequencies whose wavelengths fit exactly or in exact multiples to a specific room’s dimensions, which means their peak amplitudes will occur at the room’s walls, ceiling, and floor.
Every room with different dimensions has a different set of room modes, usually occurring in the frequency range between 20 Hz to 300 Hz.
In the example above, a 16ft long room would have room modes of 35 Hz, 70 Hz, and 140 Hz and higher frequencies not shown in the example. If you were to stand at the two ends of the room, you would hear all 3 frequencies at their peak amplitude. But if you stand in the middle of the room, you would hear 70 Hz and 140 Hz at the peak amplitude but not hear the 35 Hz frequency.
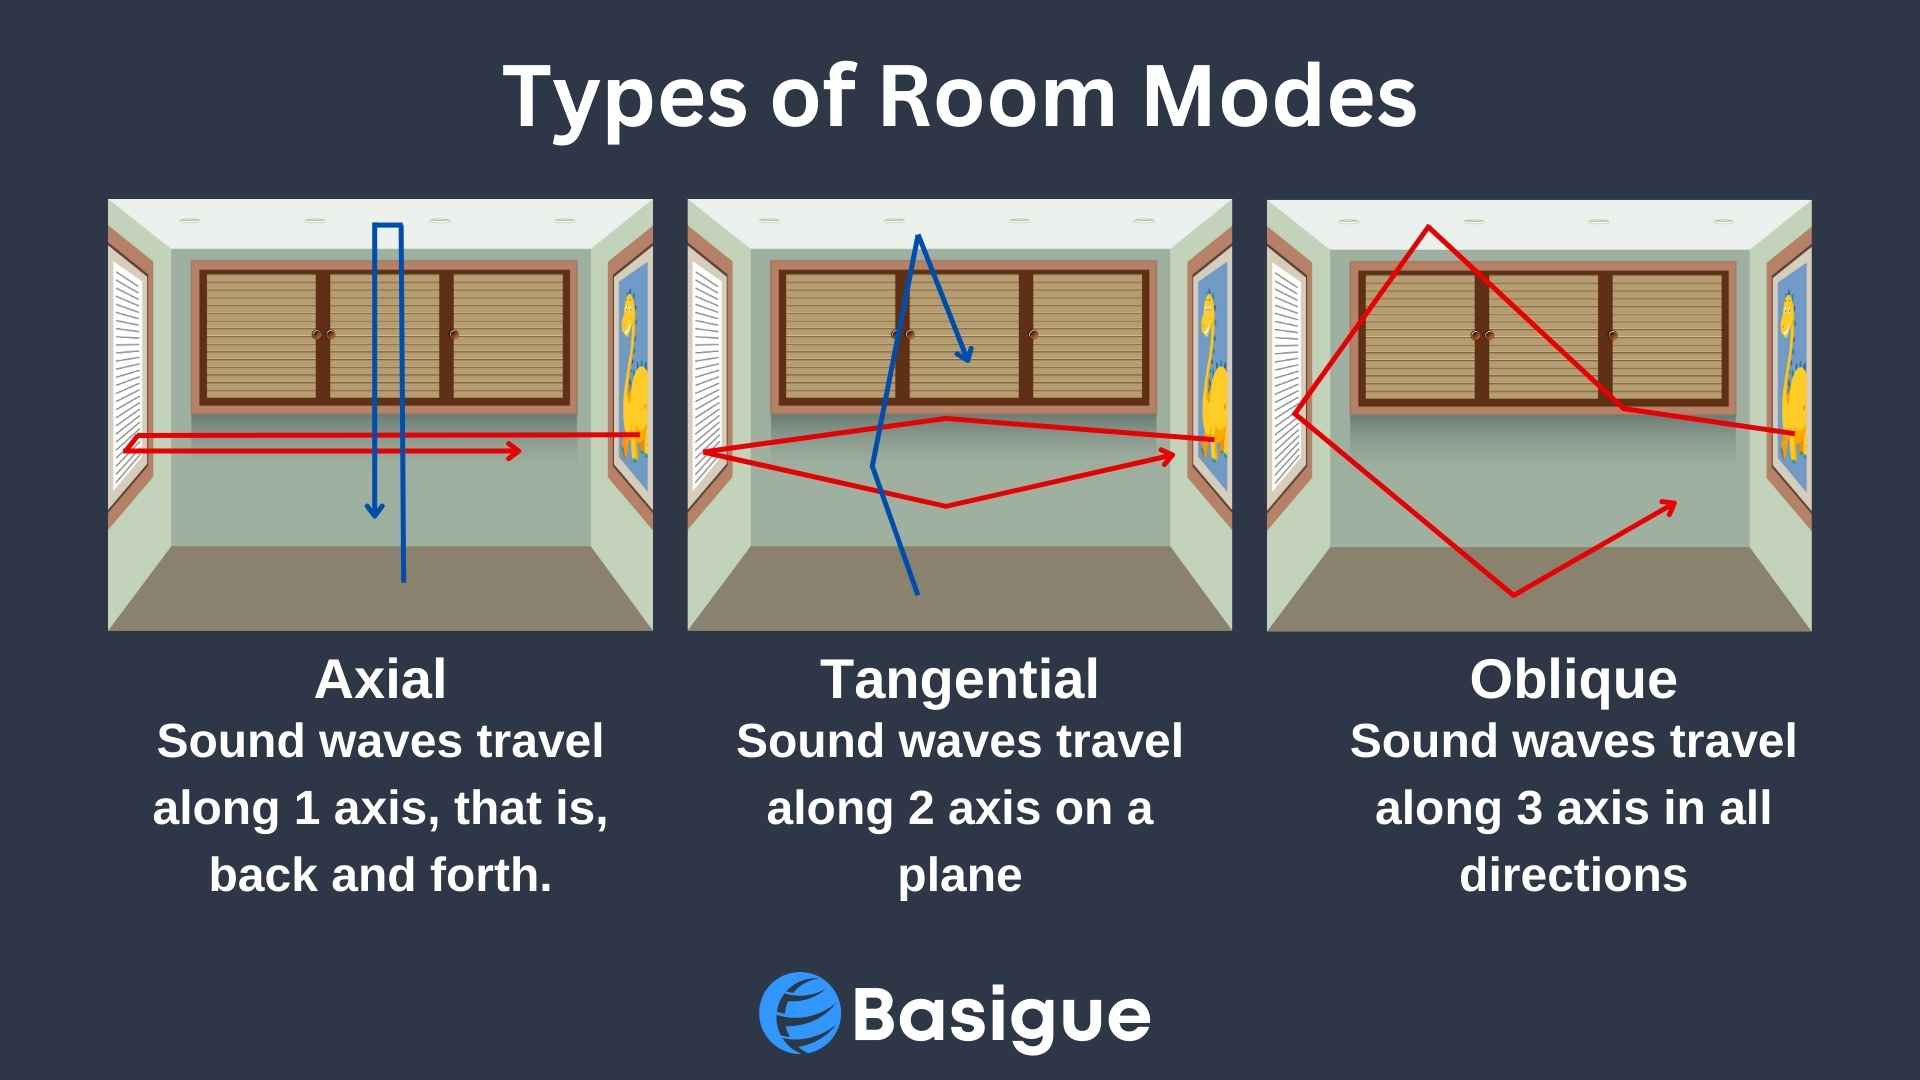
Since most interiors have parallel walls and axial modes have the most considerable effects on sound, they are the most likely to be encountered in a room.
Others can form using more complex pathways. There are oblique modes with six surfaces and tangential modes with four surfaces. Although they are more common, tangential and oblique modes have less impact overall. Tangential and oblique modes, when combined, can cause just as many problems as axial modes.
Reflected sound causes room modes. Although reflected sound can enhance the surround sound experience and create a more atmospheric sound, room modes can significantly distort the sound in a room, particularly at lower frequencies below 300 Hz.
Interference
Modes that drastically and negatively affect sound generally occur when soundwaves reflect and meet an incoming soundwave.
Whenever soundwaves of the same length or lengths that are multiple each other meet, something called “interference” is the result. Interference is a possible outcome of waves reflected off of walls.
As they bounce back, the reflected wave meets the wave radiating from the sound source. If the two waves are the same AND in phase, that is, if they have the same wavelength and meet each other at the same point as they travel through the air, the interference is said to be constructive. The result will be to increase the amplitude of their frequency.
On the flip side, when waves are identical but out of phase, they are destructive interference because of the muted sound.
Standing waves are modes that interfere constructively in a room. The reason why standing waves are thus named is that they stop the sound from naturally fading. The sound pressure may increase and “stand” in a particular area rather than diminish. An exaggerated, messy, or smeared sound may result from the effect.
What does all of this imply, then?
The size of the entire room and the kinds of reflective surfaces it contains can change the reflected sound in several ways. A big room will sound considerably more prominent than a smaller room that is one-third the size.
However, you don’t need to worry about the direct sound, as they don’t interact with the other sounds in the room. The frequency balance in your recording (or in your ears, if you’re referring to the sound coming from the monitors) is the same as the frequency balance from the source. The tone of the direct sound is unaffected, and its frequency balance is untouched.
What is Acoustic Treatment?
Acoustic treatment refers to the measures you take to control the sound produced within a room. It mainly consists of identifying the different surfaces in a room and targeting those surfaces as contributing factors to the room’s acoustic problems.
In a home studio, we may desire to address various sound-related issues, such as reducing reverberations from untreated walls, soundproofing the walls to minimize disturbance to our roommates, or resolving phase issues caused by standing waves.
Studio acoustic treatment effectively addresses most of these problems and can significantly improve sound quality in a room. Therefore, acoustic treatment is an essential part of setting up a home studio.
Sound Proofing vs. Sound Absorption
Frequently acoustic treatment is thought of as soundproofing and vice versa, assuming the two are the same when they are very different. So let’s make things clear.
Soundproofing
Soundproofing or sound insulation is a type of acoustic treatment that differs significantly from sound absorption regarding its underlying concepts. Soundproofing uses materials to insulate a room so that sound cannot escape (or enter from elsewhere). In contrast, sound absorption focuses on the noise inside a room and the steps taken to diminish it.
Although soundproofing does not alter the user’s perception of the room acoustics, it does provide isolation between spaces and improve focus within that room by reducing outside noise.
Soundproofing’s goal is to stop sound from entering and leaving a home studio by:
- Using hefty, solid material on the walls.
- Applying sealant over gaps in the windows and doors.
The most significant advantage is that you may record anytime you want without fearing disturbing your neighbors.
Conversely, acoustic treatment ONLY manages room reflections WITHIN the space, resulting in better-sounding recordings and smoother mixing. We are typically more worried about low frequencies.
Sound Absorption
The primary goal of sound absorption is to address the issue of long reverberation time and echo, which can significantly impact the sound quality in a home studio.
Sound absorption is the main focus of audio treatment and involves using acoustic panels that can reduce the noise that travels and bounces across surfaces. The degree of sound absorption significantly impacts how a location sounds to a user.
It aims to lower the reverberation time in a place and improve the overall user experience by enhancing voice intelligibility, communication, privacy, and acoustic comfort.
How to Determine Your Room’s Acoustic Needs?
There are a couple of straightforward answers to this question:
- If it’s a room, acoustic treatment is required. You could presume that acoustic treatment can enhance all untreated rooms.
- If it sounds awful, it definitely needs proper acoustic treatment.
- If the audio you’re producing sounds excellent in your home studio but lousy outside.
Have you ever clapped your hands in a room and heard a strange fluttering echo bouncing off two walls? Or notice any visible phasing as you travel about the room, such as applying a comb filter to your mix as you go from the middle to the side? These are signs that some sound waves are canceling each other out while others are adding to the reflected sound.
And if you’ve noticed a buildup of low end in some places but not others, it’s time to consider applying acoustic treatment.
While listening to a mix, go around the room and notice how the volume and frequency vary in different locations. The various sound level will give you a broad idea of the room’s acoustics.
Because your space may significantly affect how your mix sounds, we frequently add acoustic treatment to our home studios and set up monitors and other equipment to compensate for it.
In short, if you observe that the sound significantly alters depending on where you are in the room, it probably needs acoustic treatment.
Lots of Hard Surfaces
Hard surfaces, such as bare walls and floors, and rugged furniture, such as tables, chairs, and counters made of wood or metal, can negatively impact room acoustics.
Acoustic panels need to be placed on hard surfaces in a room since hard materials do not absorb sound waves but reflect them, producing a loud and echoing environment.
Multiple Noise Sources
The causes of a room’s poor acoustics are various noise sources working together. Noise problems can be a combination of people talking and moving and several external noises from phones, traffic, equipment, air conditioning, and music. An example is difficulty in understanding speech in noisy social environments.
High Ceilings
High ceilings will result in poor acoustics for two reasons. Firstly, a home studio with higher ceilings has more volume of “dead space” over our heads and causes sound loss.
Secondly, due to the distance that direct sound waves must travel before being reflected by a hard surface, they also cause more extended reverberation periods.
Types of Acoustic Treatment
Establishing Mixing Position
The mixing position consists of three components: The room choice, the studio monitors’ placement, and the listening position.
Any one of these three components can significantly influence the frequency response. This is why establishing a good mixing position can minimize acoustic problems even without installing fancy acoustic foam panels and bass traps.
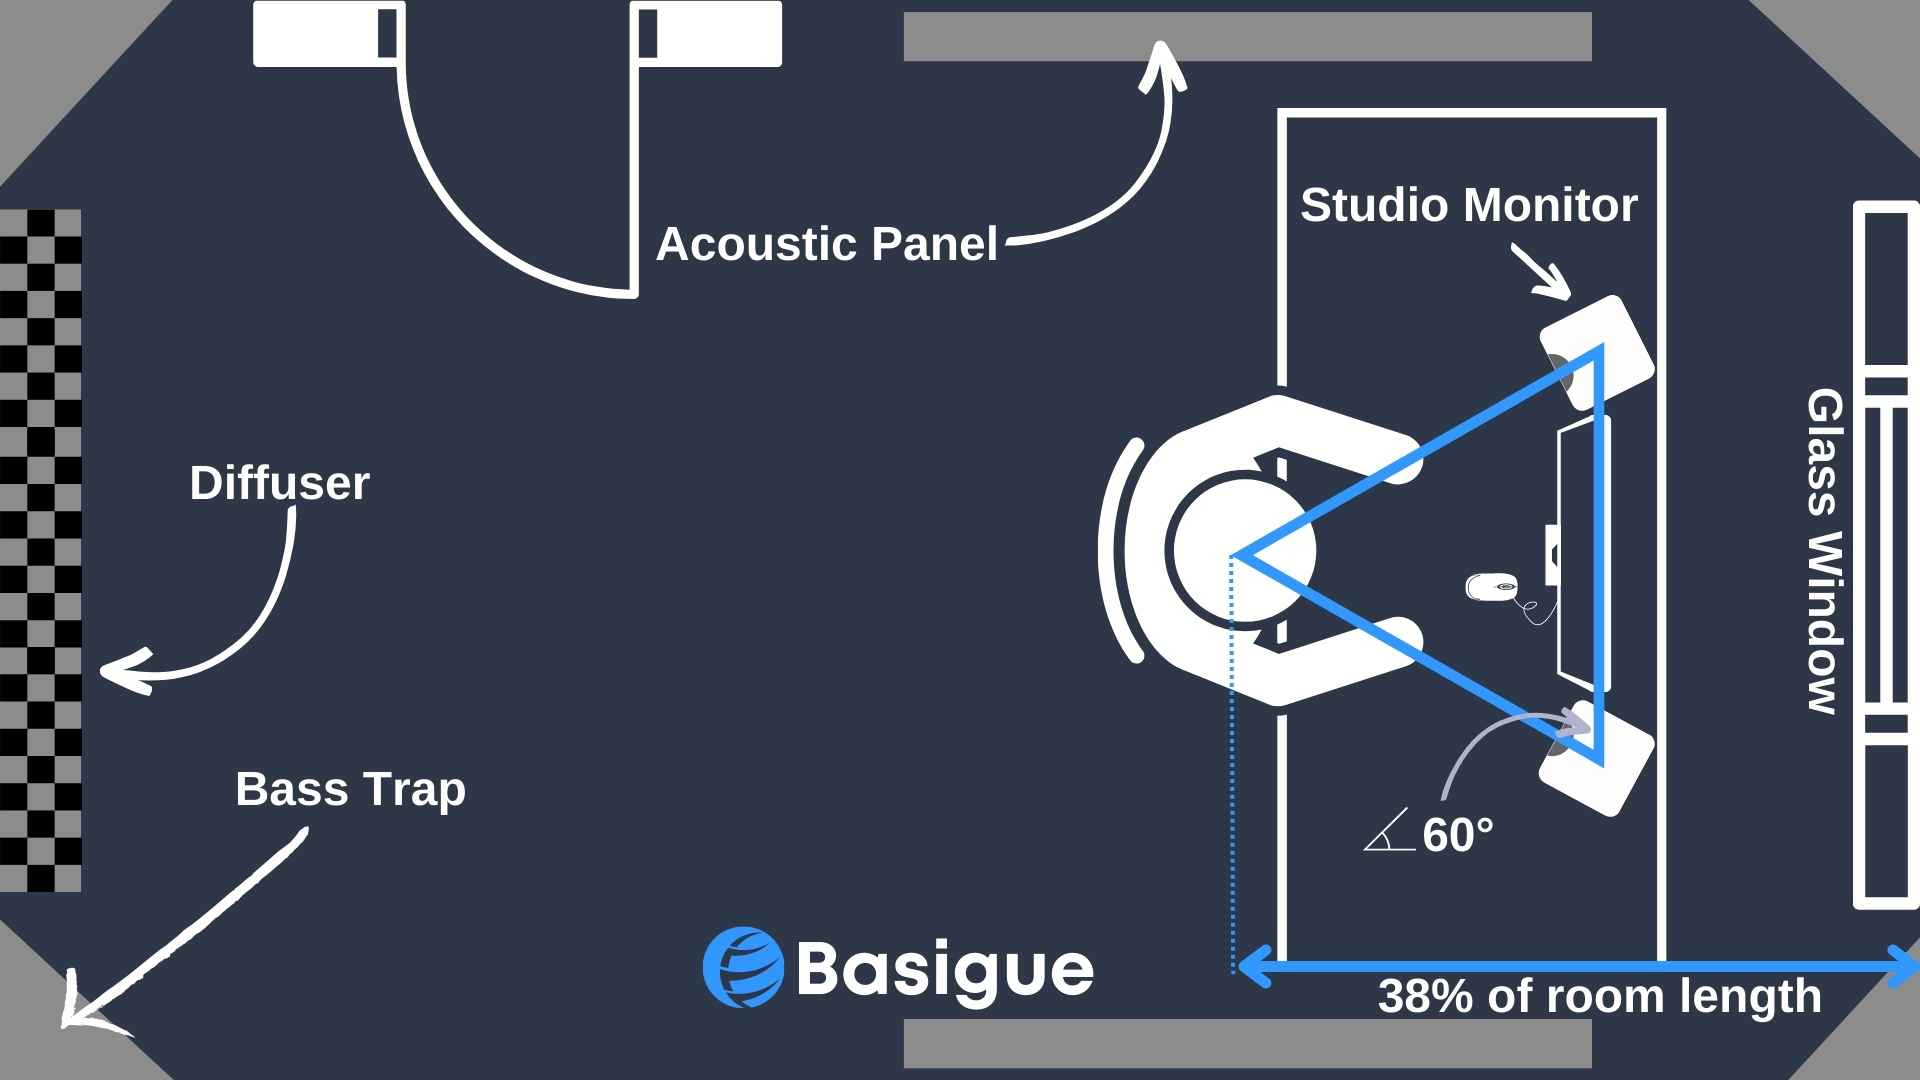
Here are some key pointers for establishing a good mixing position:
- Do not choose a small-squarish room. Choose a decent-sized rectangular room.
- Ensure a minimum distance between the speaker and the front wall to avoid bass buildups.
- Have the back of the monitors face the window (if possible) as bass tones pass through glass easily.
- Place the speakers along the shorter wall so that the emitted sound will travel along the room’s length and take longer to reflect back to the listener.
- Don’t sit in the middle of the room. The listening position should be 38-40% of the room length from the front wall.
- The position between the listener and studio monitors should form an equilateral triangle.
- The speakers should be at ear level, and their line of sight should not be blocked.
Dealing with SBIR (Speaker Boundary Interference Response)
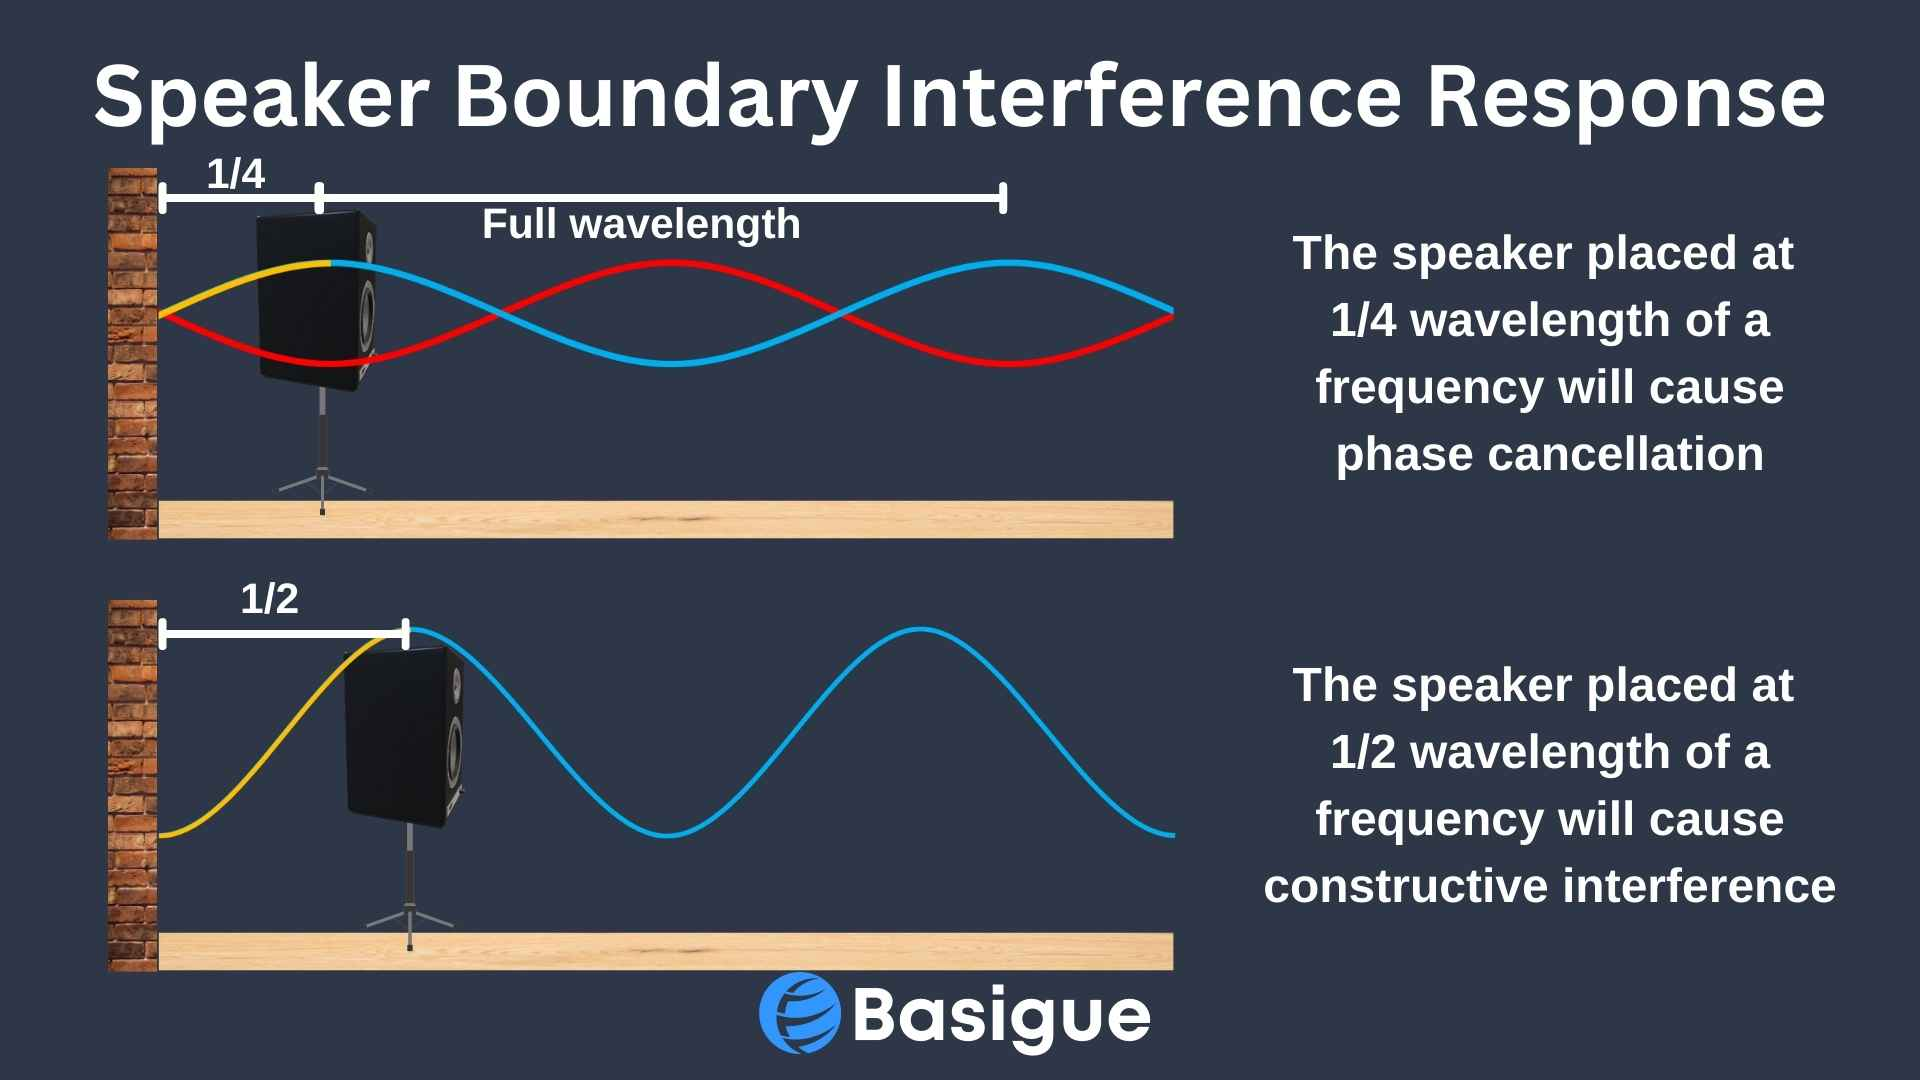
The term “Speaker Boundary Interference Response” (SBIR) describes how a speaker’s proximity to a hard wall may change the response, especially in the low-end bass frequencies which are projected in an omnidirectional pattern from the speakers.
In professional-grade recording studio control rooms, a firm, sturdy wall flush with your studio monitors is the only effective method to combat SBIR.
If installed properly, there won’t be any front wall reflection. And your front wall won’t interfere with your speakers in any way. Flush installation improves acoustical loading, which amazingly drives your monitors and boosts their effectiveness at bass frequencies.
If you are unable to flush your speakers with the wall, you can arrange your speakers so that the peaks and nulls that ruin your sound are as small as possible. Also, bass traps should be placed at wall corners to prevent bass buildups. Another way to reduce bass buildups is to use front-ported studio monitors, which emit bass tones from the front rather than the rear.
As mentioned above, point the back of speakers towards glass windows if possible to allow low frequencies to pass through.
One thing to keep in mind is the distance between your speakers and nearby surfaces like walls and floors. If the distances are the same, you’ll end up with multiple sound reflections that will interact with each other in a negative way.
This can lead to peaks and dips that are frustrating and make your music sound downright terrible when you are trying to cover a song or record an instrument.
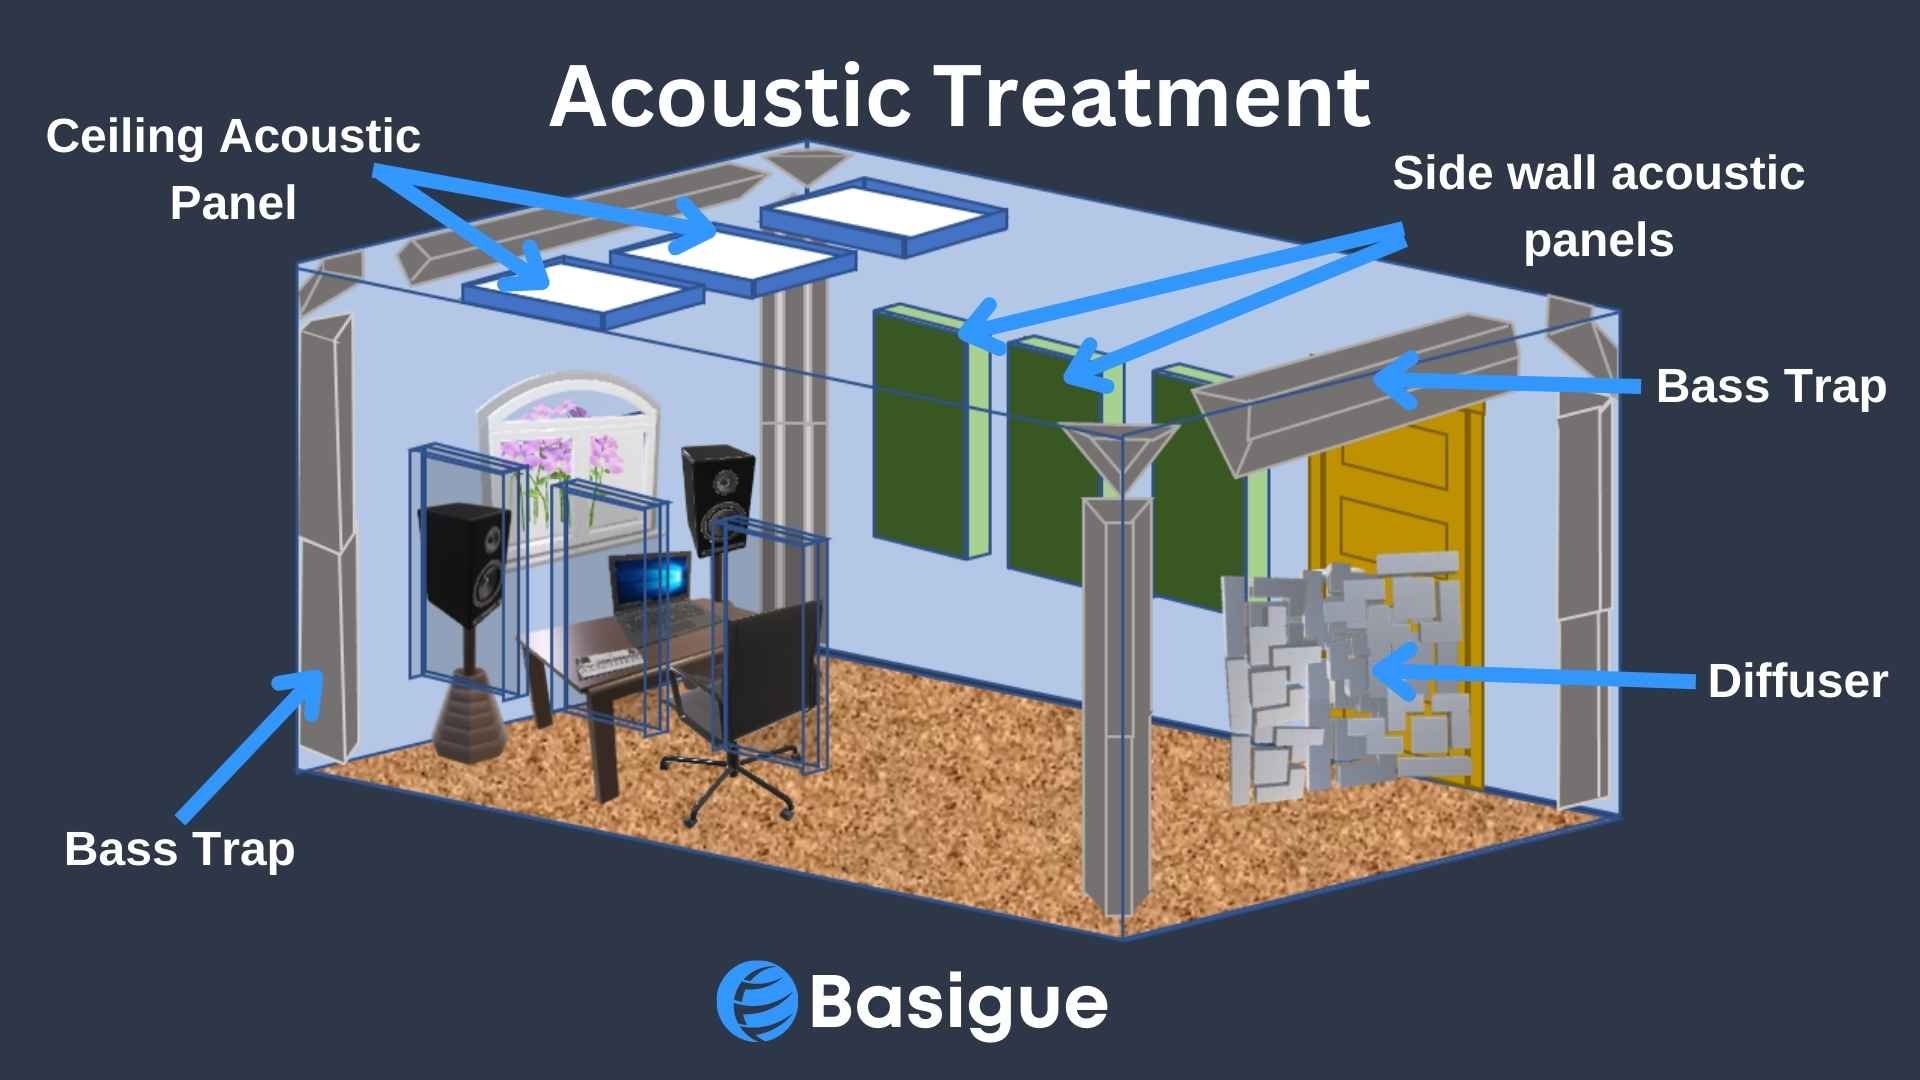
Absorption and Diffusion
The two main types of acoustic panels for acoustic treatment are diffusers that disperse sound and absorption panels that absorb sound.
The top concerns are treating early reflections with acoustic panels and placing bass traps in as many nooks as possible. Installing the proper acoustic panels, diffusers and bass traps may lessen unwanted sound reflections that could otherwise degrade the quality of your listening position.
Both acoustic absorbers and diffusers kill standing waves and echoes. Absorption panels will soften the sound, while diffusion acoustic panels will keep it more vibrant.
Absorption
Regarding acoustic panels, thick and porous materials make superior absorbent materials that can help to minimize early reflections. Absorbent materials include thick fabric, acoustic foam, cushions, and fiberglass insulation. These materials may reduce the mid and high-frequencies that bounce around your home studio.
Fiberglass or Rockwool panels are better than acoustic foam panels because they have a higher absorption coefficient, more consistent frequency responses, and more excellent absorption at lower frequencies.
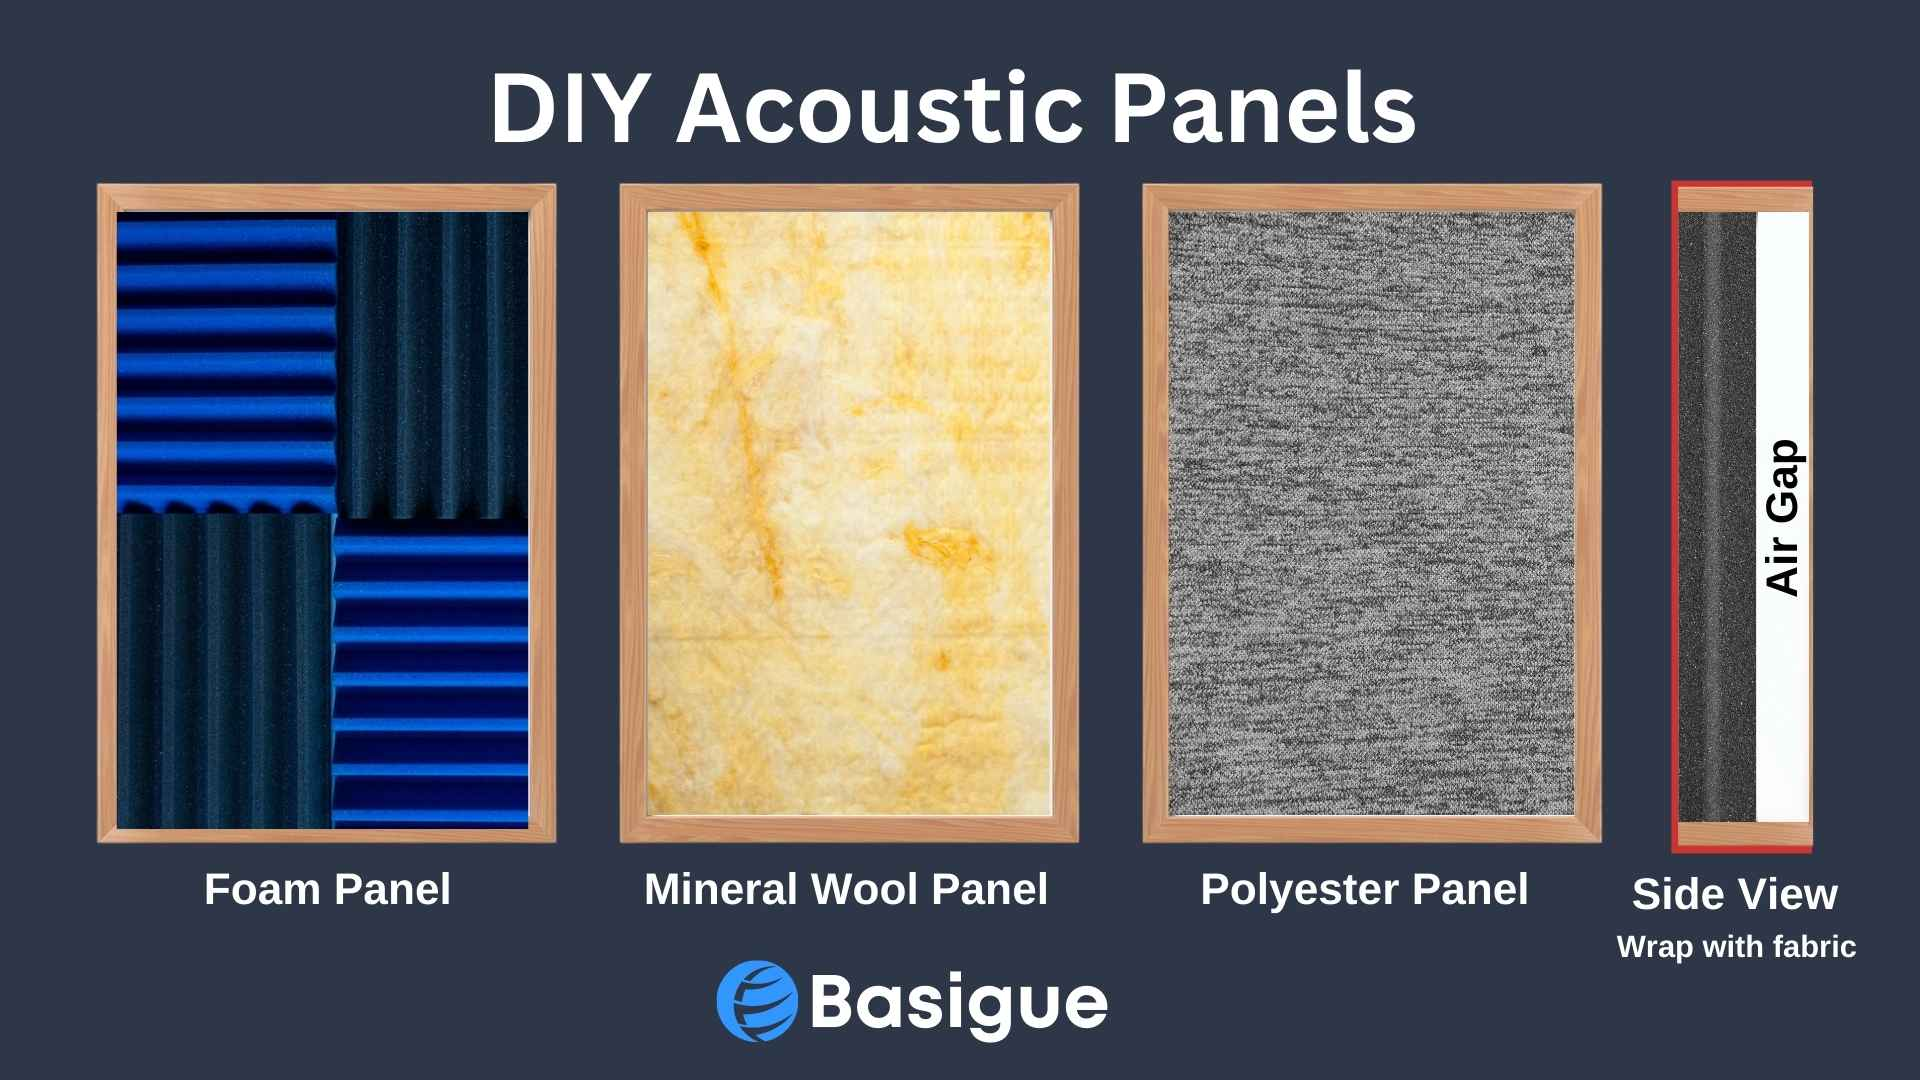
You can also consider making your own acoustic panels for a DIY acoustic treatment if you are on a tight budget.
Diffusion
Diffusers are a popular type of acoustic treatment. While absorption panels prevent sound from bouncing off the various surfaces of the space, diffusers jumble up these early reflections, preventing them from returning directly to the sound source.
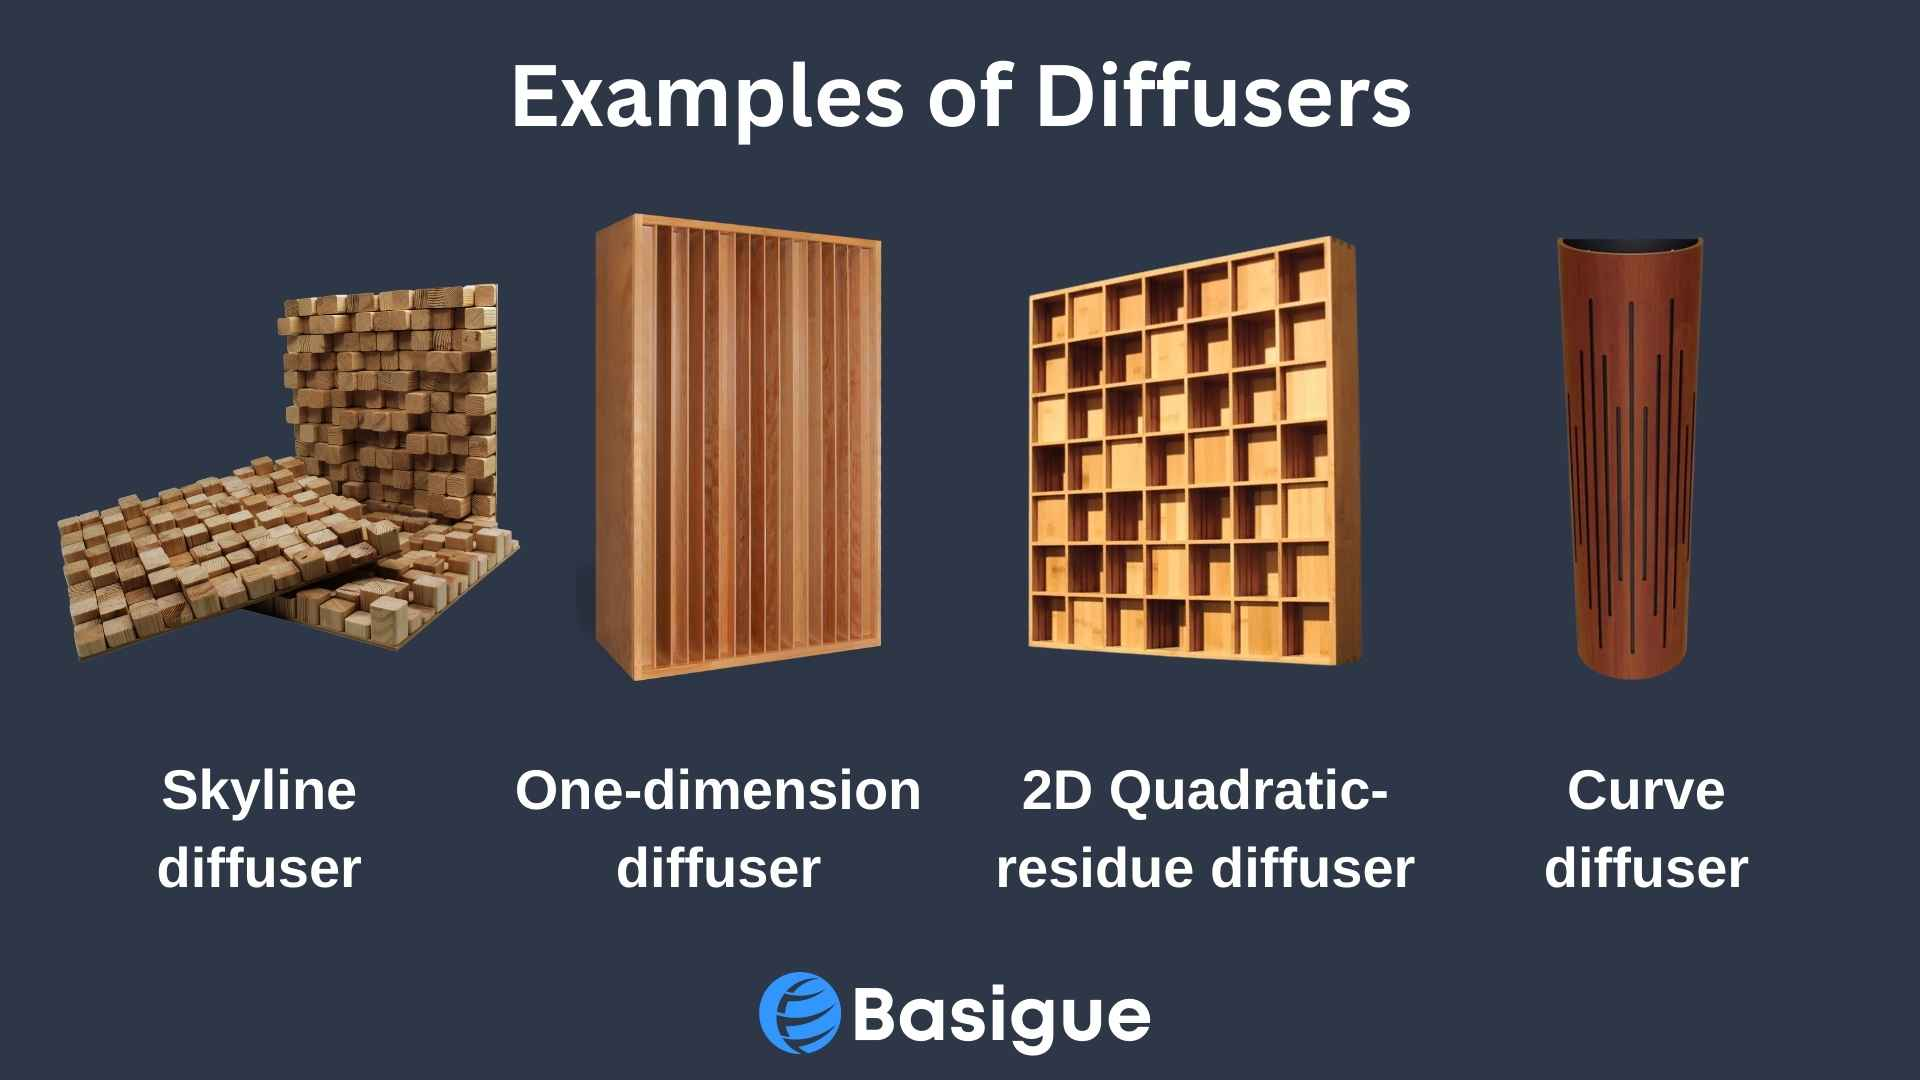
They are designed to scatter sound waves and create a more balanced acoustic environment. There are various types of diffusers, each with its own unique design and characteristics.
The one-dimensional skyline diffuser is perfect for large spaces and has a sleek design that complements any decor and is great for scattering sound waves evenly.
If you’re after a more uniform and natural tone, the 2D quadratic-residue diffuser might be the one for you. This diffuser uses a mathematical formula to scatter sound waves in a specific pattern and is popular among audiophiles.
For a visually simple option, the curved diffuser scatters sound waves in all directions, creating a lively and immersive acoustic experience.
Finally, the skyline diffuser, with its multiple parallel slats of varying lengths, provides effective diffusion of sound waves and adds a unique aesthetic to any room.
How to Carry Out Acoustic Treatment
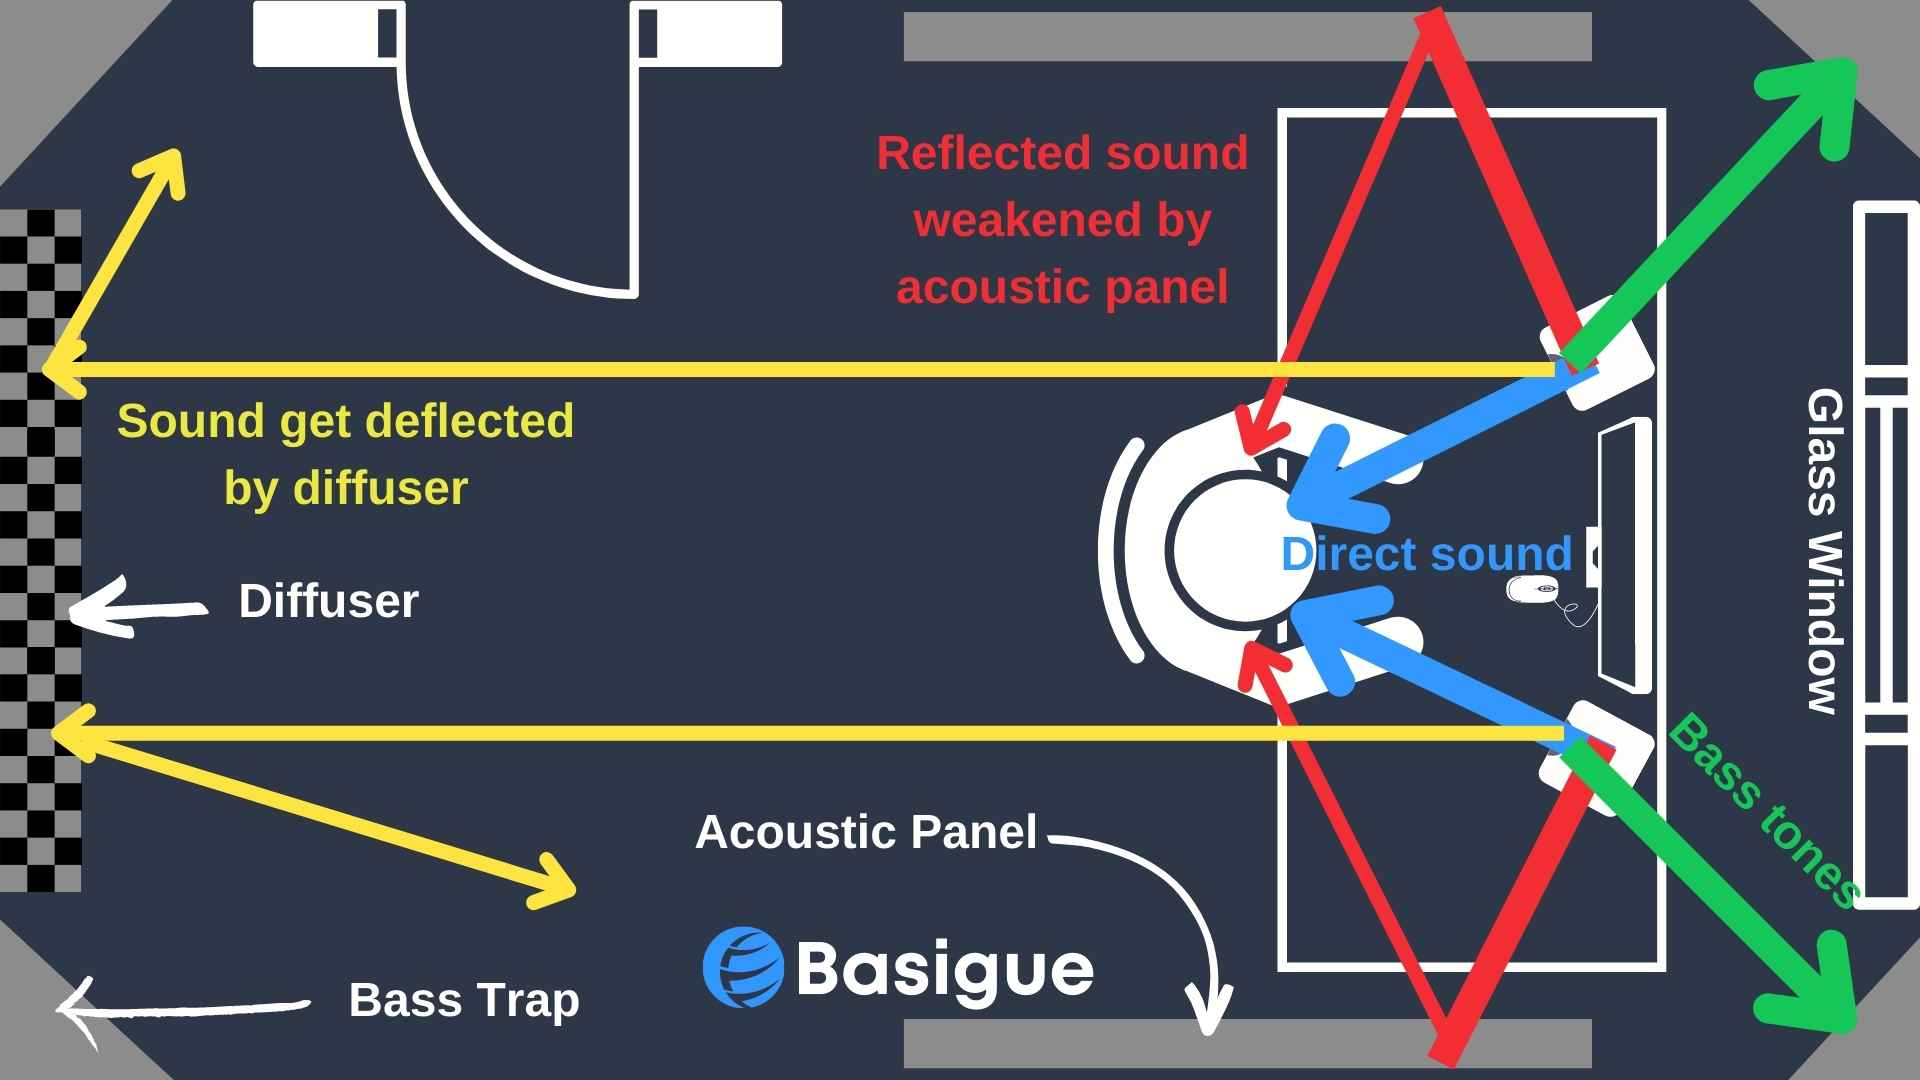
Dealing with Reflections in General
Suppose you were in a room with no acoustic treatment listening to a mix, and a lot of sounds enter your ears, both reflected and direct sound.
However, for smaller rooms, there will not be much space between your side walls and the speakers, hence there will also be a strong reflection. This strong reflection is undesirable because they arrive at your ears in a loud and delayed manner.
Early reflections from your monitor speaker will affect the frequency response and may result in many dips and peaks in the frequency spectrum.
Because you are hearing both your recording studio space and the space inside the mix, this can also pose problems when attempting to add reverb to create space in your mix. As a result, even though you may not realize it, the reverb in the room is what you are hearing.
We have the ceiling, the floor, the desk, and the side walls. These areas need acoustic treatment to produce a reflection-free zone around your listening position without significant early reflections.
You can minimize early reflections by putting some large acoustic panels on the side parallel walls, and an acoustic panel or two hovering above the listening position.
Next, we come to the desk or floor, which is often disregarded but maybe just as troublesome as the others.
If your monitor speakers are pretty far in front of you and the reflection is coming from the floor, you’ll need to treat the floor by laying a carpet.
If you can afford it, use a tilted workstation to deal with tabletop reflections. The slanted desk will direct the reflections significantly lower so that instead of hitting your ears, they will land someplace behind you.
Dealing with Bass Buildups
In an untreated room, an increase in loudness can happen at specific frequencies, especially lower ones.
Bass traps are employed where standing waves or resonant frequencies tend to accumulate. The low end, between 20 Hz and 700 Hz, is typically where these significant problems arise and must be addressed since we frequently make translation errors.
For example, when a 70 Hz peak sounds too loud in your home studio, you might unintentionally dial down on 70 Hz in your EQ when it might just be a standing wave (a room mode at its resonant frequency). When you finally listen to the mix in a different setting, such as in a car, you might be surprised that the bottom end is absent.
We can improve the listening experience by using bass traps and large acoustic panels made of thicker material that can capture and absorb low frequencies. Since bass builds up where two borders converge such as wall corners, placing bass traps there is the simplest solution.
Also, there is a lot of bass buildup where three separate spots converge, such as the intersection between two walls and the ceiling. Therefore, installing bass traps and installing acoustic treatment in the room’s corners helps us absorb low frequencies and attempt to get a flatter response across the frequency range.
Using Air Gaps
An air gap can extend the frequency response, allowing you to absorb even more low-end frequencies than you would typically be able to if the treatment used absorptive treatment material that was simply flat on the wall.
Air gaps can be added behind treatments, wherever they are just flat acoustic panels or those corner traps in the corners of ceilings.
Dealing with Back Wall Reflections
After you’ve addressed the bass buildups and early reflections, you should consider the back wall.
In larger rooms, diffusion is often used alongside absorption to scatter sound energy. In contrast, in smaller rooms, diffusers are debatable because they are generally too close to the listener to be genuinely effective.
The treatment for the back wall is less crucial, but if you’ve completed the first two steps and still want to enhance the sound, or if you have extra acoustic panels, you can use them for the rear wall.
In a professional studio, diffusers are typically installed on the rear wall or ceiling between the listening position and the sound source, which is expensive.
In smaller home studios, the approach is to have a soft sofa in the back of the room, which functions as an absorber to some degree, and to have shelves randomly loaded with books or various stuff above these.
However, in tiny spaces where the back wall is closer than six feet from the listening position, you’re more likely to succeed at absorbing the sound than dispersing it using diffusers.
If your home studio is large enough to use diffusers, you may use semi-cylinders (bent ply with Rockwool filling for damping), split logs, wooden blocks, and even old CDs mounted onto slanted wooden blocks to break up those early reflections.
You don’t have to spend a fortune to see concrete improvements. However, it isn’t easy to anticipate how much improvement there will be for any particular strategy, so testing is essential.
One inexpensive acoustic solution that ought to work well in medium-sized rooms is to cover a sizable portion of the back wall with Rockwool trapping that is several inches deep, cover that with textile fabric, and then install some vertical split-log style fence posts on top with finger space gap between each one.
While the Rockwool behind will absorb some of the sound energy in the mid-range and low frequencies, the curved surfaces of the posts will offer some effective high-frequency scattering in the horizontal plane.
Front Wall
One more area that people frequently wonder about is the front wall, which is the wall behind the speakers you are facing. Since speakers are directional, the direction of all of the significant sounds will be pointed towards your ears and will bounce off the first reflection points, but you have already addressed those.
You don’t need to worry too much about treatment on the front wall. Since you have acoustic panels on the back wall, sounds from the monitors will be silent by the time they bounce off the panels and return to the front wall in front of you. Therefore, you don’t need any acoustic treatment on the front wall behind those speakers.
However, having bass traps on the front wall in those corners is essential since low-end is omnidirectional, meaning it will come out of the speakers in any direction. The bass sounds will be reasonably strong at the front corners where the monitors are. So that’s a crucial spot to install bass traps in the region behind the speakers.
Conclusion
The objective of home studio acoustic treatment is to treat the surroundings to make them sound good when recording or mixing. We are attempting to establish a reflection-free zone for mixing by providing a lot of absorption surrounding the mixing region.
Treating the home studio space minimizes the reverb and improves the acoustic environment with a flatter frequency response for mixing and recording. This makes it easier to hear modest EQ adjustments, and mixes will transfer better.
Hopefully, this article has provided you with sufficient knowledge to carry out acoustic treatment for your room that will take your audio game to the next level. Don’t be afraid to get your feet wet and try something out!