4 Key Points on How to Record Acoustic Guitar Like a Professional
Whether you want to record an acoustic guitar video to share your music with the world or simply keep a record of your progress, recording is an essential part of your musical journey.
But when it comes to recording acoustic guitars, it’s a whole different ball game compared to recording electric guitars. While their focus is capturing the perfect sound for guitar amps, it’s all about the instrument for acoustic guitars.
There are many considerations to be aware of, and I’ll give you 4 key points on how to record acoustic guitar.
1. The Basic Equipment You’ll Need
Acoustic Guitar
First things first, you’ll need an acoustic guitar. I know what you’re thinking, ‘Well, duh!! You can’t record an acoustic guitar without an acoustic guitar!’
However, this is worth mentioning because some of you might run off to get the most expensive acoustic guitar with a piezo pickup, like a Taylor 812ce 12-Fret, only to realize later that you don’t quite like the recorded sound of an acoustic guitar pickup. You’ll be surprised how much better it will sound recording through a microphone, which we’ll get to later.
Furthermore, if you’re just starting out, it is more important to hone your guitar skills; that alone will improve your recording much more than any gear you can find.
You can start with a highly popular beginner’s model like the Yamaha FG800 that will give you the most bang for your buck. For just $200 (at the time of writing), it can provide a full, rich, and snappy resonance. It is lightweight and durable, has good intonation at every fret, and can stay in tune for a long time.
Microphone
As mentioned, recording acoustic guitar through a microphone will sound more beautiful than plugging the pickup directly into an audio interface because you can get the rich, full sound of the entire acoustic guitar.
There are three main types of microphones you can choose from based on their transducer type:
Dynamic Mics
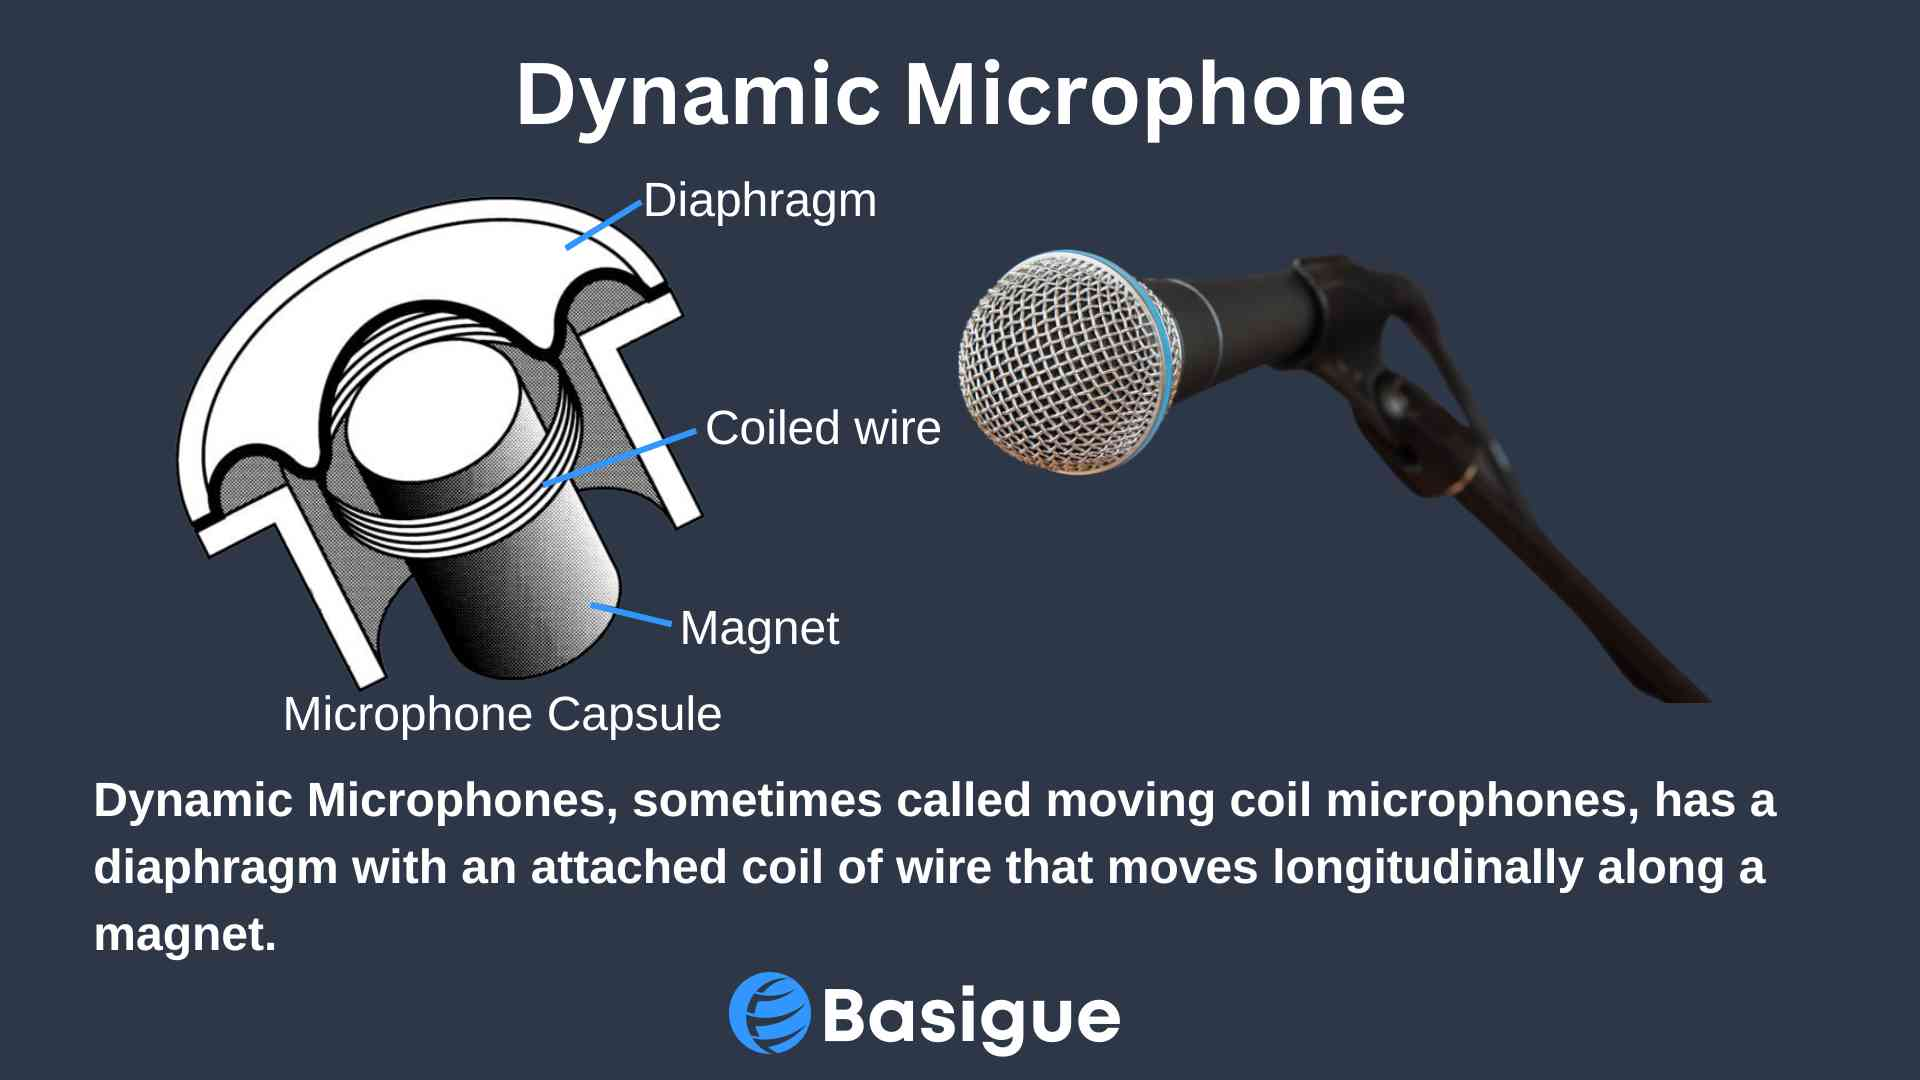
Dynamic mics excel at handling high sound pressure levels; hence they’re great for recording loud guitar amps and drum kits. They also reject background sound well, making them popular podcast microphones.
However, they are passive microphones (mics that do not require phantom power) that lack clarity in high frequencies and tend to roll off in the bass, making them unable to fully capture the richness of an acoustic guitar’s highs and the warmth of its bass.
You could still use a dynamic mic like the Shure SM7B for single notes and arpeggio-type playing, as it tightly captures the string sounds and minimizes the overtones of the high ends.
Condenser Mics
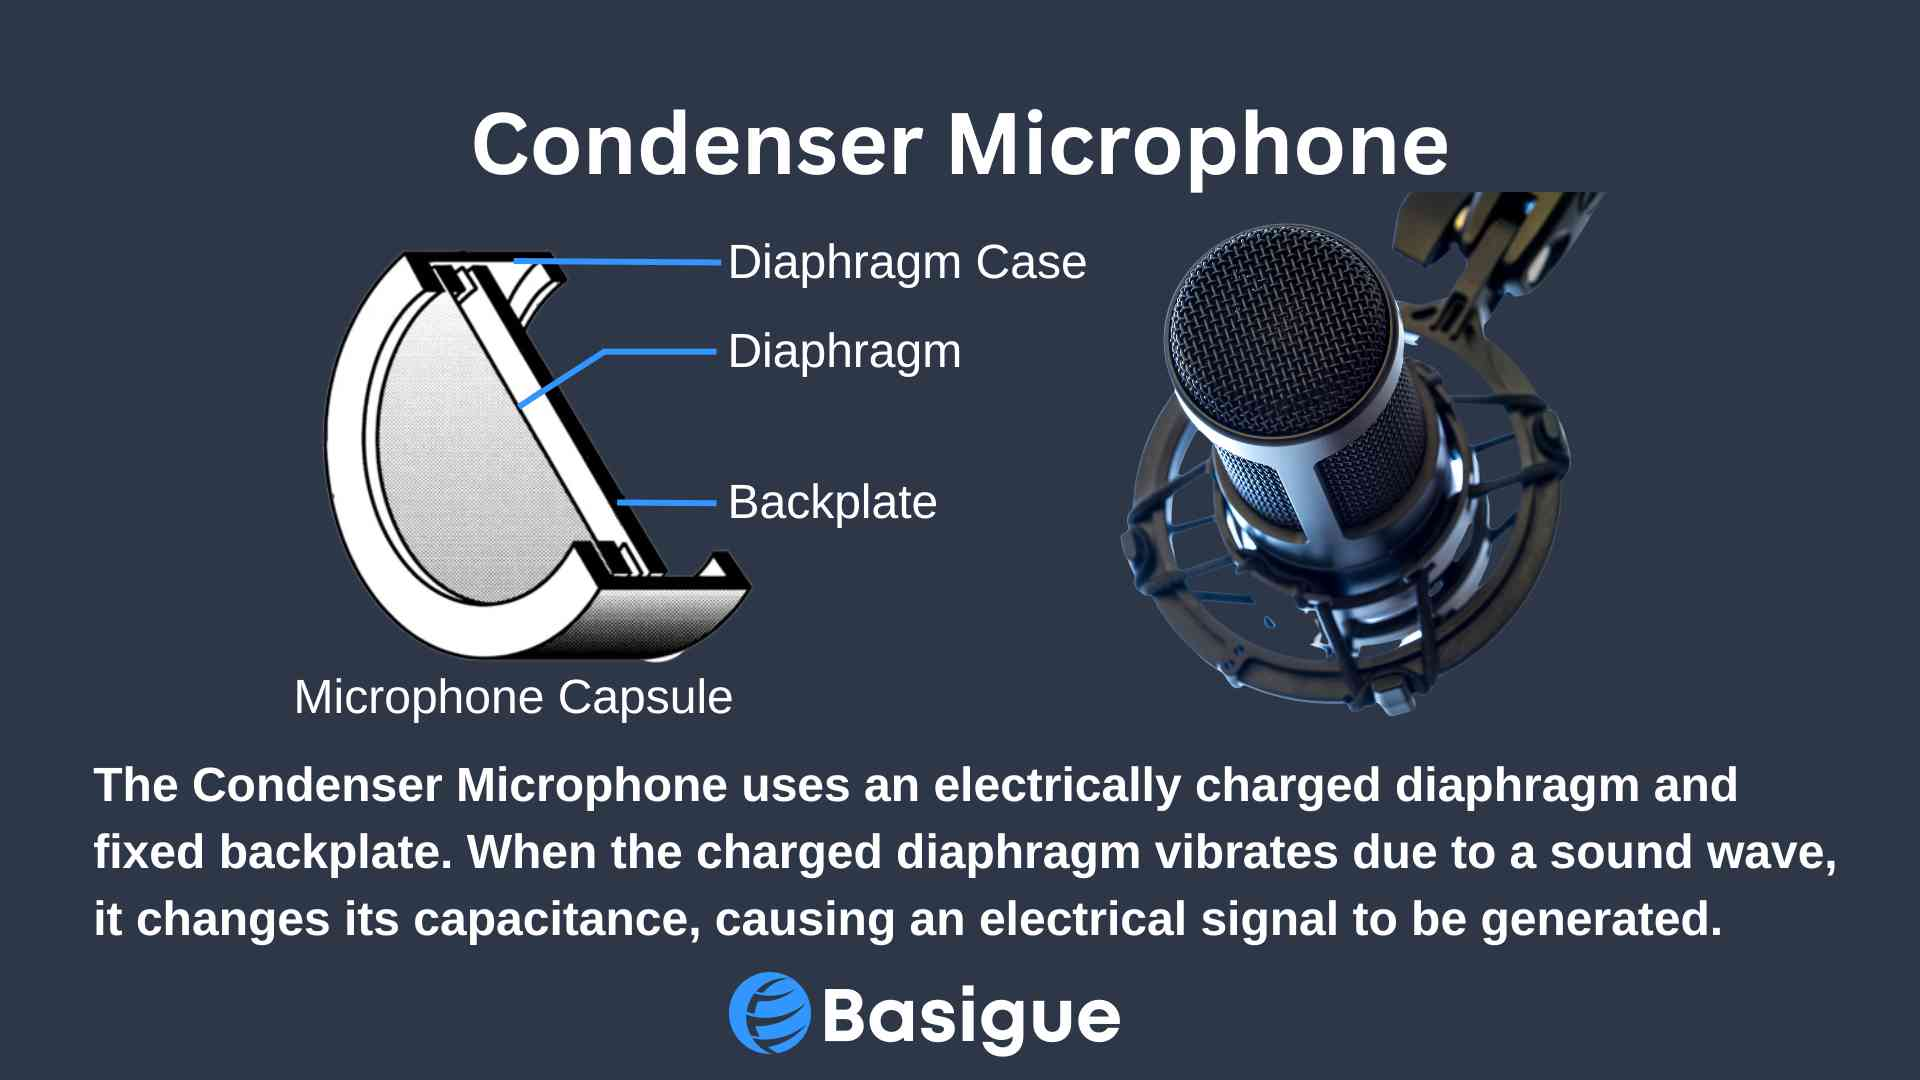
Condenser mics are ideal for acoustic guitar recording because they are highly sensitive to sound, allowing them to pick up subtle details clearly, especially in higher frequencies.
They have a flat frequency response, meaning they will accurately represent the recorded audio without many colorations. They often have a wide frequency response, allowing them to pick up bass and treble notes well.
They also have a cardioid polar pattern which allows them to pick up sounds from the front while rejecting noise from all sides, which means they won’t pick up wall reverberations traveling to the back of the mic.
Small diaphragm condenser mics have a lighter mass, giving them a fast transient response. They can pick up fast beats and sounds of string instruments and percussion. Small diaphragm capsules are also often used for shotgun mics, and they are highly directional mics which makes them ideal for filmmaking. If you are interested, you can check out our shotgun mics recommendations.
Large-diaphragm condenser mics have more mass, making them better at capturing bass tones than small-diaphragm ones. Hence, large diaphragm condenser microphones are often the most popular choice for recording acoustic guitars due to their warm and smooth sound.
It is important to note that most condenser microphones require 48V phantom power.
Ribbon Mics
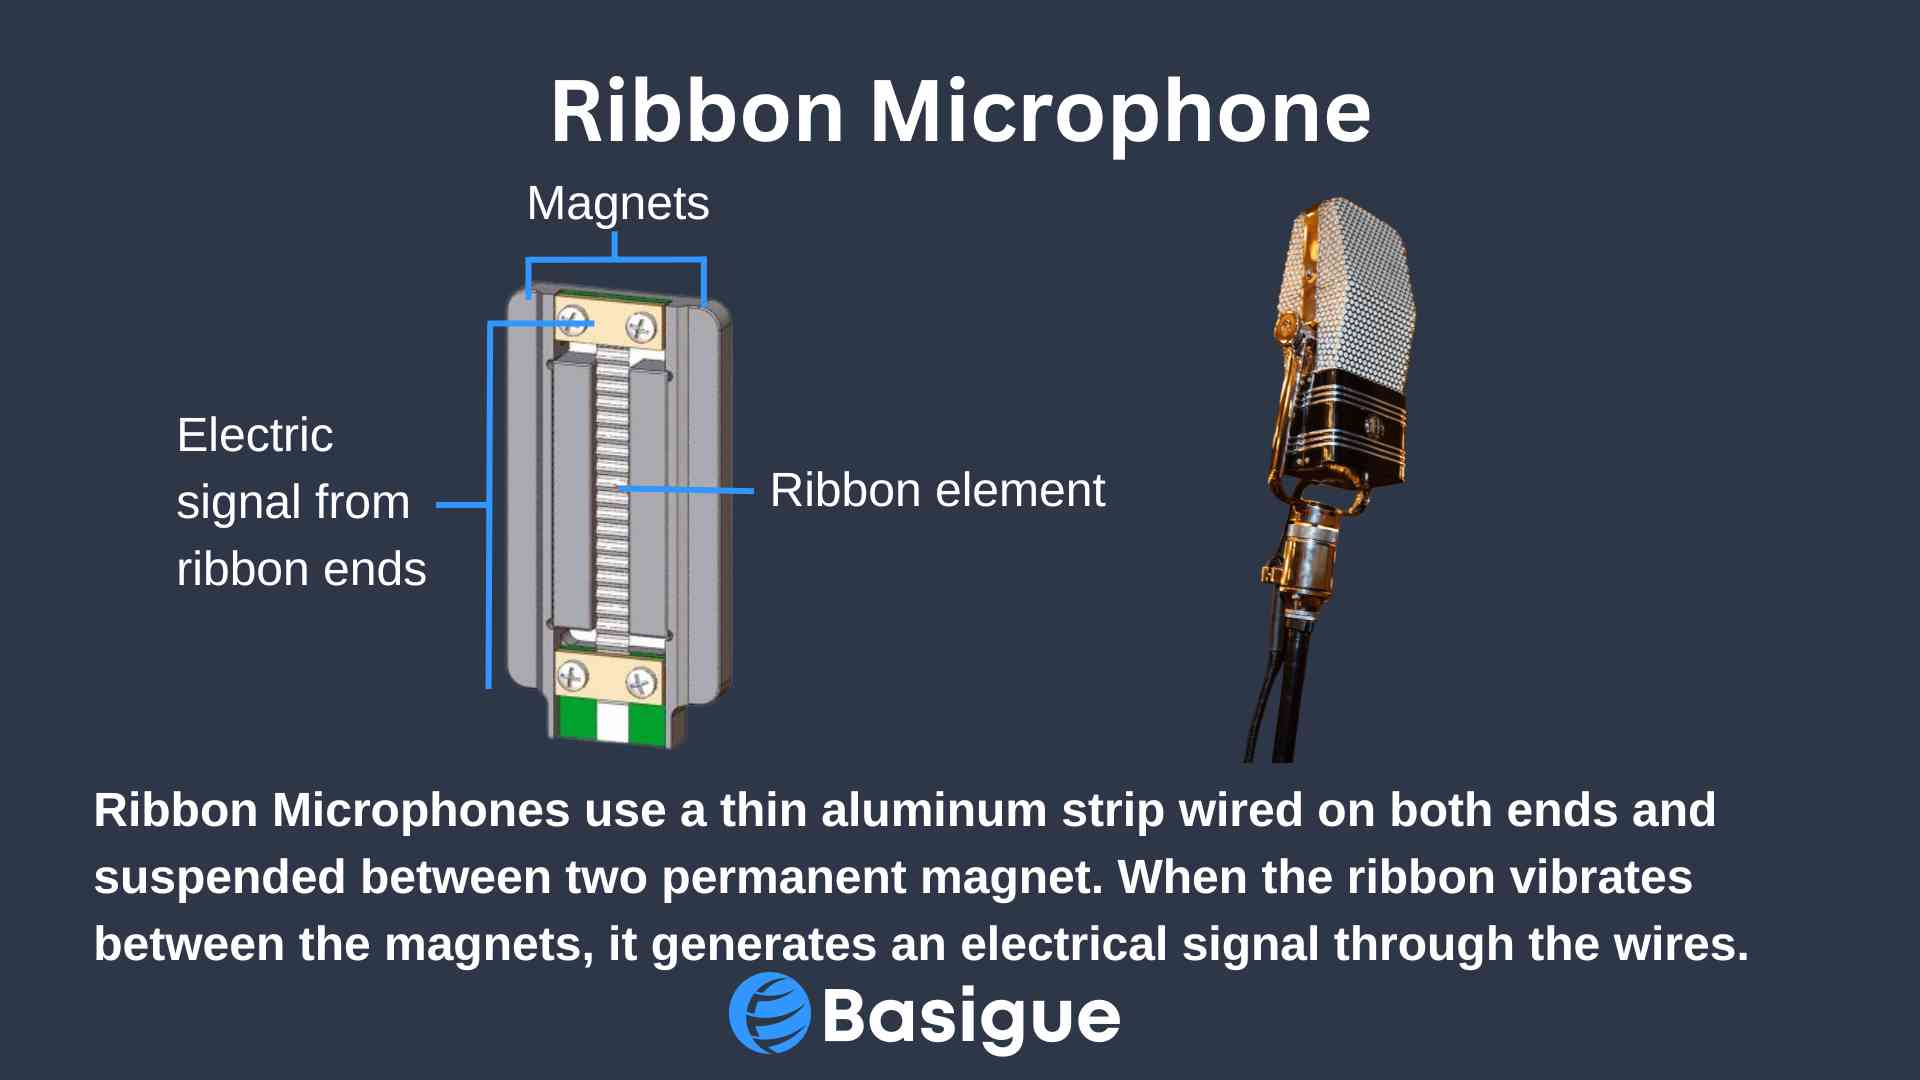
Ribbon mics are the old schoolers popular in the 1930s and 1940s. If you don’t know what they sound like, imagine those vintage, sultry voices from old radio stations.
Ribbon mics have an incredibly smooth and dark tone, allowing them to pick up the warmth of an acoustic guitar that neither a condenser microphone nor a dynamic mic can.
However, they are often expensive compared to condenser mics and dynamic mics. If you have the budget, consider using a ribbon mic with a condenser microphone to capture the warmth of the mids and lows and the crispiness of the high ends of your acoustic guitar.
We have amazing recommendations for ribbons mics in this article.
Audio Interface
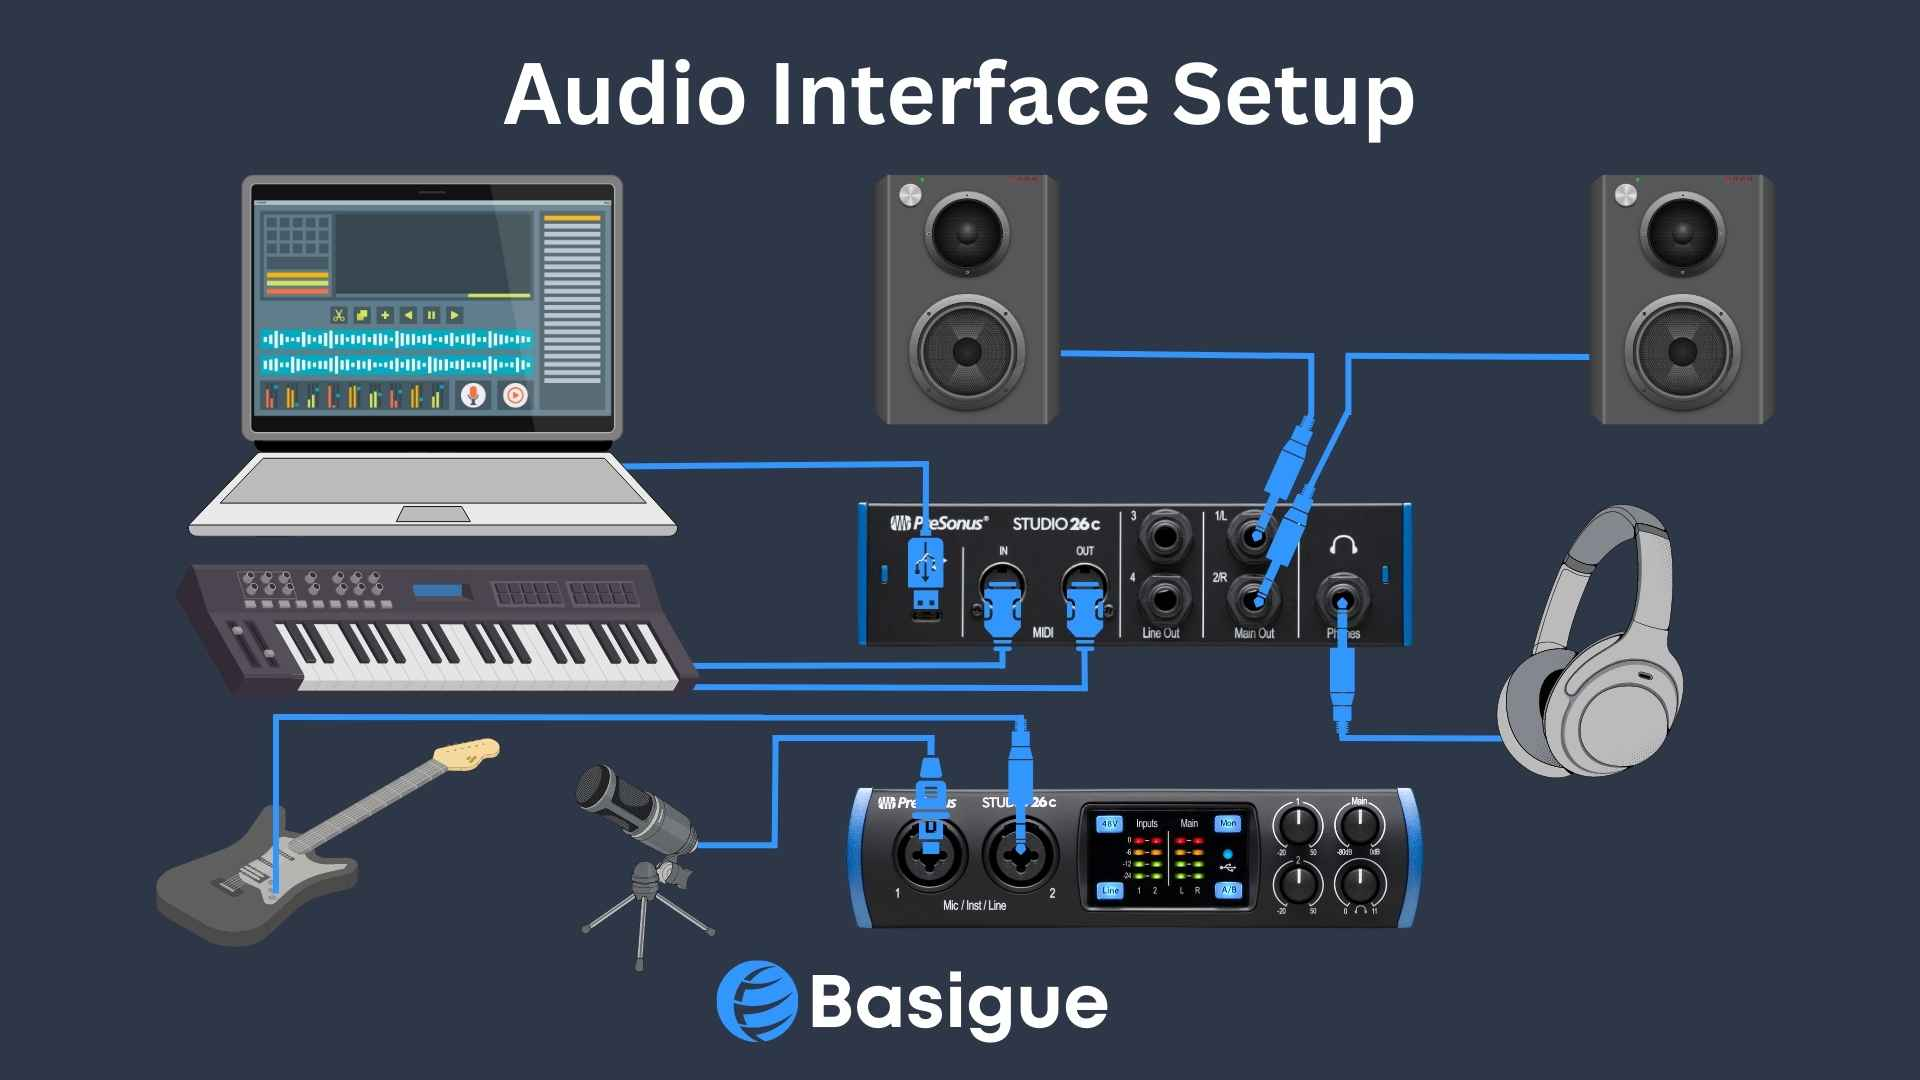
An audio interface is an external sound card with a digital-to-analog converter that converts an analog signal from a microphone or instrument to a digital signal for your computer.
Modern audio interfaces also have built-in preamps to boost low-level microphone signals and phantom power for condenser mics.
You will also need a pair of XLR cables for connecting your microphone to the audio interface. While bypassing an audio interface to connect directly to your computer using a USB microphone is possible, they never sound quite as good as XLR microphones.
If you are looking for an affordable audio interface, we have some great recommendations for audio interfaces with dual combo jacks for connecting two microphones to record your acoustic guitar.
Computer
You need a computer like a PC, laptop, or Mac with a digital audio workstation (DAW) like Ableton Live to edit, mix and master your acoustic guitar recording.
You’ll need a decent computer to run your DAW smoothly, minimally one with an i5 processor, at least 8GB of RAM, and 256GM of storage.
But if you can afford it, you should get one with higher specs like one with an i7 CPU, 16GB RAM, and 1TB storage.
We have some great recommendations for laptops if you’re considering getting one.
2. Things to Do Before Starting a Recording
Don’t think you can just pluck your acoustic guitar, hum a tune, and expect to have a hit guitar recording. Making a stellar acoustic guitar recording takes more than just skills and equipment.
You’ll need to set up a proper home recording studio to achieve that crisp, clear guitar sound that’ll make your listeners swoon.
Now, before you start sweating and thinking it’s gonna cost you an arm and a leg, we’ve got a guide for beginners that’ll walk you through setting up a home studio without breaking the bank.
But if you’re still not ready to dive into a full-blown studio setup, there are a few things you can do to maximize your guitar sound quality:
Room Acoustic Treatment
Before starting room acoustic treatment, deal with any possible noise sources that could bleed into your recording space. Trust me, you don’t want your acoustic guitar recording to be accompanied by your neighbor’s dog barking or cars whizzing by.
So, choose a quiet time of day and a room isolated from the hustle and bustle of the outside world because acoustic treatment cannot prevent unwanted noise from creeping into your recordings.
Ensure that you do not record in a room with many hard surfaces. This will only contribute to reverberations that will muddy your acoustic guitar recording. It is better to record in a well-furnished space with a sofa, bed, and curtains that will help absorb reflections.
Place fiberglass absorption panels or diffusers along the side walls to prevent reflected sound waves. Put base traps at the corners of the room with bass buildups.
If you can’t afford acoustic panels, you can use everyday items like mattresses, curtains, and blankets to treat your recording space. Also, ensure that the floor you record on is carpeted.
For a more detailed and comprehensive guide, check out our article on how to acoustically treat your recording studio.
Use New Guitar Strings
Picture this: You’ve finally nailed the perfect take after hours of recording acoustic guitar, but when you play it back, something just sounds…off. Well, guess what? It’s probably those two-year-old strings you’ve been stubbornly holding onto. They’re dull, lifeless, and completely robbing your recording of the high-end sparkle it deserves.
We cannot emphasize enough the importance of re-stringing your guitar to bring back that brightness in your acoustic guitar recording. And don’t worry, you can always dial back the brightness during mixing if you overdo it. But trying to add sparkle to a dull sound? Good luck with that.
Tune Your Guitar
While most guitarists would diligently tune their guitars before starting a recording, they sometimes overlook tuning a guitar when a capo is on. This is important because a capo can sometimes cause a tuned guitar to be slightly off-tune.
Setting the Input Gain
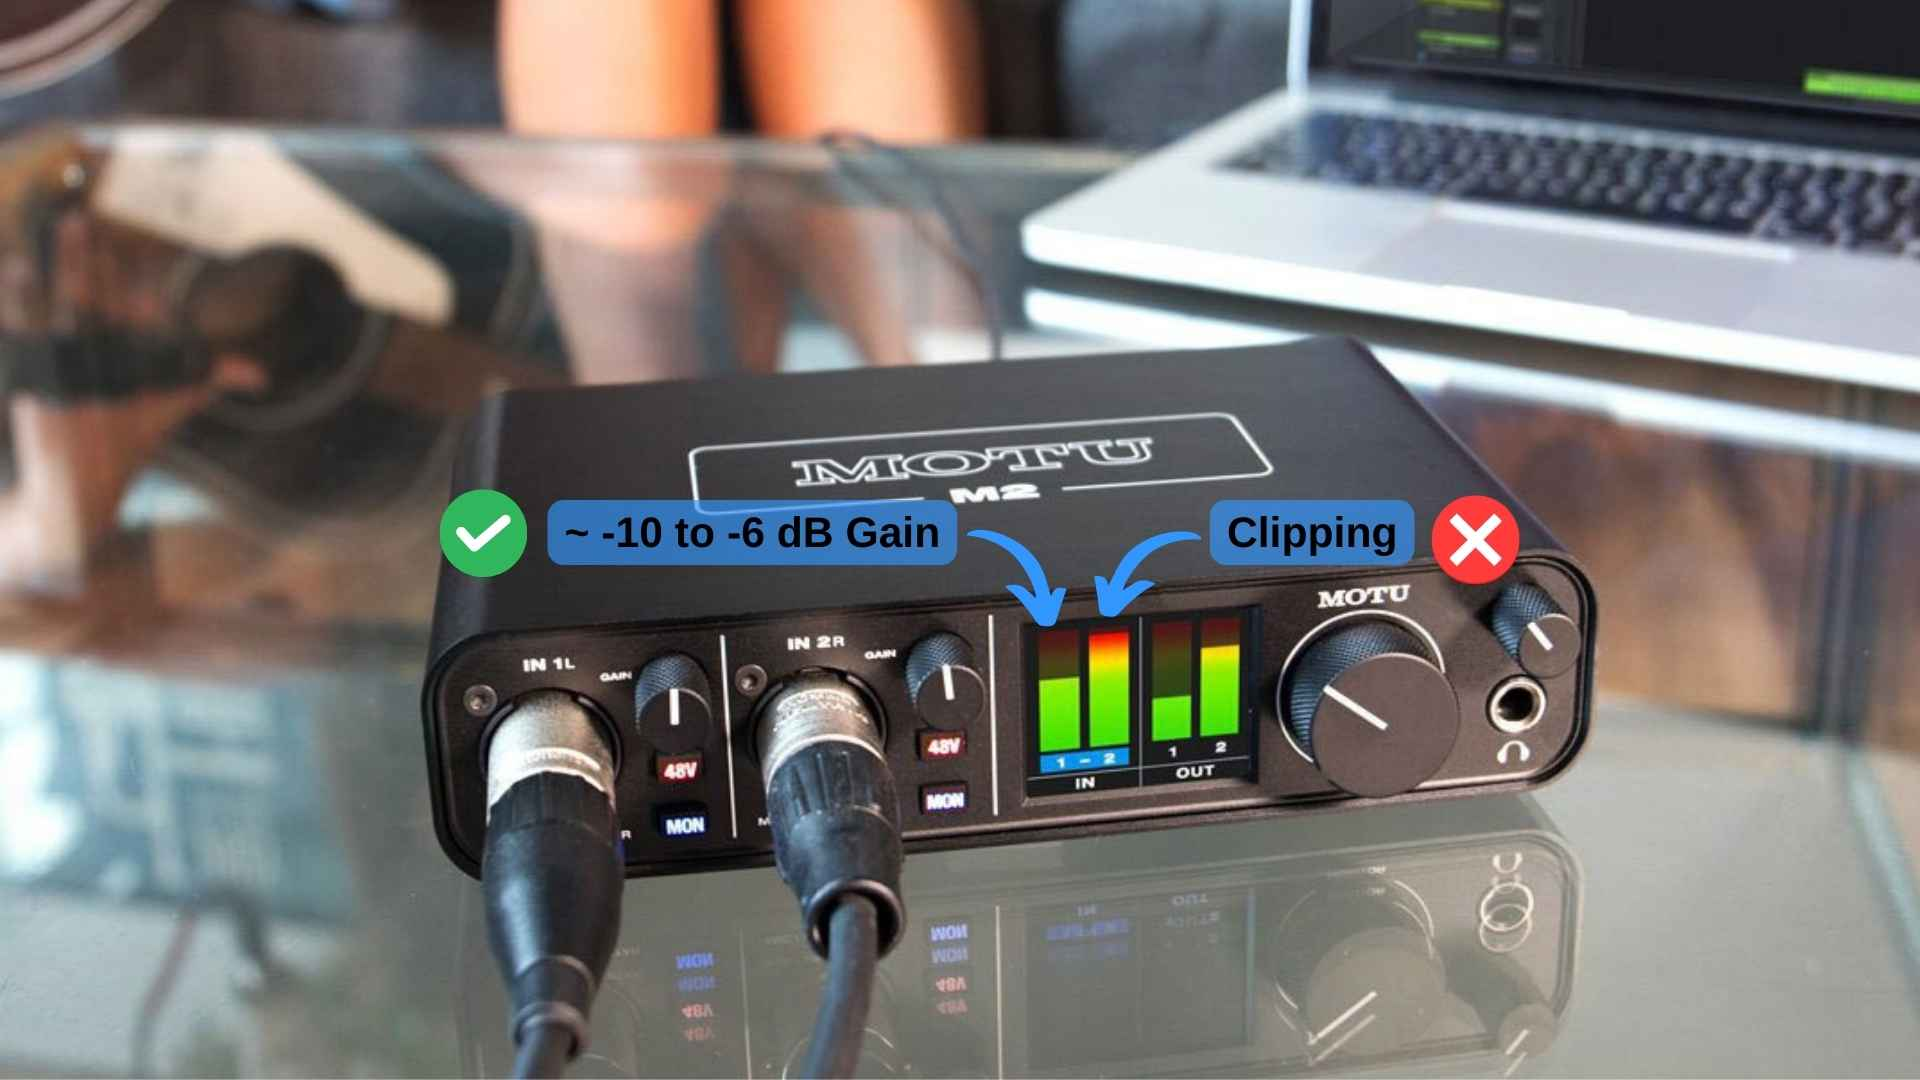
The way to achieve a clear and punchy guitar recording is to set the correct input gain on your audio interface and digital audio workstation.
To start, you need to play your acoustic guitar at its loudest while considering the distance from the microphone. Then, adjust the input gain on your audio interface to a healthy level, making sure not to hit the red on the metering gauge, which is a sign of peaking or clipping that can ruin your guitar recording.
But beware! Your playing style can affect the gain levels, too. If you set the gain while playing softly and then suddenly hit a heavy strum, you risk overdriving the signal.
Once you’ve set your gain on the interface, you will need to do the same on your DAW. Adjust the input gain levels using the slider (or any method used by your DAW) until you hit somewhere between negative 10 to negative 6 dB, providing a good dynamic range for your acoustic guitar recording.
Getting the input levels right is critical, as the raw recording is the foundation for everything else you add, such as compression or EQ. A good input level ensures that your guitar recording has a strong signal on the quietest and loudest parts without distortion.
Remember, the gain stages are interconnected, and any changes you make at the guitar level will affect the entire signal chain. So, if you notice any distortion, work backward along the chain to identify where the excess gain is coming from.
3. Recording Options
Direct vs. Miked Sounds
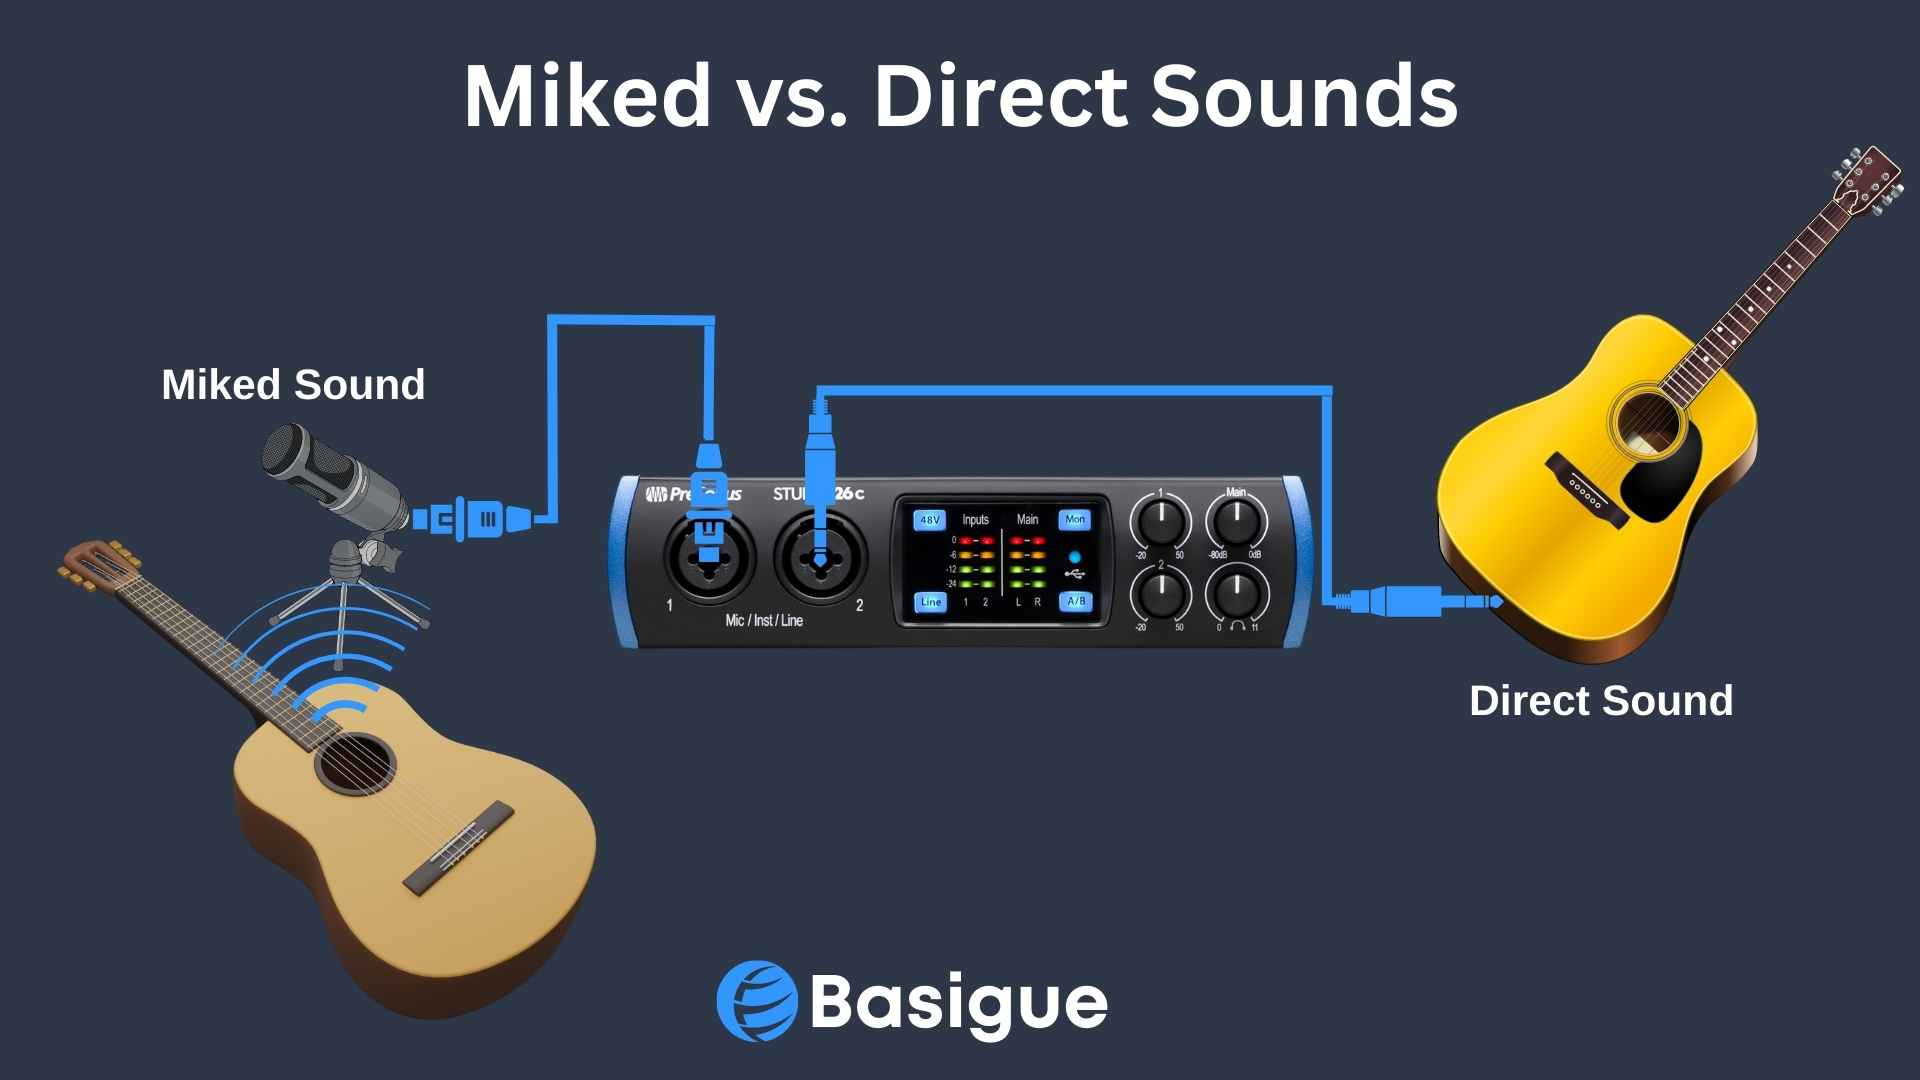
I know we have mentioned this several times in this article already. Still, if you own an acoustic guitar with a built-in pickup system, like a piezo, it’s easy to get carried away and plug it directly into an audio interface to start recording.
Don’t forget that every part of your acoustic guitar produces a unique sound. From the strings’ high-end vibrations to the soundboard’s resonance and the boomy low-ends of the sound hole, each one contributes to the overall character of your guitar tone.
And let’s not forget about the impact of the environment; the treatment of the room you’re recording acoustic guitar in also plays a huge role in how it sounds.
So while a pickup system might be a more convenient setup, it can only capture a fraction of what’s actually going on. You need a microphone (or two mics if you can afford it) to get the full picture.
Mono vs. Stereo Miking
Are you torn between using one or two mics? Here’s the lowdown on mono and stereo miking to help you make the right choice for your acoustic guitar recordings.
Mono recording is the way to go if you’re after a quick and easy setup with no fuss. With only one mic, you don’t have to worry about pesky phasing issues, and it’s perfect for thickening up your guitar tracks.
But if you want to take your recording to the next level, a stereo recording will get you the best sound. With two guitar mics, you can create a fuller, more dynamic sound that adds depth and width to your recordings.
Stereo recording acoustic guitar is especially important in songs with a sparse arrangement where the acoustic guitar is the primary stand-out instrument.
However, you should not record with stereo mics when you have several acoustic guitar layers with different rhythmic patterns. It will sound messy, and you won’t be able to hear a distinct separation between the two layers.
Double Tracking When Using a Single Microphone
Are you tired of your recordings sounding dull and lifeless with just one microphone? Double tracking can solve your single-mic problems by adding depth and dimension to your recordings!
Double tracking is recording the guitar track twice as similarly as possible and panning each guitar track to opposite sides. This creates a wide stereo sound with unique nuances in timing and dynamics between the two performances.
But don’t be fooled by recording techniques that mimic double tracking, such as duplicating and delaying one side. These recording techniques just don’t have the same expertly performed double-track sound. Also, recording once in stereo using two guitar mics is not the same as double tracking.
Double tracking fills sonic space and gives your recordings a more complex character. Clean strums, single lines, and muted rhythms can stand out in the mix without turning them up. This is especially useful for distinguishing your acoustic guitar as the main solo instrument when other instruments are in the mix.
You get different transients, tones, and phase shifts with each pick stroke, resulting in a richer and more dynamic acoustic guitar sound. Even if you’re not the most skilled player, the fine-grained expressions of double tracking will add life to your recordings.
However, if you don’t play well, the differences in each take can lead to confusion when trying to create a consistent melody.
Similar to stereo recording, double tracking should not be used when there are several guitar layers with distinct parts, as it will cause the mix to sound messy.
4. Microphone Placement
Mono Microphone
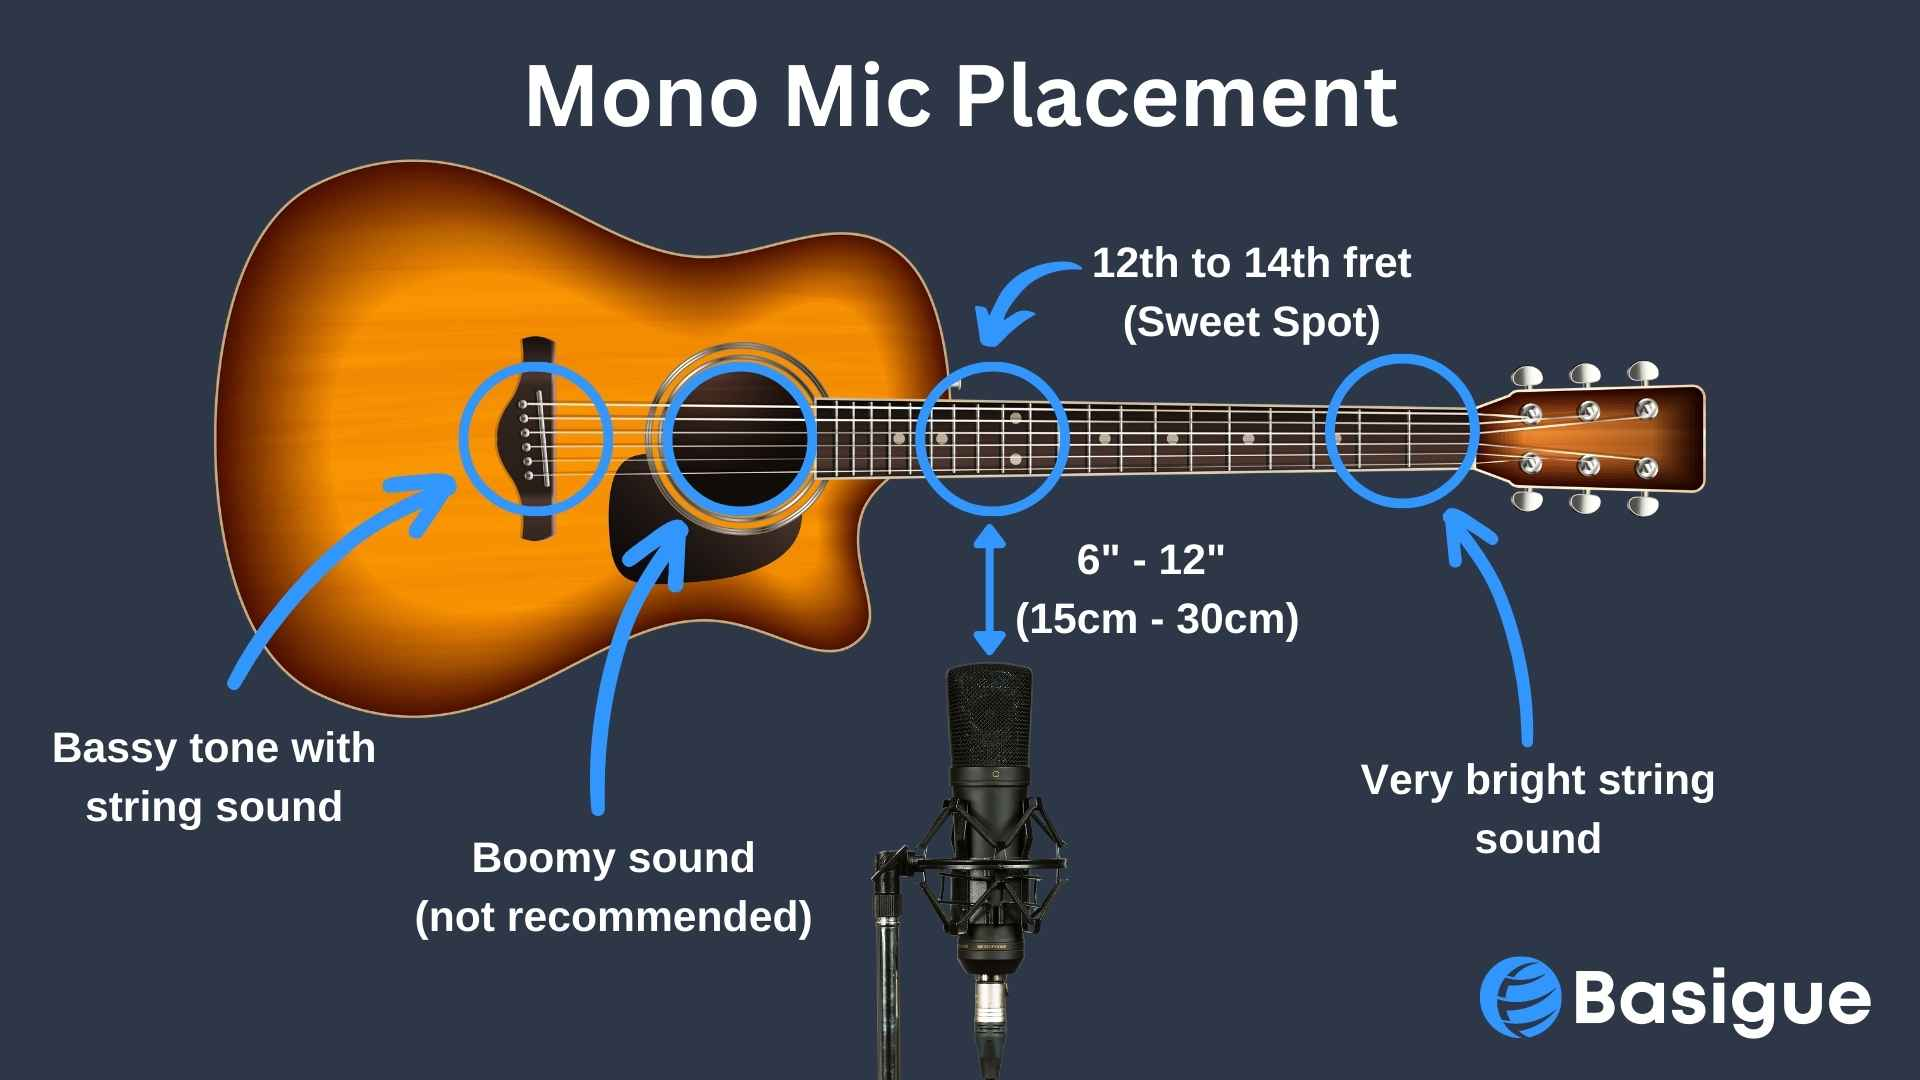
The advantage of using only one mic is that it eliminates any phase issues caused by multiple mics, but it also means you’ll lose out on the stereo image. But don’t worry, if you’re looking for that fuller sound, you can always double-track, as we mentioned earlier.
The most popular mono mic placement to get a natural and balanced sound is to position your mic about 6 to 12 inches directly in front of the 12th fret, where the neck meets the body.
This mic positioning gets you the warm tone of the guitar body and the brighter sound of the neck and finger noise. It also avoids directly recording in front of the sound hole, which you would want to avoid due to its unpleasant boomy sound.
If you’re looking for a brighter acoustic guitar sound with high-frequency details, move the microphone higher up the fingerboard. On the other hand, if you want to capture a more bassy guitar tone and the delicate nuances of fingerpicking, position the mic in front of the bridge.
The closer the mic is to your guitar, the louder the guitar will be relative to the room sound, which helps to compensate for less-than-optimal room acoustics.
However, remember that cardioid mics exhibit a phenomenon known as the “proximity effect” that produces more bass as you move closer to the sound source, so you’ll need to experiment to find the right balance.
Spaced Pair Configuration
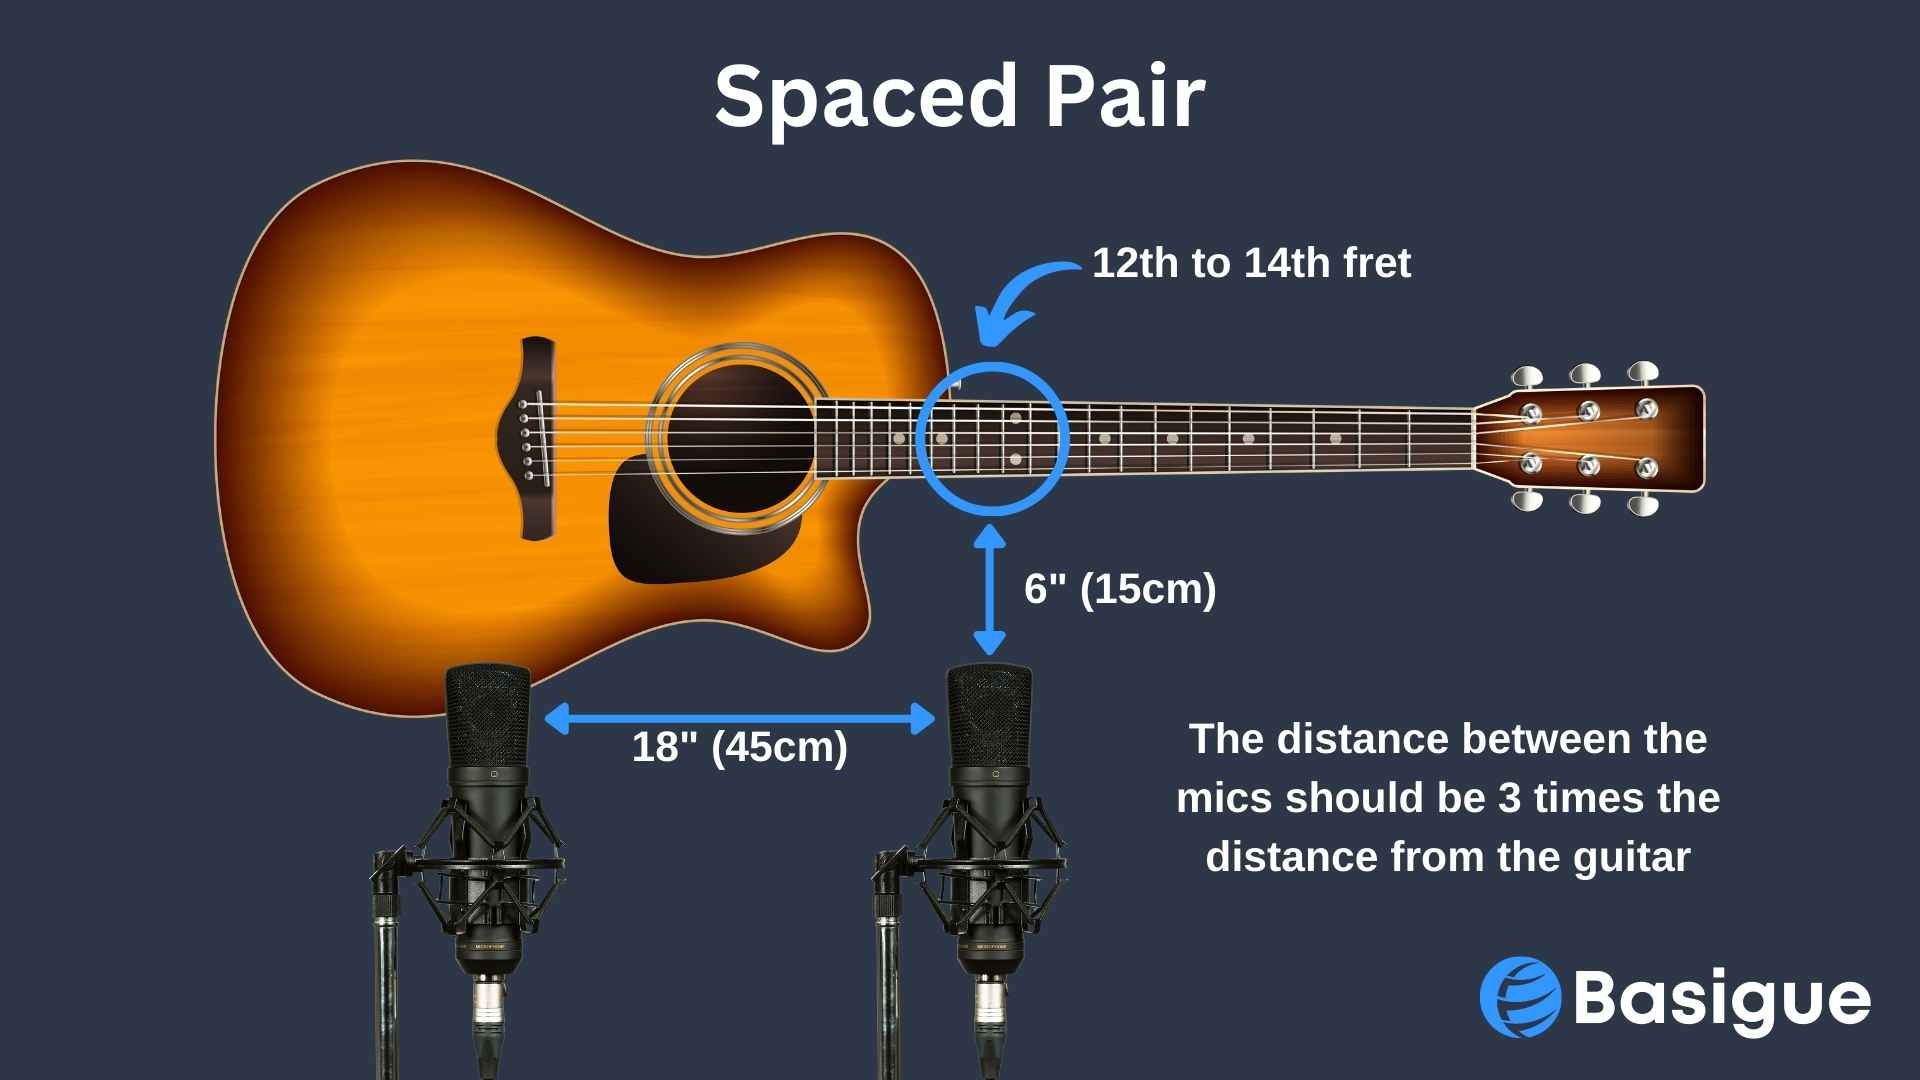
The spaced pair technique involves using two mics, one placed at the 12th fret and the second mic near the bridge, pointing towards the body or sound hole.
This microphone placement can create a beautiful stereo image by adding depth and dimension, as well as capture the warmth and richness of the guitar body and the crispness of the strings.
However, when using this method, phasing can be a major concern that can result in a thinner sound. To minimize phase issues, many engineers follow the “3:1 rule,” meaning the distance between the spaced mics should be at least three times the distance from the guitar.
Before you start, record a quick single chord on the acoustic guitar and check that the waveforms in your DAW line up in phase. If there are not, try adjusting the placement of one of the microphones until the sound waves are in sync.
When mixing the acoustic guitar sound, you can pan each microphone hard left and hard right to create a spacious and immersive sound. Just make sure to adjust each mic’s gain level to sound good before panning them.
Coincident Pair Configuration (X/Y)
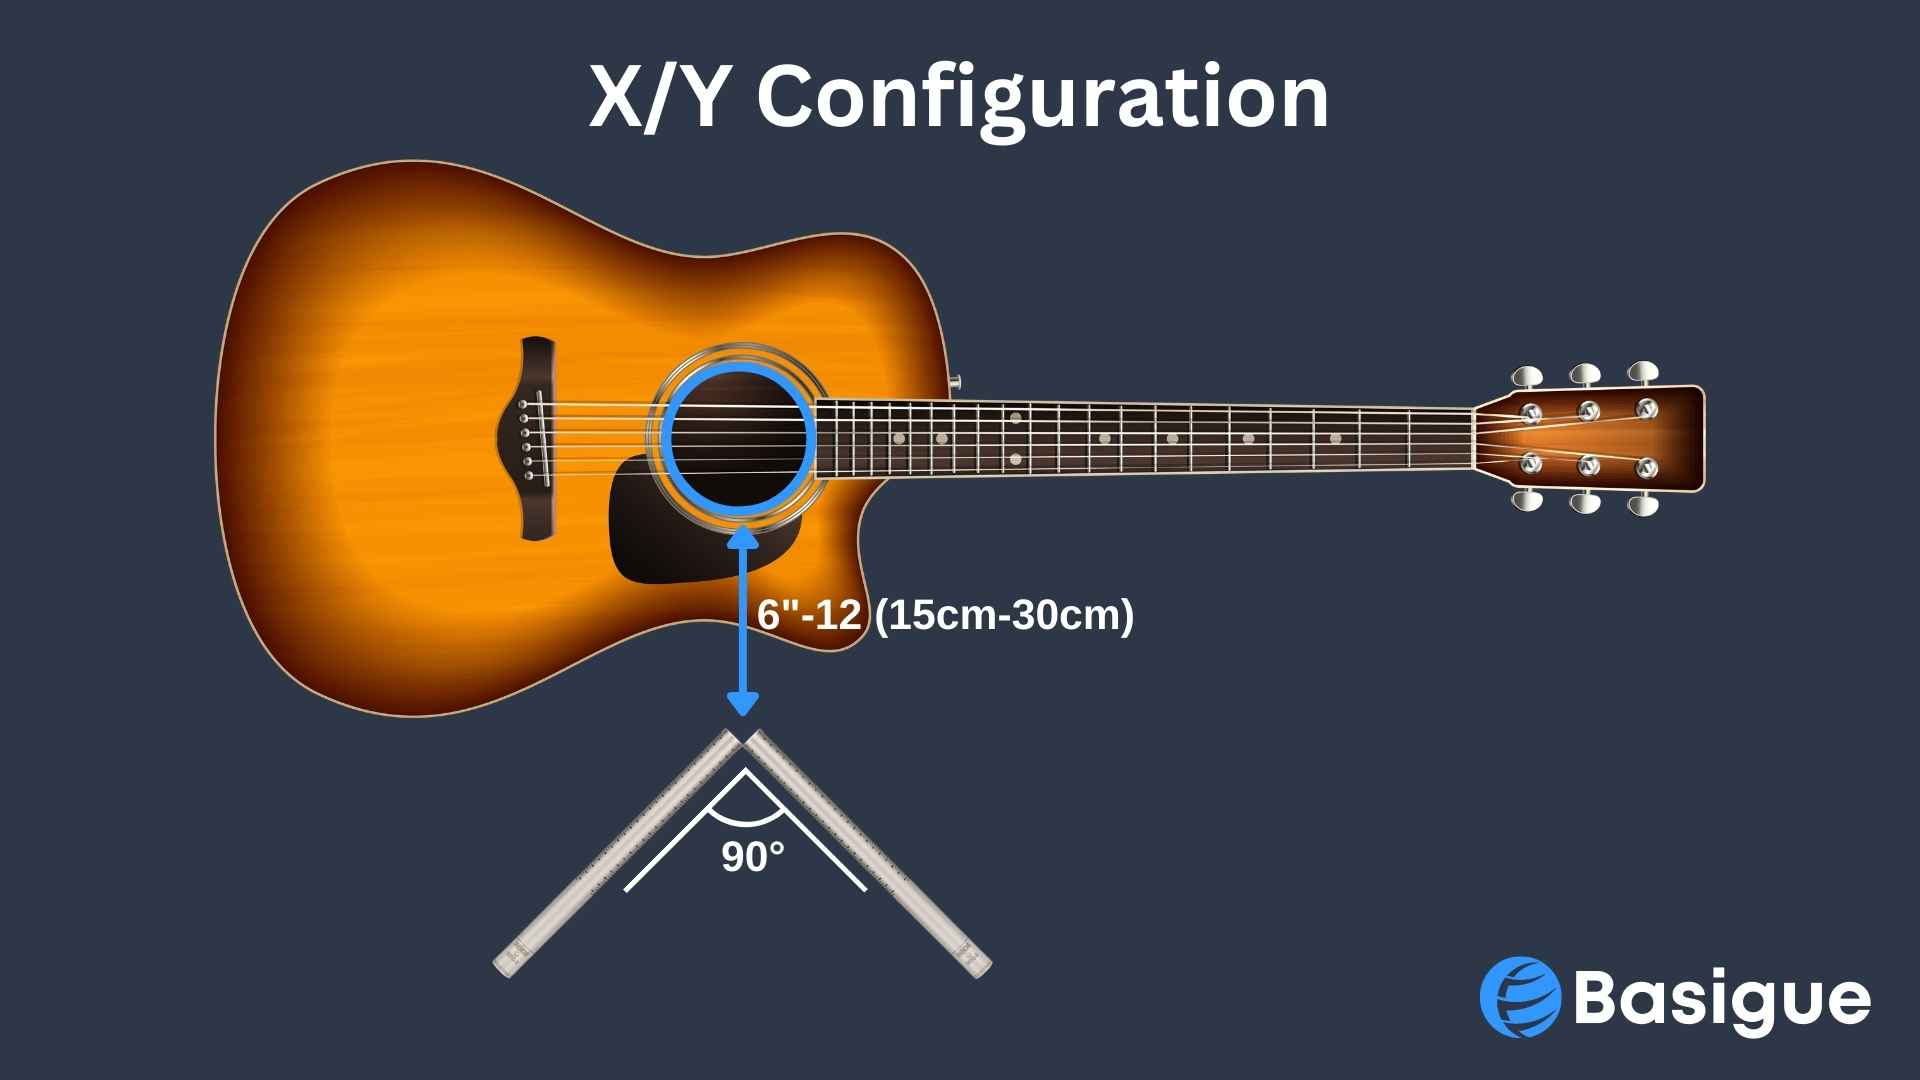
Looking for a stereo mic setup that’s easy to use and hard to mess up? Consider the X/Y configuration. This setup will also help reduce phasing issues and create a pleasant stereo sound.
This microphone placement setup involves placing the tips of a matched pair of small diaphragm condenser microphones close to each other, with their diaphragms at 90° angle.
The matched pair of microphones should then be placed about 12 inches in front of the sound hole, with one microphone pointing at the bridge and the second mic pointing at the neck. This way, you can get the warmth of the body and the highs of the neck without directly recording the bass heavy sound hole.
Also, you wouldn’t want to pan the X/Y mics as extremely as the spaced pair in the mixing process.
Mid-Side Configuration (M/S)

The Mid-Side configuration is one of the microphone techniques to get the best sound for an acoustic guitar recording if pulled off correctly. It involves using a cardioid pattern microphone, a figure-8 microphone, and some processing after the recording to create a natural sound of the room with a spacious stereo effect.
The cardioid pattern microphone will be placed in the same way as a mono mic placement, about 6-12 inches from the 12th fret where the guitar neck meets the body.
Next, place the bi-directional microphone under or above the cardioid microphone with the figure-8 capsule at a 90° angle with the cardioid capsule, pointing towards the sides. This will be used as the room mic, the better the room’s acoustics, the better the recording.
After recording, you will need to duplicate the figure-eight microphone and pan both copies hard left and right, but keeping the cardioid mic at the center. Invert the phase of the duplicate copy, and the amazing stereo sound of the mid-side configuration will suddenly shine through.
Conclusion
Following these tips, you’ll know how to record acoustic guitar, capture its rich and nuanced sound, and bring your recordings to the next level.
First things first, make sure you have the right equipment. Don’t skimp on your microphone – a quality microphone will make all the difference. And don’t forget about the room sound – a little acoustic treatment can go a long way.
Before you start recording acoustic guitar, take some time to prepare. New strings, a well-tuned guitar, and properly setting your input gain can drastically improve the recording. And when it comes to recording options, experiment with different options and find what works best for you.
Finally, don’t forget about microphone placement. Whether you’re using a mono mic, spaced pair, X/Y, or mid-side configuration, experiment until you find the sweet spot. And always trust your ears – if it sounds good, it is good.
However, if you are more keen on learning how to record vocals, check out our article that will guide you on recording vocals without using an instrument.


