Best Blue Yeti Settings For Amazing Vocals and Audio
Introduction
If you’re reading this, chances are you’ve just got your hands on a shiny new Blue Yeti microphone. Or, if you’re still considering whether to add one to your recording setup, you can check out our review of the Blue Yeti microphone.
While it is a superb USB microphone, offering great quality audio and versatility, you will still need the right Blue Yeti microphone settings to get the best sound quality.
We’ll walk you through the best settings for Blue Yeti microphones, ensuring you get the most out of this fantastic piece of audio equipment.
Setting Up the Blue Yeti
Before you can start using the Blue Yeti microphone, you need to ensure that it is plugged into your PC or Mac with the provided USB cable and set as the mic input.
Thankfully, this is a pretty simple process; the Blue Yeti is a USB plug-and-play microphone that does not require an audio interface or any drivers to be installed.
Windows 11 Setup
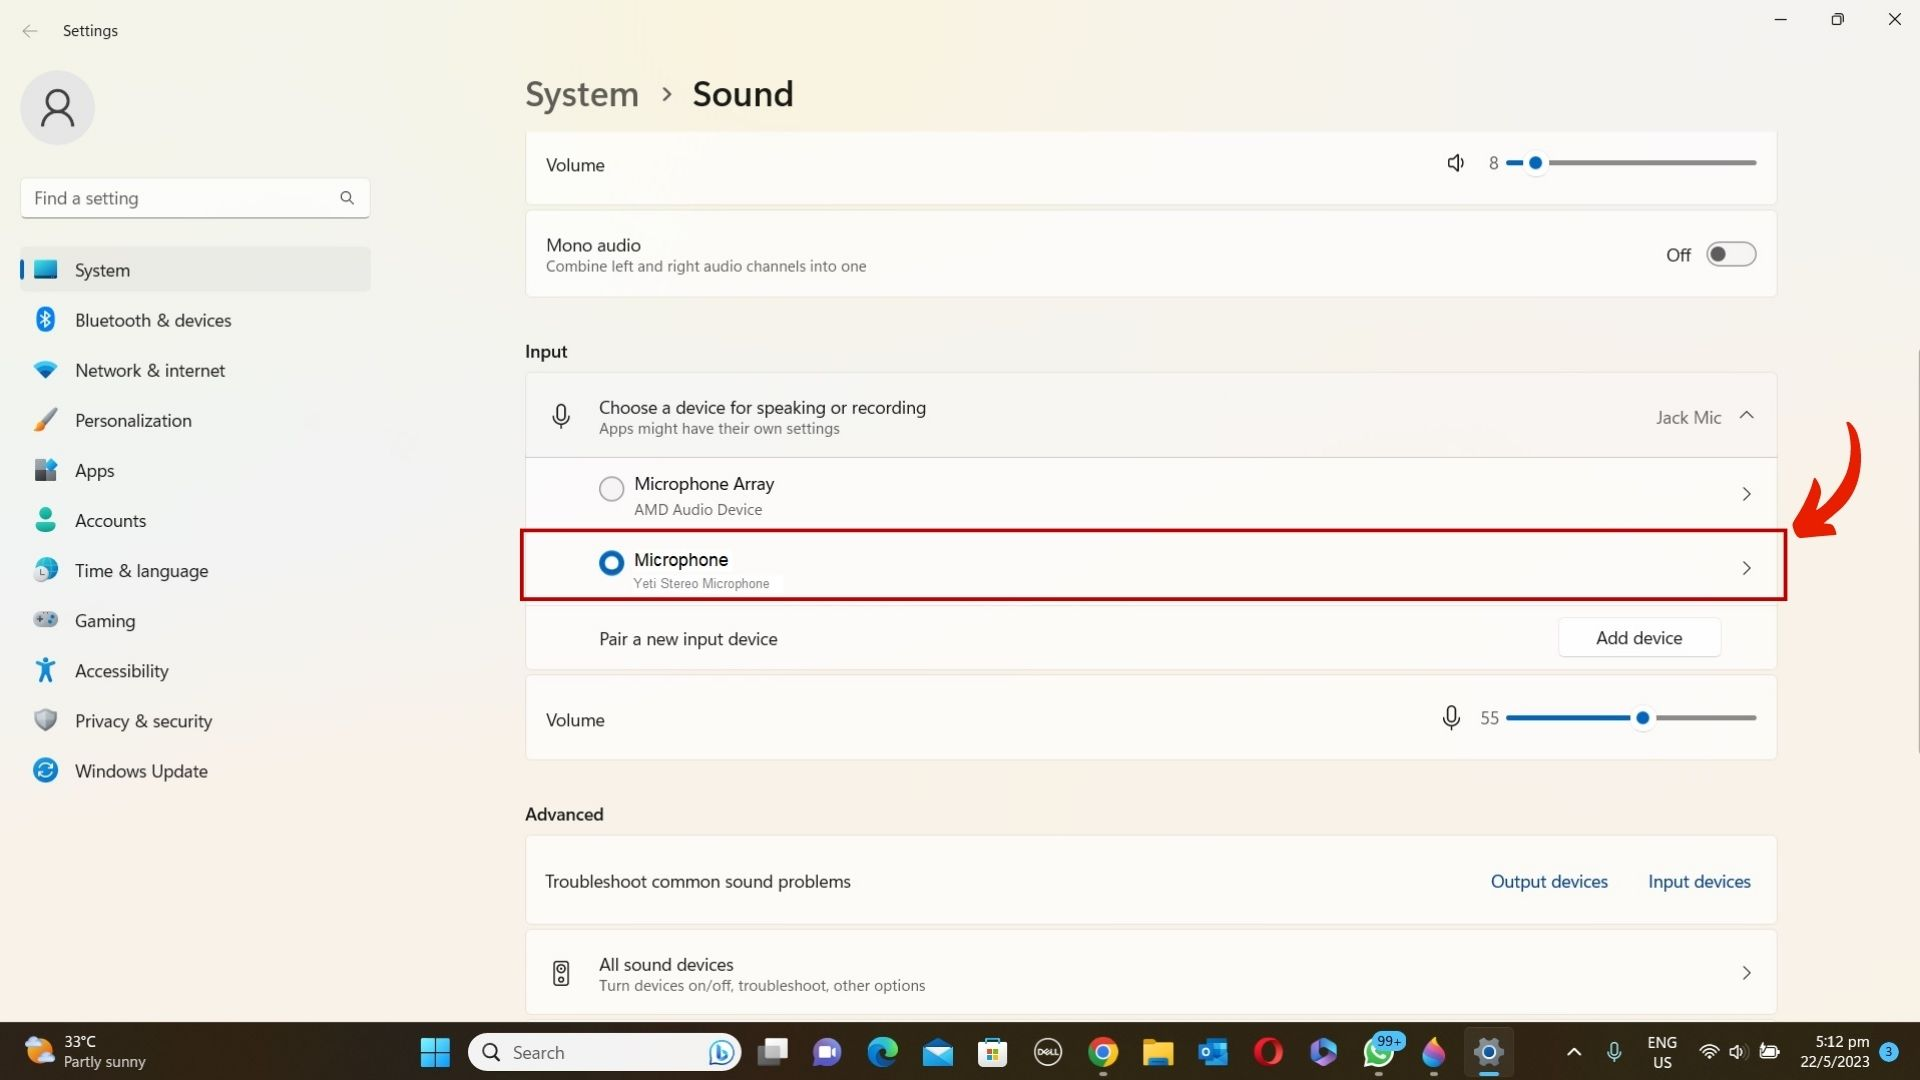
Setting up your Blue Yeti mic on Windows 11 is a breeze. When you plug the Blue Yeti microphone into your PC with the provided USB cable, it should start working immediately. However, checking if the Blue Yeti microphone is selected as the audio input does not hurt.
- At the bottom right corner of your taskbar, right-click on the “Speaker icon” and left-click on “Sound settings.”
- The “System > Sound” menu should appear. Scroll down until you see the “Input” section.
- You might see a list of devices, especially if your headset and Blue Yeti microphone are connected, and select “Yeti Stereo Microphone.”
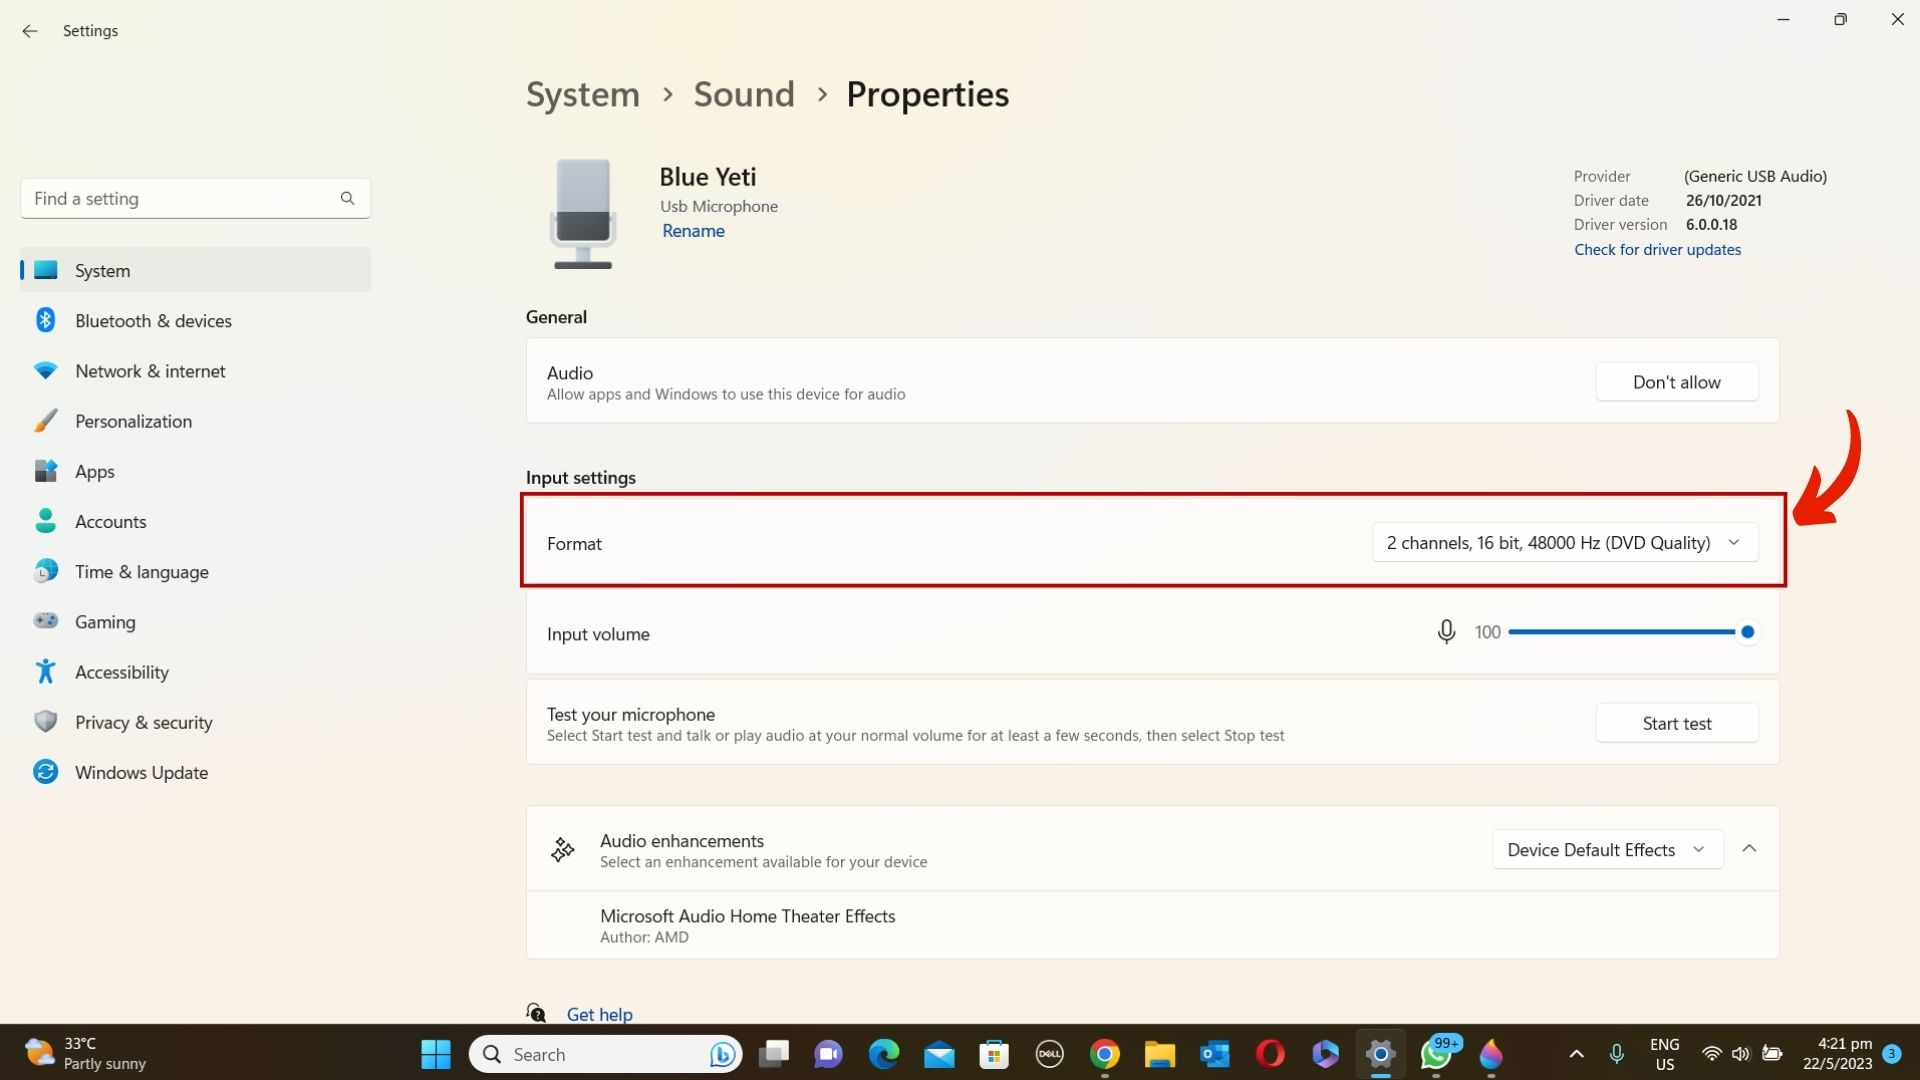
The input volume controls the volume of the sound going into your computer, while the gain controls the sensitivity of the Blue Yeti.
Also, when you enter the “System > Sound > Properties” menu of the microphone, you can choose between 44.1kHz or 48 kHz; choose 48kHz for the best sound quality.
Mac Setup
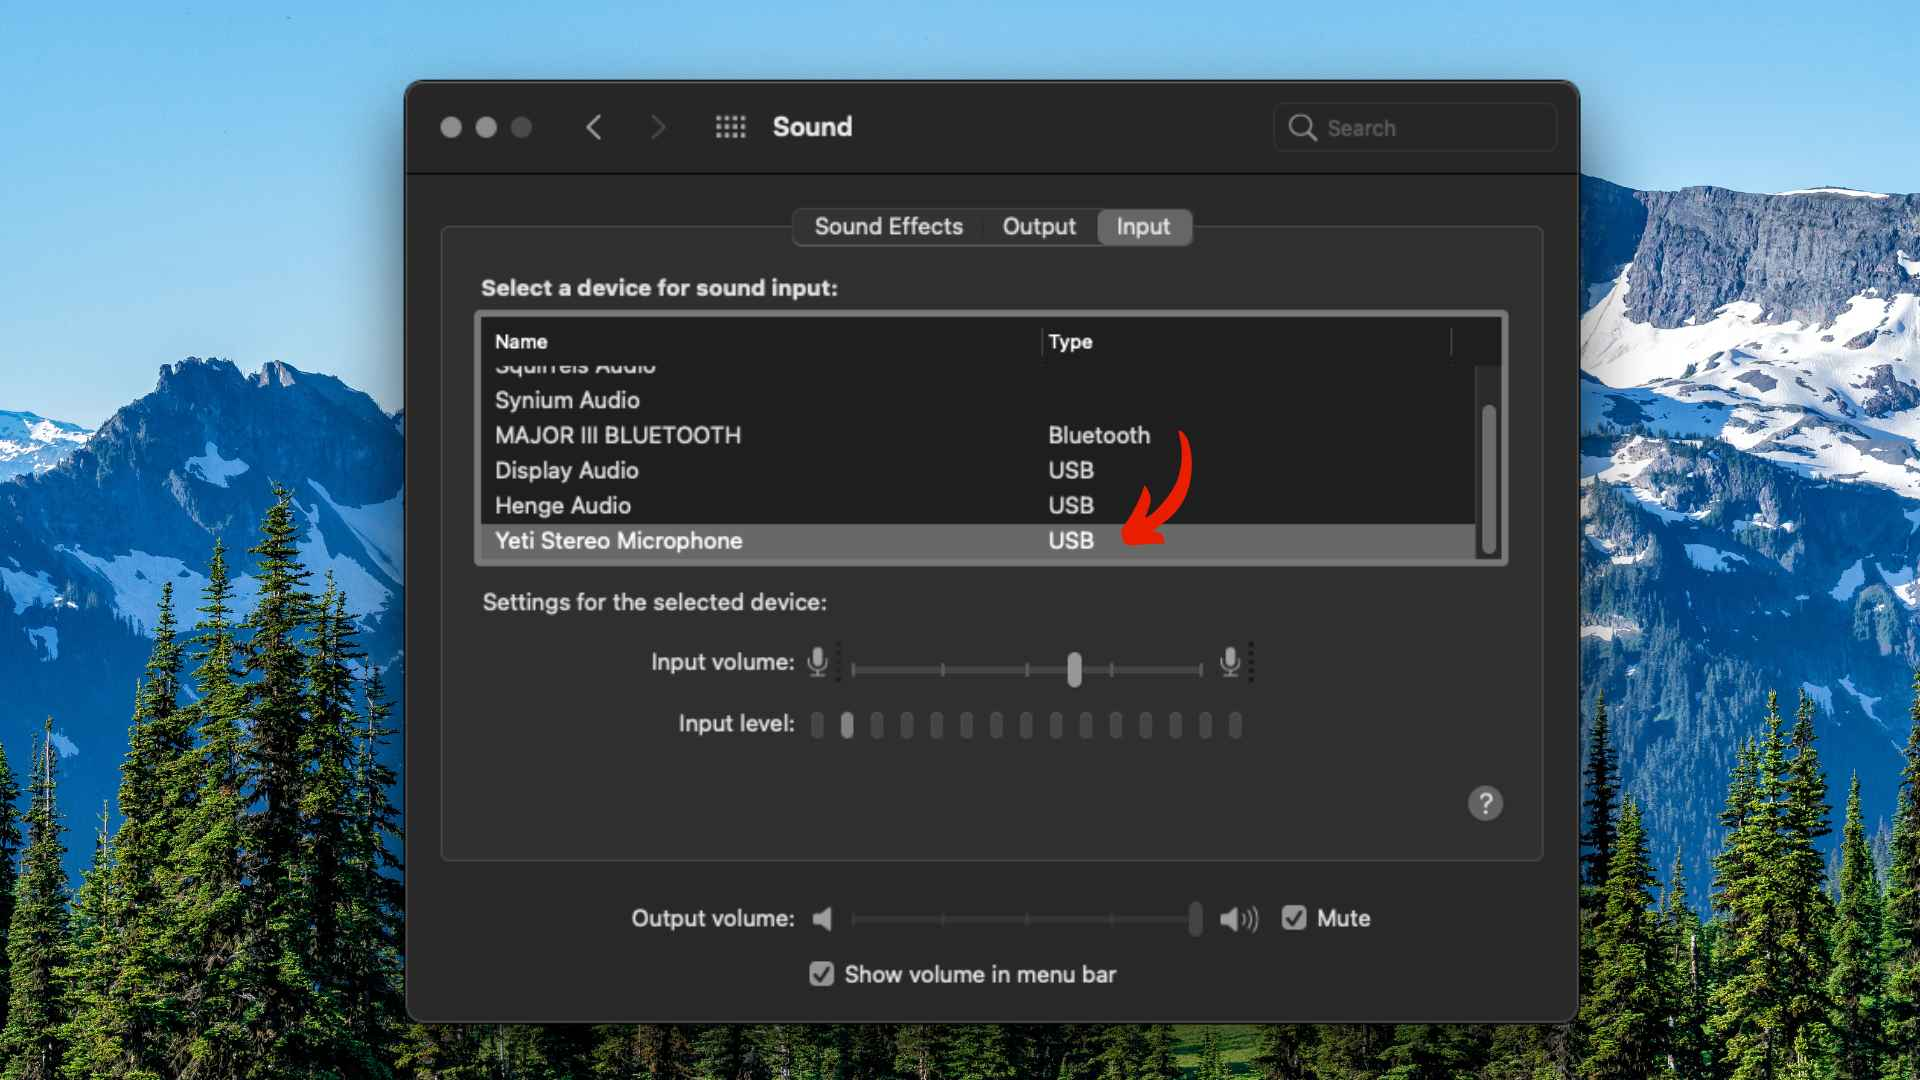
Setting up your Blue Yeti microphone on a Mac is just as easy.
- Plug in your Blue Yeti microphone with the provided USB cable, go to the bottom taskbar, and click the “System Preferences” icon.
- A menu will pop up. Click on “Sound” which has the speaker icon.
- When the sound menu appears, click the “Input” tab near the top and choose “Yeti Stereo Microphone.”
Similar to Windows, you can adjust the input volume in this menu.
Use Headphone Monitoring
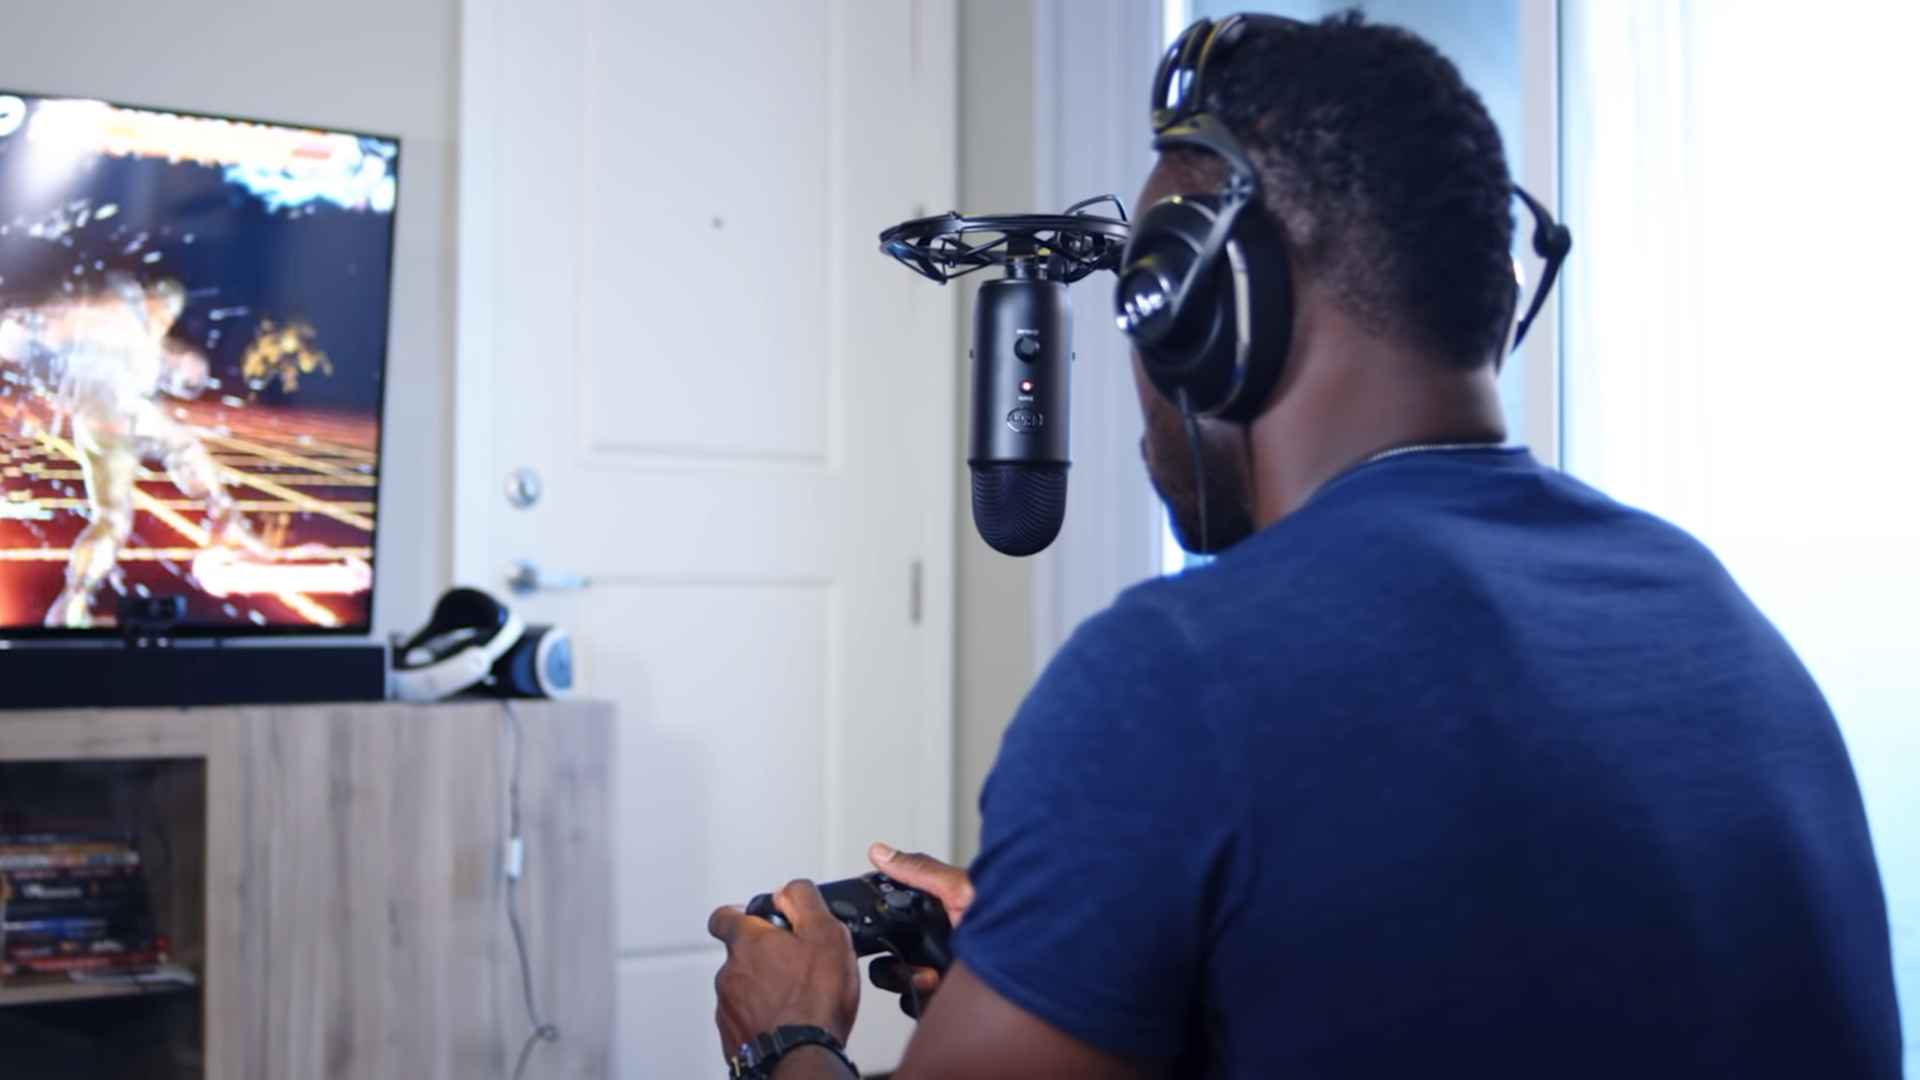
I know you’re excited to start tweaking all the fancy controls at the get-go, but the most important thing is to hear what you sound like with every tiny adjustment.
The Blue Yeti mic has a built-in headphone jack for real-time monitoring. You won’t have to use the headphone jack of your computer or audio interface.
This means you can listen to what you’re recording without any latency. It’s like having a direct line to your own voice, allowing you to catch any issues with your audio on the fly.
If you can afford it, use a set of good-quality studio monitors or open-back headphones to keep an ear on your audio quality. It’s also a good idea to keep the headphone volume at a comfortable level. Too loud, and you might miss subtle issues in your audio.
Understand the Difference between Mic Gain and Volume
Before we dive into the nitty-gritty, let’s clear up a common confusion: the difference between the volume and gain knobs on your Blue Yeti microphone.
The volume knob controls the loudness of the audio you hear through your headphones. The gain knob, on the other hand, adjusts the sensitivity of the Blue Yeti microphone. In simple words, the gain is INPUT into the Blue Yeti microphone, and the volume is OUTPUT to the headphones or speakers.
The higher the mic gain, the more sound the Blue Yeti picks up. It’s like the microphone’s ears: turn up the mic gain, and it hears more; turn it down, and it hears less. But remember, a higher mic gain also means more background sounds, so it’s all about finding the right balance.
Set a Suitable Gain Level
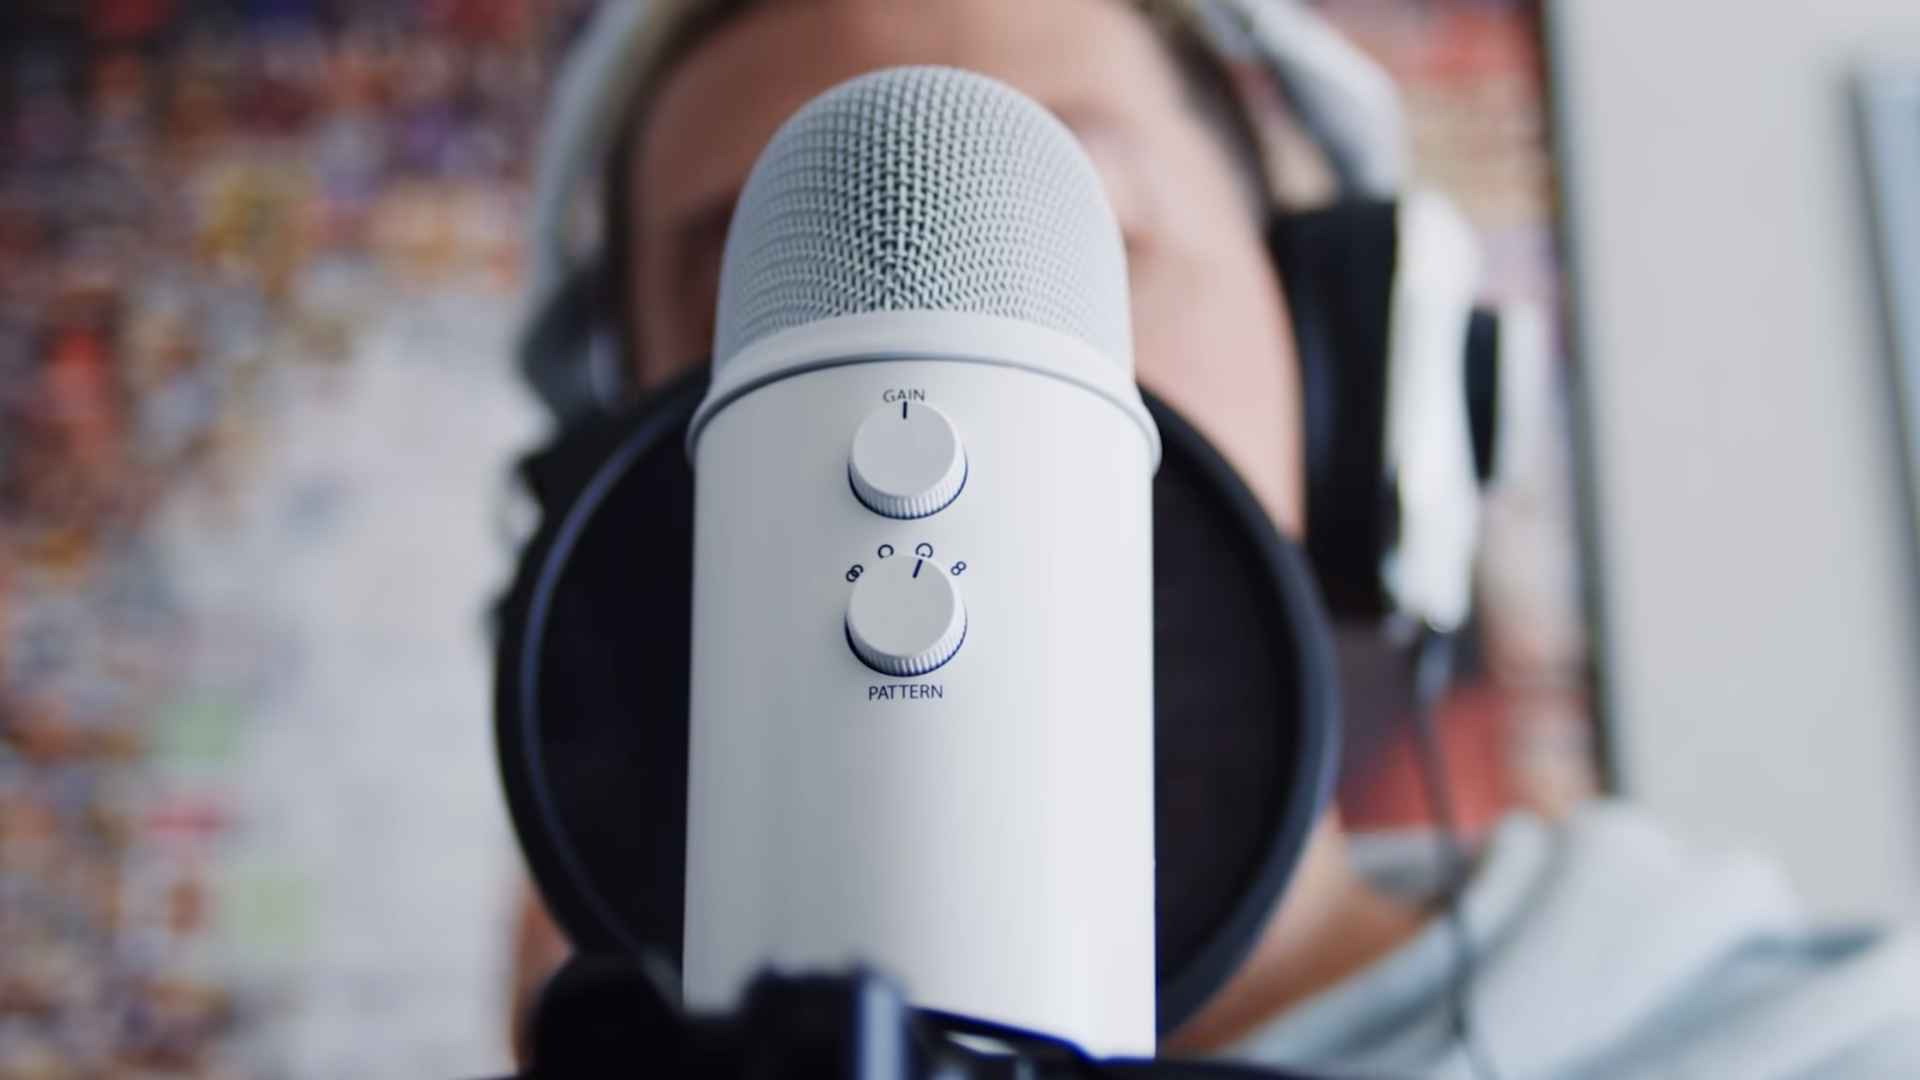
Setting the mic gain level on your Blue Yeti microphone is a bit like Goldilocks trying to find the perfect porridge. Too high, and your audio will be distorted with background noise. Too low, and your voice will be as faint as a whisper in a windstorm.
The trick is to find the sweet spot where your voice is clear and crisp without any unwanted noise. For most podcasters, Youtubers, and live streamers, the ideal audio level is around -12 dB. And ensure that this level does not exceed -6 dB when you speak loudly; otherwise, you will get distortion from audio clipping.
Start with the gain knob at zero and adjust it higher while speaking into the Blue Yeti until the audio level reaches -12 dB, ensuring you do not hear any background sounds like your air-conditioning, fan, or neighbors talking.
Choose the Appropriate Pickup Pattern
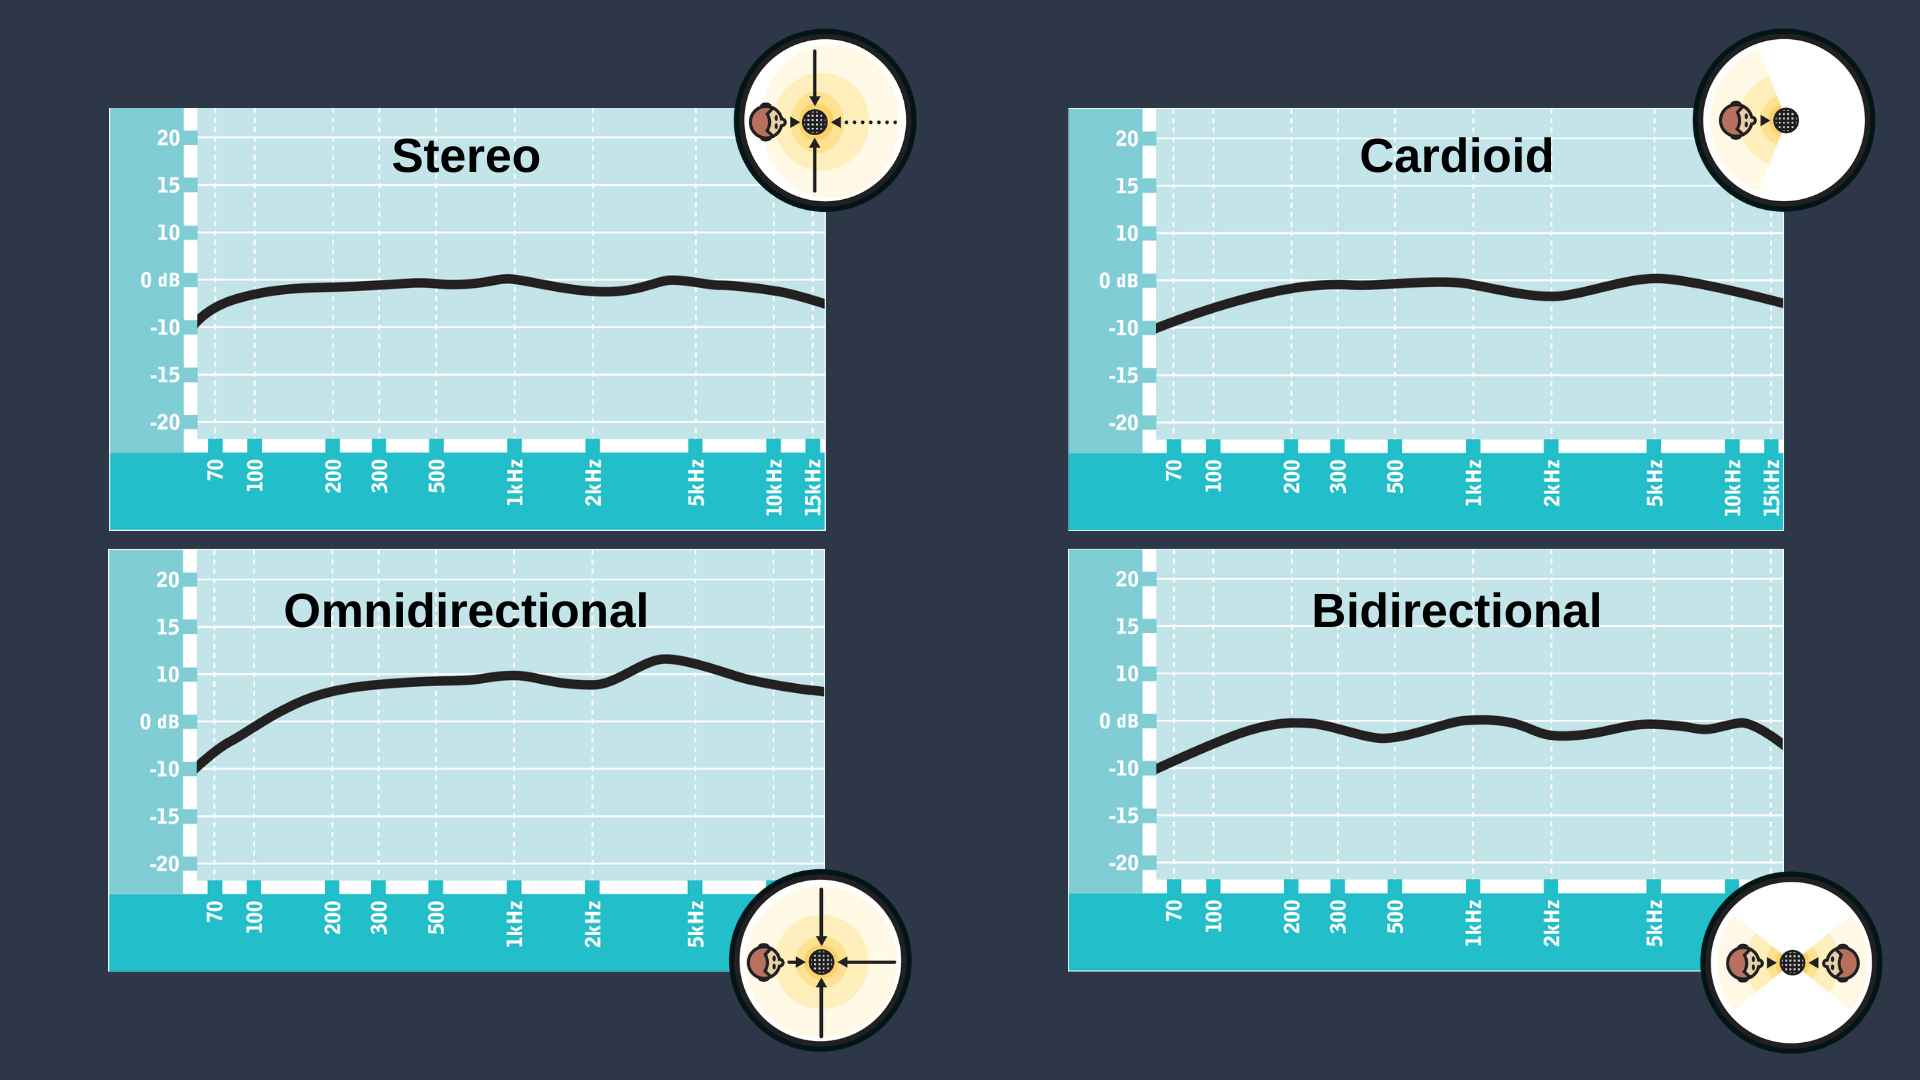
The Blue Yeti mic boasts four different recording patterns, each suited to a different recording situation. Let’s break them down:
Cardioid Mode
Cardioid mode is your go-to for solo work. It picks up sound from the front of the microphone and is perfect for recording podcasts, voiceovers, and any situation where you’re the only person speaking.
This pickup pattern focuses on frontal sounds while rejecting noise from all other sides, which minimizes background noise.
This mode is also great for instruments, capturing the sound directly in front of the Blue Yeti and giving your recordings a rich, full-bodied sound.
Bidirectional Mode
Bidirectional mode picks up sound from both the front and back of the Blue Yeti while rejecting sound from the sides, making it ideal for face-to-face interviews or duets.
If you’re really strapped for cash, you can also use this mode (instead of two separate mics) for recording two instruments simultaneously, capturing their interplay.
Omnidirectional Mode
Omnidirectional mode picks up sound from all around the Blue Yeti. It’s great for capturing the ambiance of a room or recording a group of people.
This mode is perfect for recording audio during a live performance or a roundtable discussion, capturing the energy and dynamism of the situation.
However, you might want to be careful using the omnidirectional mode as your audio can get muddy from all the different sounds it is picking up. Ensure you do not have too many sound sources around the Blue Yeti.
Stereo Mode
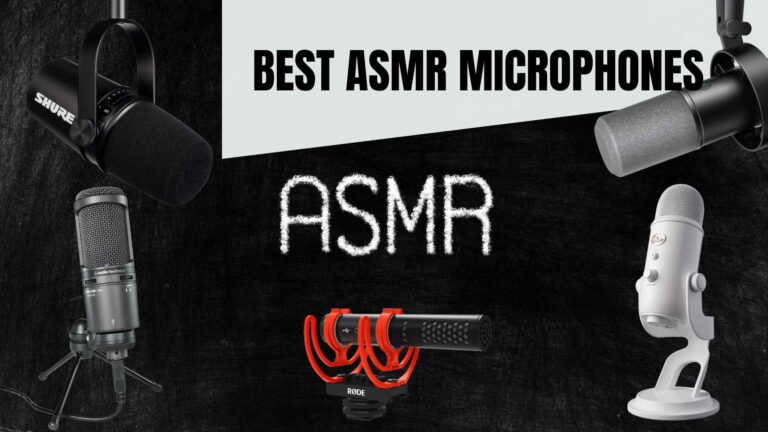
Stereo mode picks up sound from the left and right channels, creating a sense of depth and space in your recording. It’s perfect for ASMR recordings or any situation where you want to create a rich, immersive audio experience. Check out our recommendations for great mics for ASMR recordings.
This mode is also great for recording musical performances, capturing the spatial arrangement of the instruments, and creating a wide, realistic soundstage.
Ideal Mic Placement
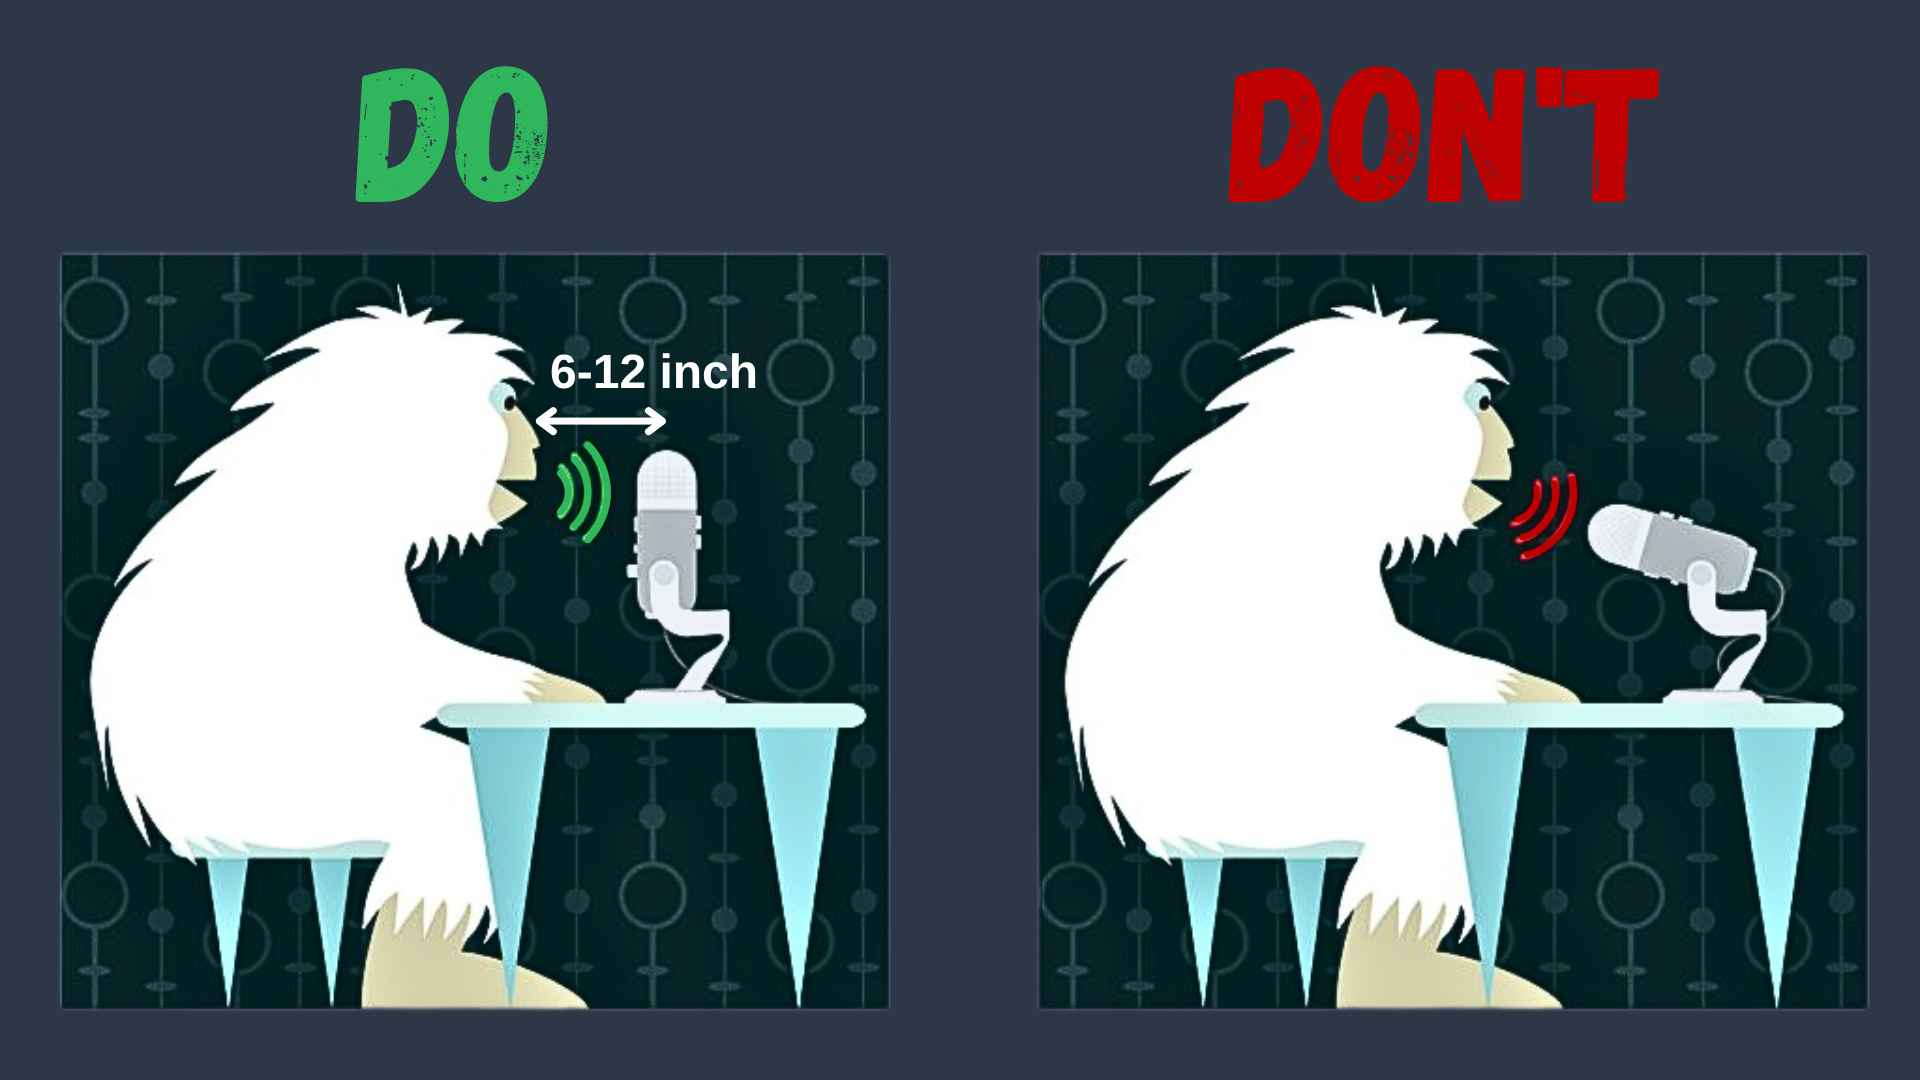
Now that you’ve chosen your pickup pattern, it’s time to place your Blue Yeti. The ideal placement for your Blue Yeti microphone is about 6-12 inches from your mouth.
The Blue Yeti is a side-address mic that has to be facing upward instead of tilted toward you.
Ensure you are speaking to the Blue Yeti from an angle and not directly in front of the microphone. This will help to reduce plosive sounds (those pesky “p” and “b” sounds that can cause distortion) and ensure your voice is captured clearly. You can also use a pop filter to reduce those plosives further.
But remember, every voice is different, so feel free to experiment with different placements until you find the one that works best for you.
Setup for Recording Instruments
First things first, the Blue Yeti is a good condenser microphone with a flat frequency response for instrumental and vocal recording. There are also great XLR mics for voice if you want something with a higher quality than a USB mic like the Blue Yeti.
However, the Blue Yeti might not be the ideal microphone for recording certain instruments, especially those with high sound pressure levels like drums or electric guitars. You will need different kinds of microphones, like dynamic microphones for recording loud music, or vintage-sounding ribbon mics for warm and dark tones.
The best polar pattern is the cardioid mode for recording a solo instrument. The other polar patterns, like omnidirectional mode and bidirectional mode, will only pick up room reverberations that muddy your audio. You can also experiment with stereo mode to record several instruments or get a wide sound image from a single instrument.
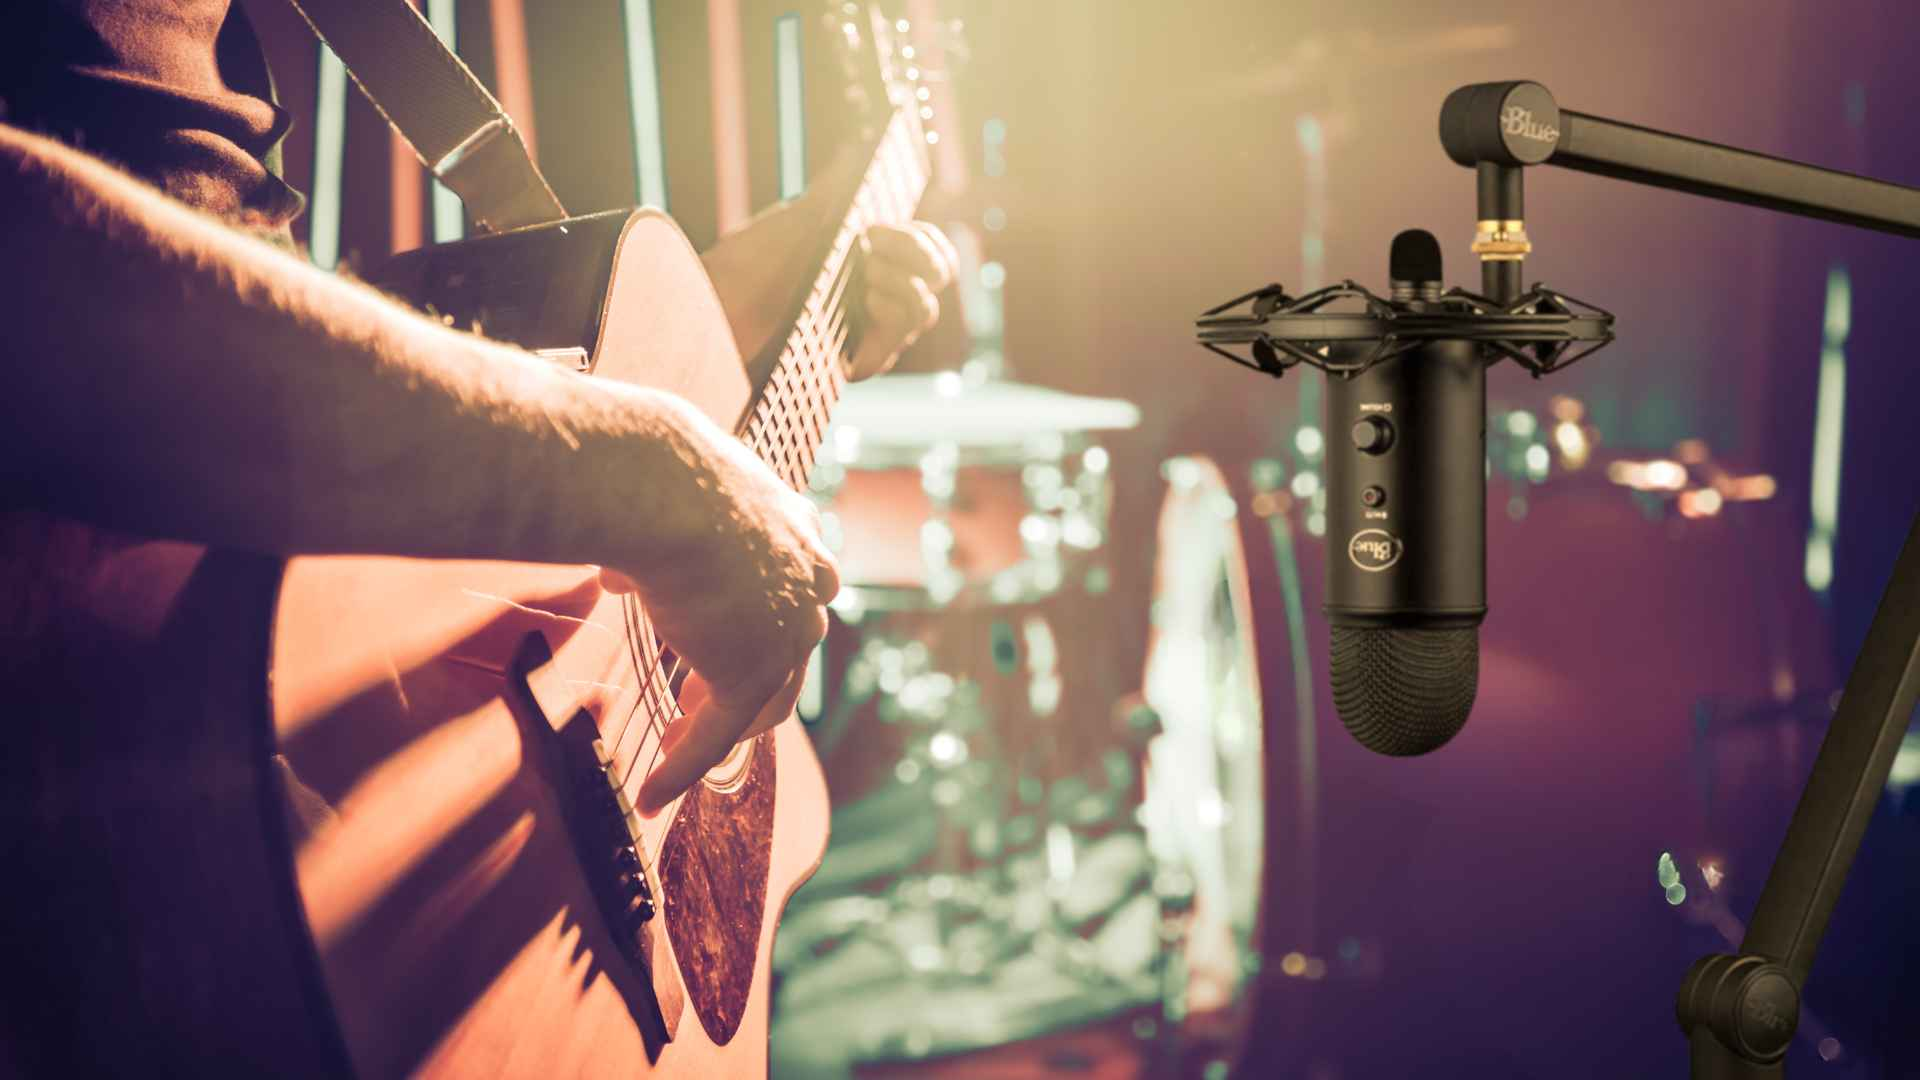
You might be tempted to shove the mic right up against your instrument but resist the urge. The Blue Yeti microphone performs best when it’s about 6 – 12 inches from the instrument. If you’re recording an acoustic guitar, ensure that the Blue Yeti microphone is not directly facing the sound hole but somewhere around the 14th fret of the fingerboard.
Check out this comprehensive guide if you’re looking to record an acoustic guitar. It’s packed with tips and tricks to help you get the best sound out of your guitar and Blue Yeti microphone.
When recording instruments, you want to ensure your microphone gain is set correctly to avoid distortion. This is especially important if you’re recording louder instruments like drums or brass.
While I did mention that the ideal audio level is -12 dB for recording podcasts and live streams, it is not the same for recording music. The audio levels for recording instruments should be between -18 to -20 dB. Remember, the goal is to capture the natural sound of your instrument, not to blast your listeners’ eardrums.
And if you’re looking to take your recordings to the next level, consider setting up a home studio. A good home studio setup can make a world of difference in the quality of your recordings. And don’t worry, setting up a home studio doesn’t have to break the bank. Check out this beginner’s guide on how to set up a home studio for some budget-friendly tips and tricks.
Setup for Live Streaming
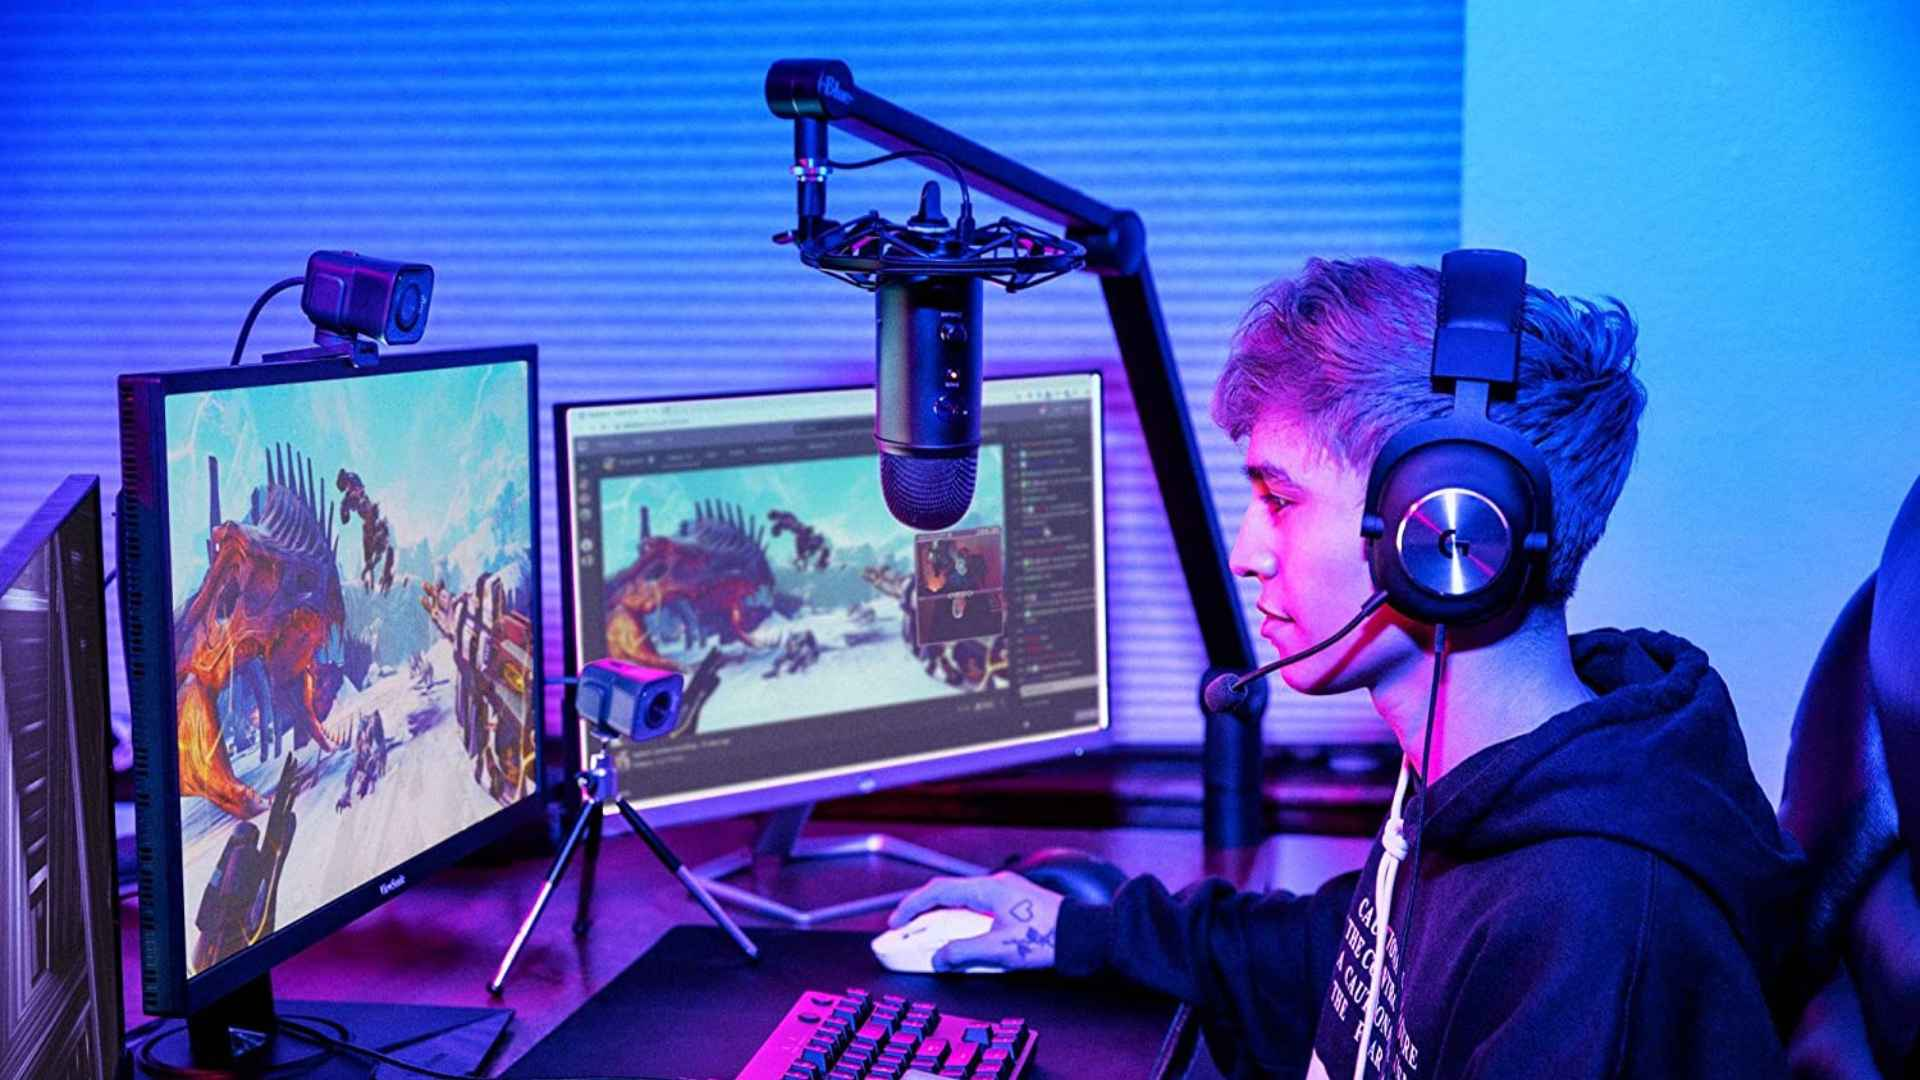
Live streaming is a whole different ball game, but the Blue Yeti microphone is more than up to the task for various stream genres. You would still want to follow the above-mentioned suggestions, such as using the cardioid mode, keeping the Blue Yeti microphone 6-12 inches from your mouth, adjusting the gain settings until you get around -12 dB audio level, and using headphone monitoring.
Check our recommendations for other good-quality live-streaming microphones.
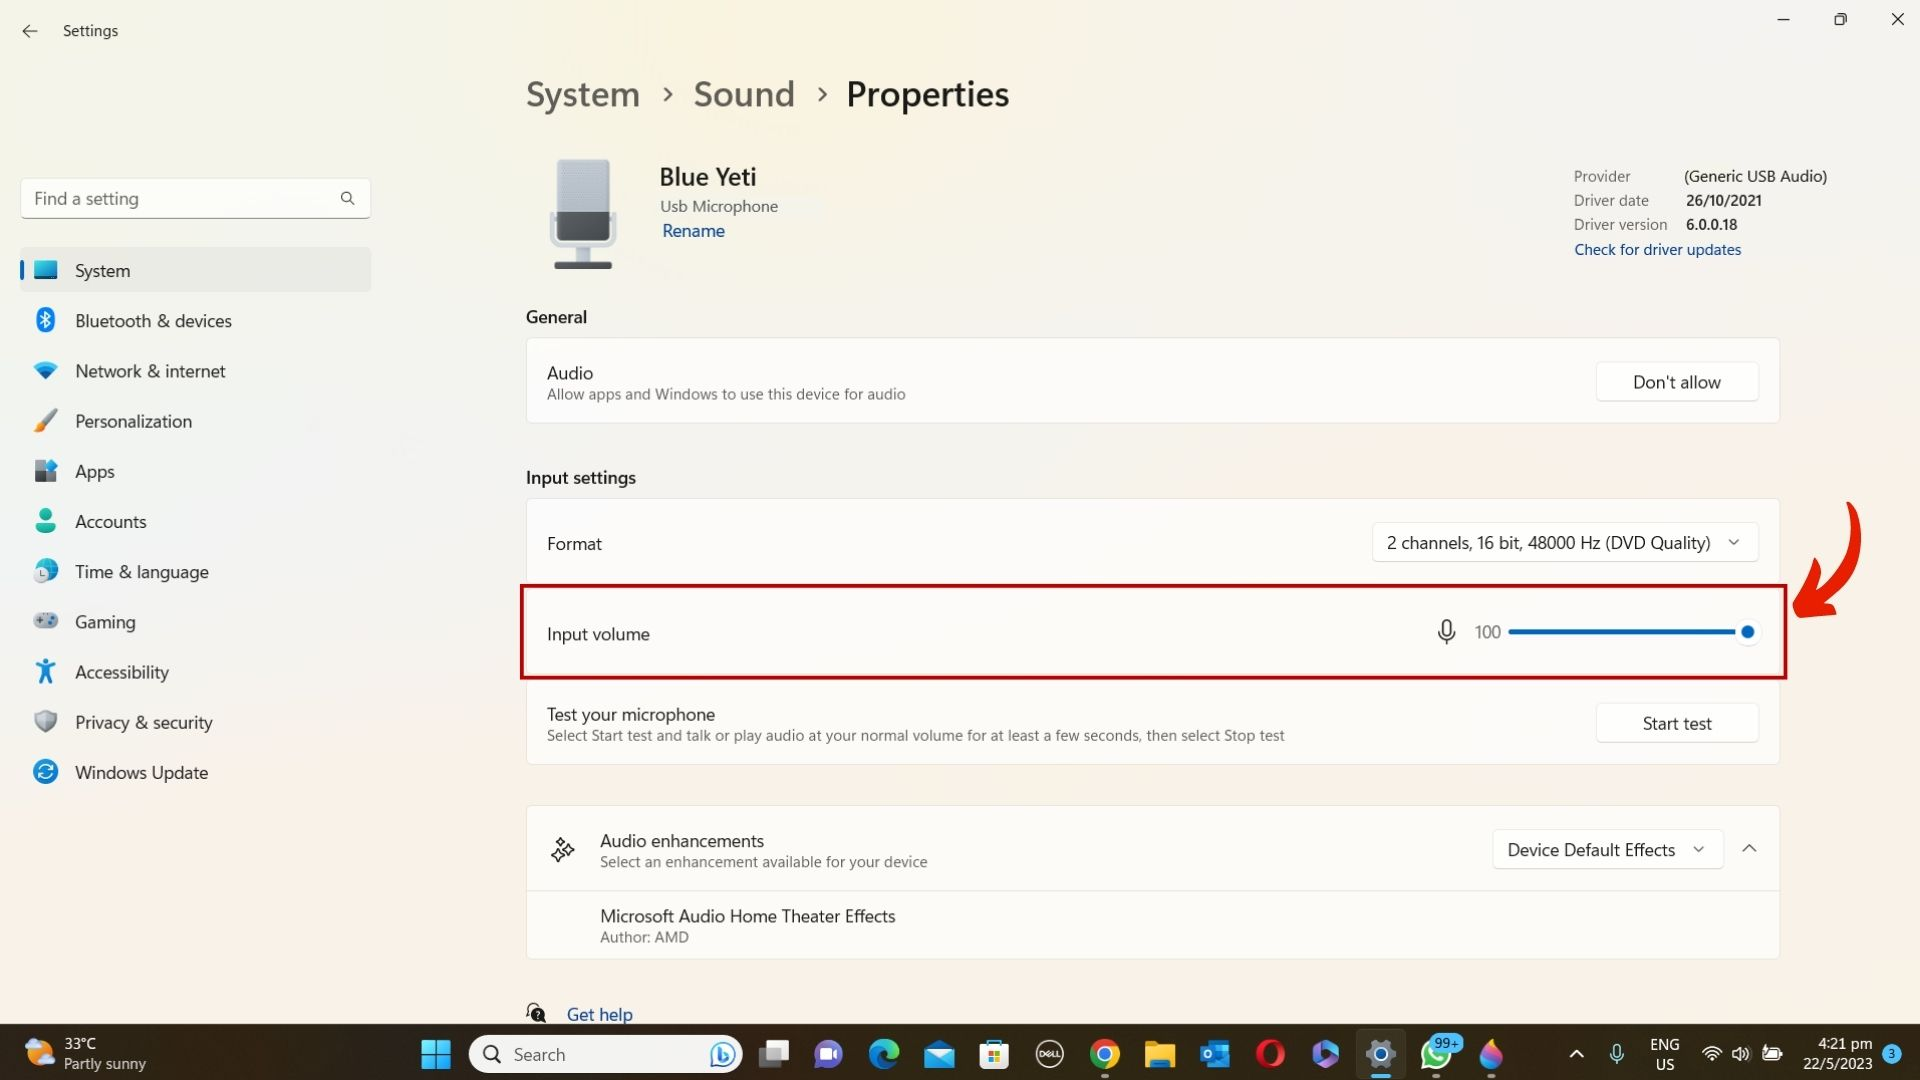
However, there are some other things you would want to take note of, such as your Windows volume (Input volume, not output volume). This might seem like a no-brainer, but it’s a bit of a balancing act. If your gain is down all the way, try cranking your Windows volume up to 100. This will help your mic regain some of its sensitivity without picking up those pesky ambient sounds.
If that doesn’t work, you can try the opposite approach: raise your gain to a middle point and lower your Windows volume to 0. It’s all about finding the sweet spot that works for you.
While the Blue Yeti does come with a fancy mic stand, consider investing in a boom arm like the Blue Yeti Compass. This handy tool will allow you to position your mic exactly where you want it, and keep it steady while you’re streaming.
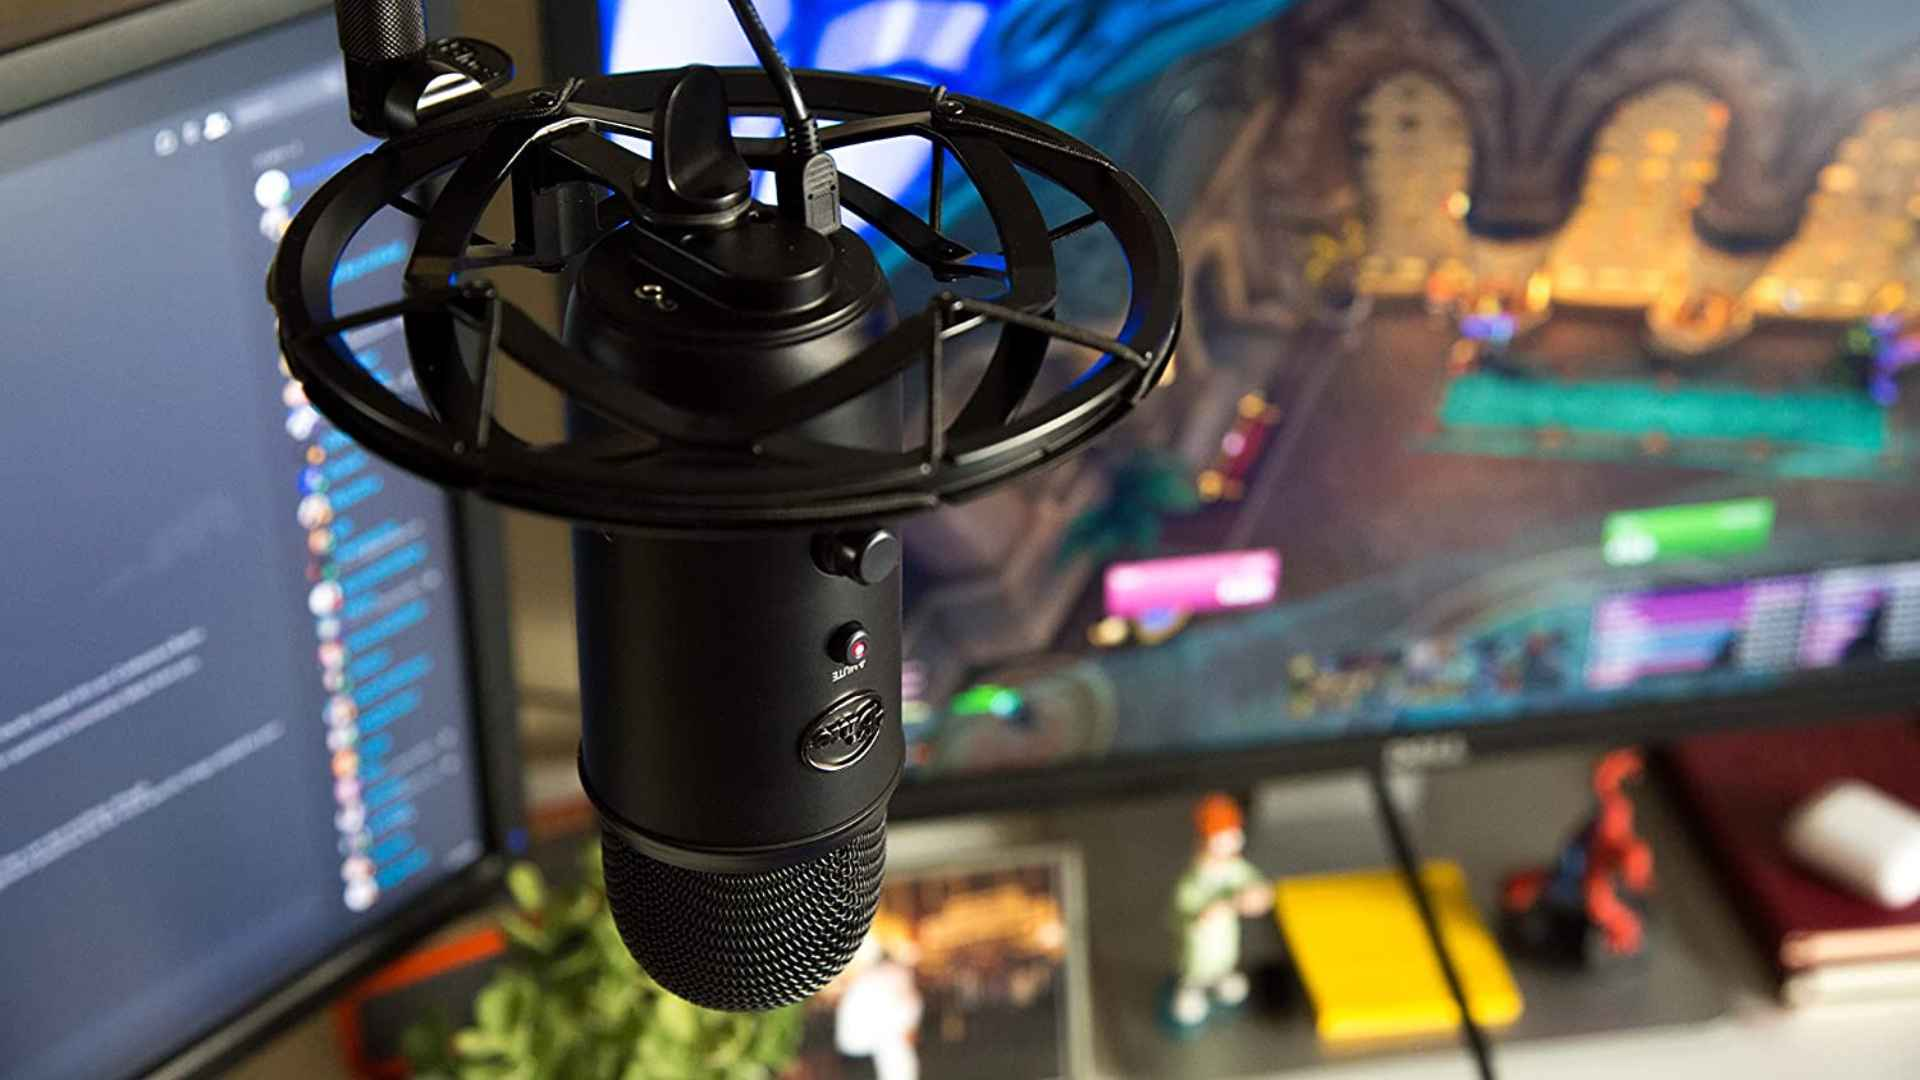
Furthermore, you can boom the Blue Yeti microphone out-of-frame; I know how much screen space the huge Blue Yeti microphone can take up! Also, to get better quality audio, use a pop filter to help reduce plosive sounds and a shock mount like the Radius III Shock Mount to reduce handling noise.
Finally, remember to utilize those helpful OBS/Streamlabs filters. Filters such as the noise gate, compressor, and noise suppression can make a difference when it comes to improving sound quality. They can help to eliminate ambient sounds, level out your volume, and even prevent those sudden loud noises from deafening your audience (we’ve all been there).
These are the bare minimum equipment you’ll need. If you want to set up a professional live stream, you will need several more live streaming equipment, such as a high-resolution camera, a gaming PC, an audio mixer, and a Stream Deck, just to name a few.
Best Room Acoustics
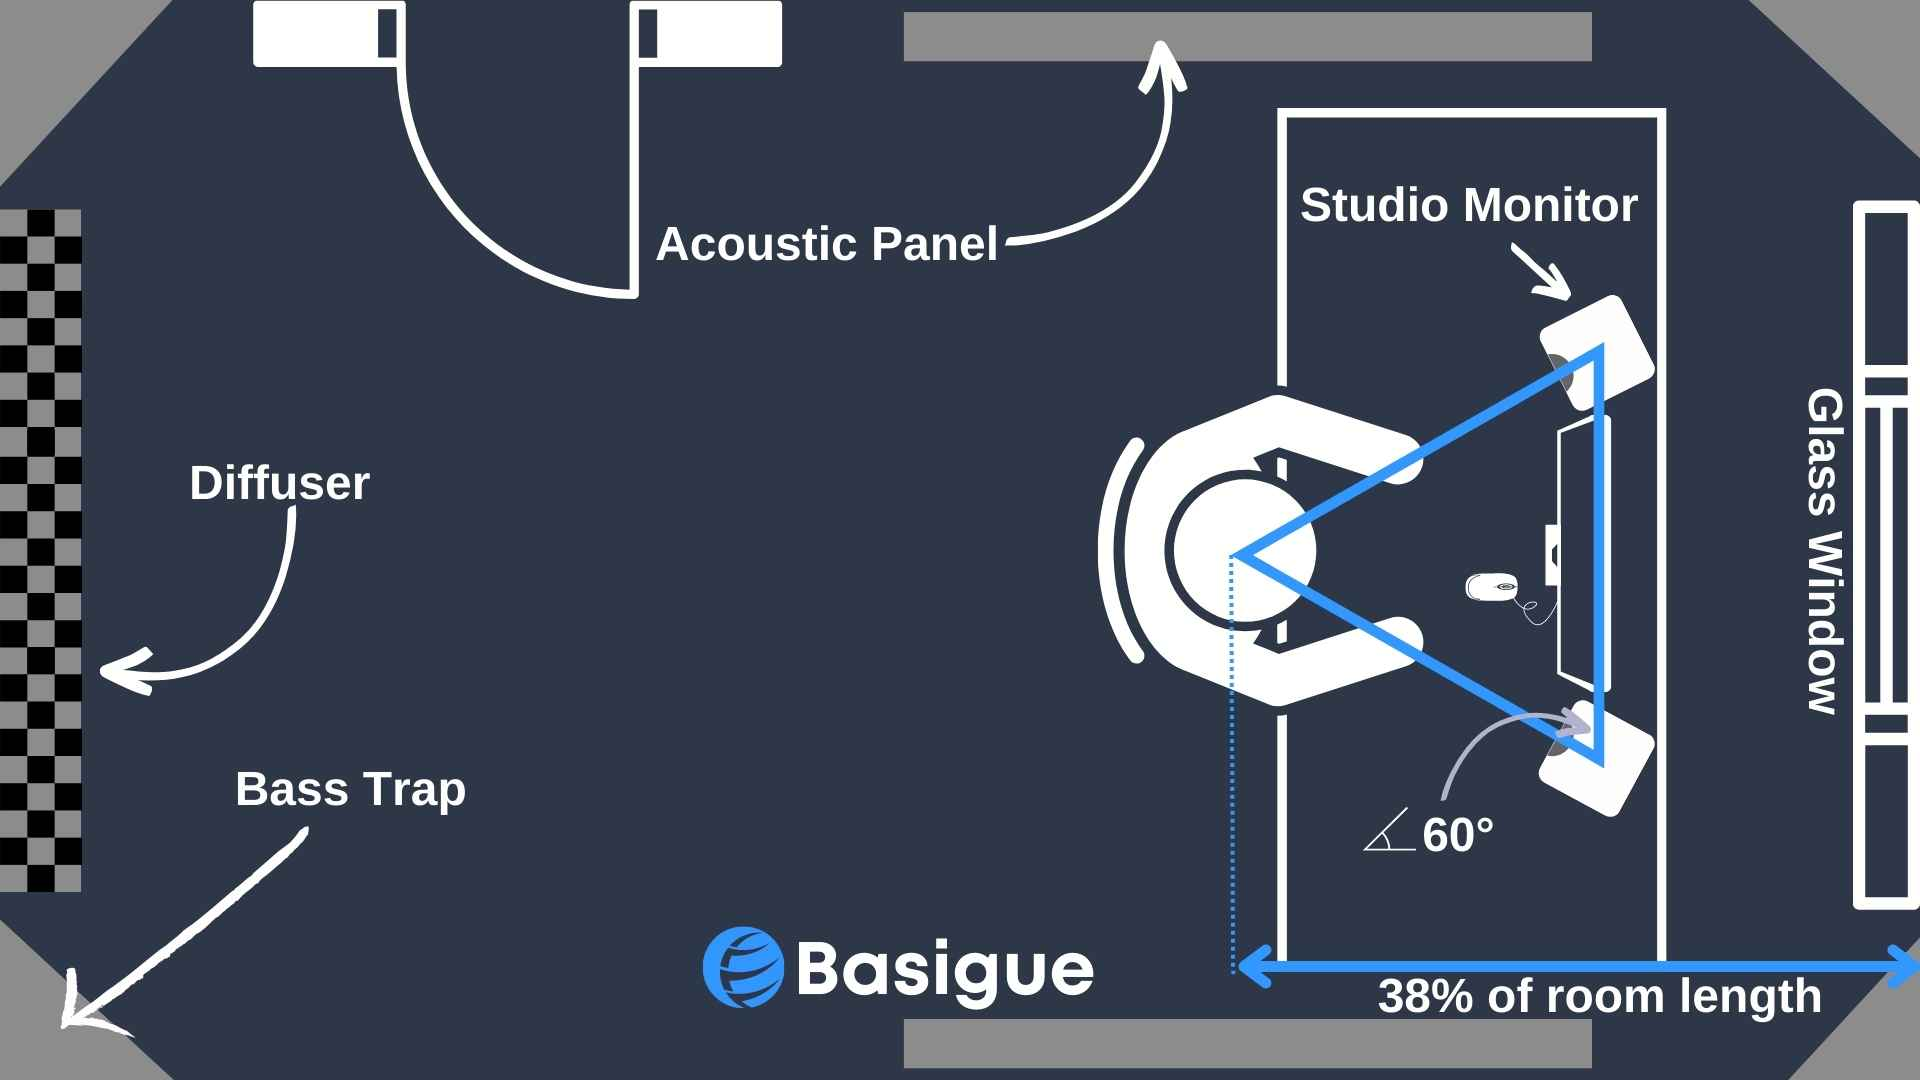
The acoustics of your room can significantly impact the sound quality of your recordings. A room with good acoustics will enhance your audio, while a room with poor acoustics can make your Blue Yeti sound bad.
Consider adding acoustic panels to your walls for sound absorption to improve your room’s acoustics. These will reduce background noise and echo, giving you a cleaner sound.
Also, consider the size and shape of your room. A small, square room can create unwanted echoes, while a larger, irregularly shaped room can help to diffuse sound and reduce echo.
Check out this article for more information about acoustic treatment for your home studio.
Use the Blue VO!CE Software
For those looking to take their audio quality to the next level, the Blue VO!CE software is a must. This software gives you the best Blue Yeti settings to fine-tune your audio, with audio processing options for EQ, compression, and more.
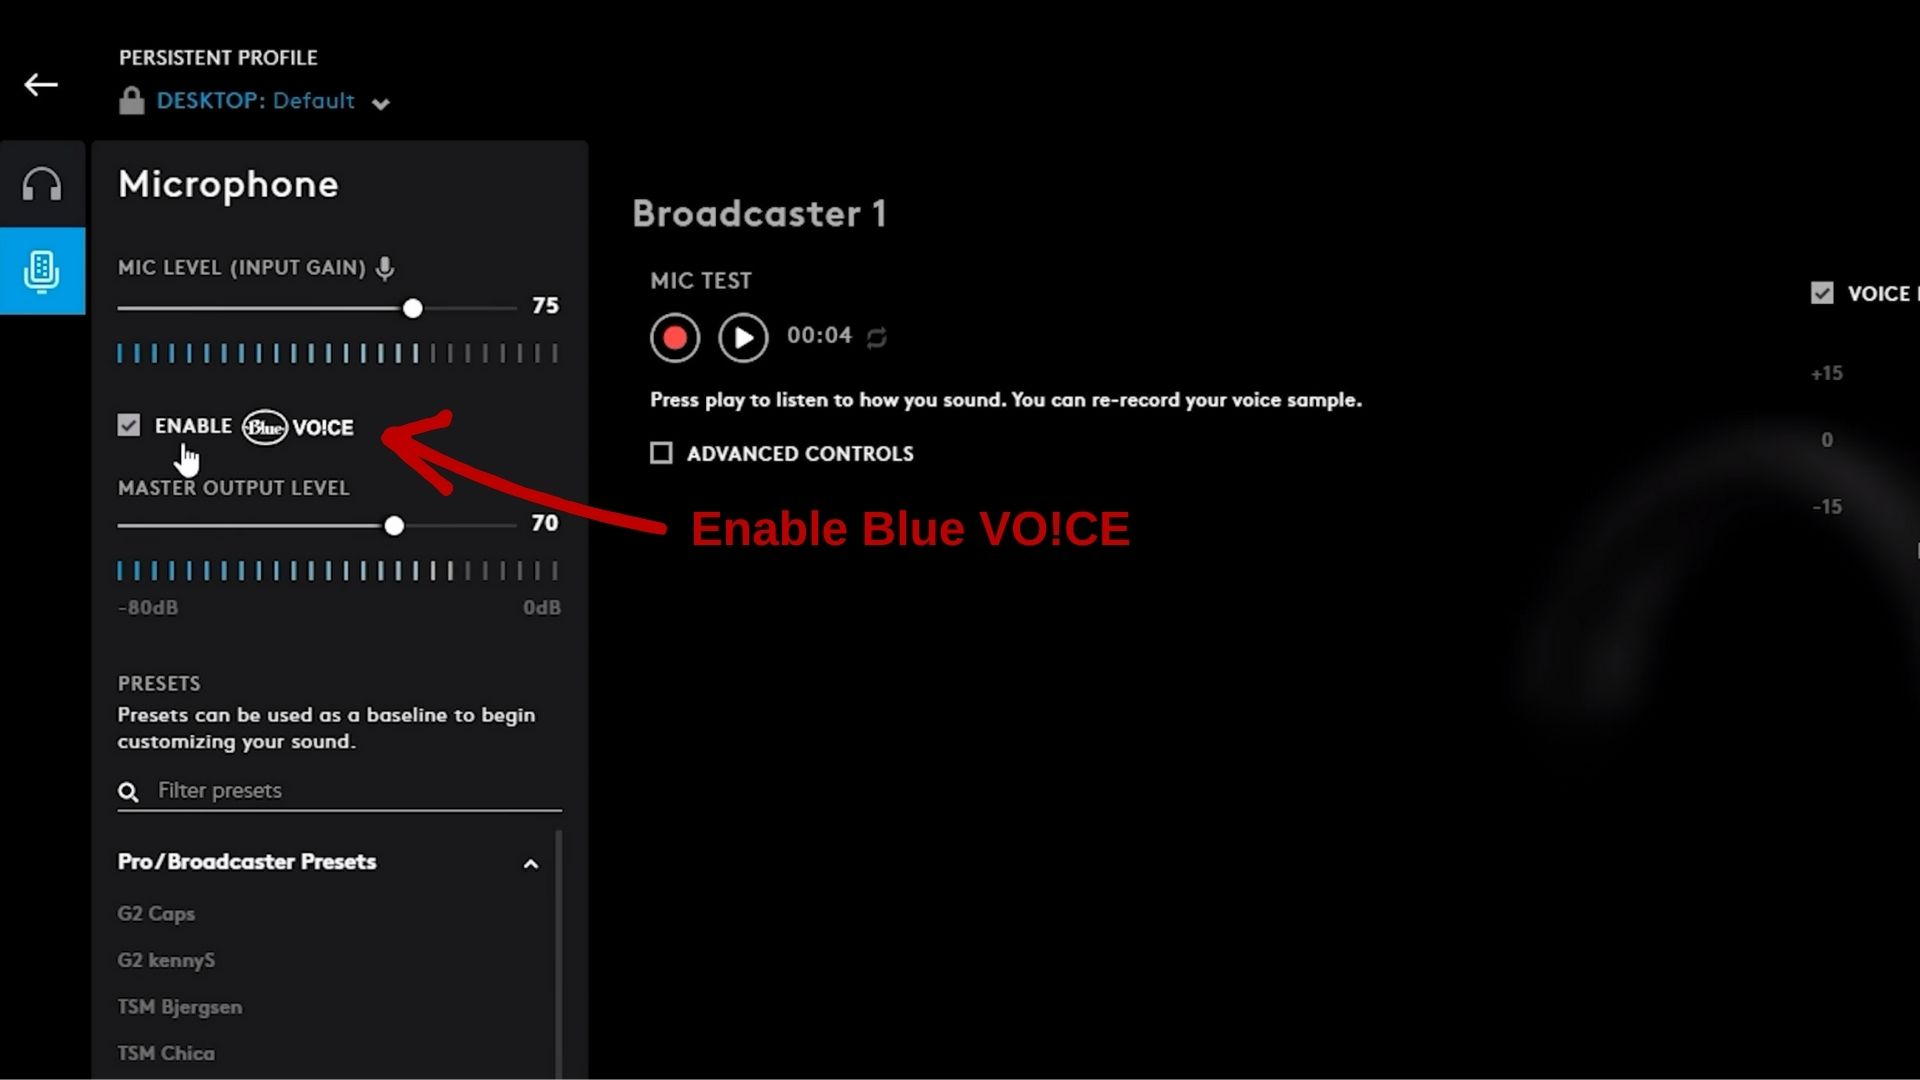
To use Blue VO!CE, you’ll first need to download and install the Logitech G HUB Gaming Software. And then, you will need to select the Yeti microphone and enable ‘Blue VO!CE’ in the app.
Blue VO!CE uses real-time voice filters to reduce unnecessary noise and enhance the richness and clarity of your voice. This gives the Blue Yeti an edge for making podcasting content or recording vocal cover songs.
Key features include the high-pass filter, which keeps out low-frequency noise, and the noise reduction feature, which eliminates consistent, unwanted sounds. The expander/gate feature is great for cutting out background noise when you’re not speaking.
The de-esser reduces hissing or sibilant sounds, and the voice EQ lets you boost or reduce selected frequencies to change the sonic profile of your voice. Finally, the compression and limiter features ensure your voice volume is consistent and doesn’t exceed a certain level.
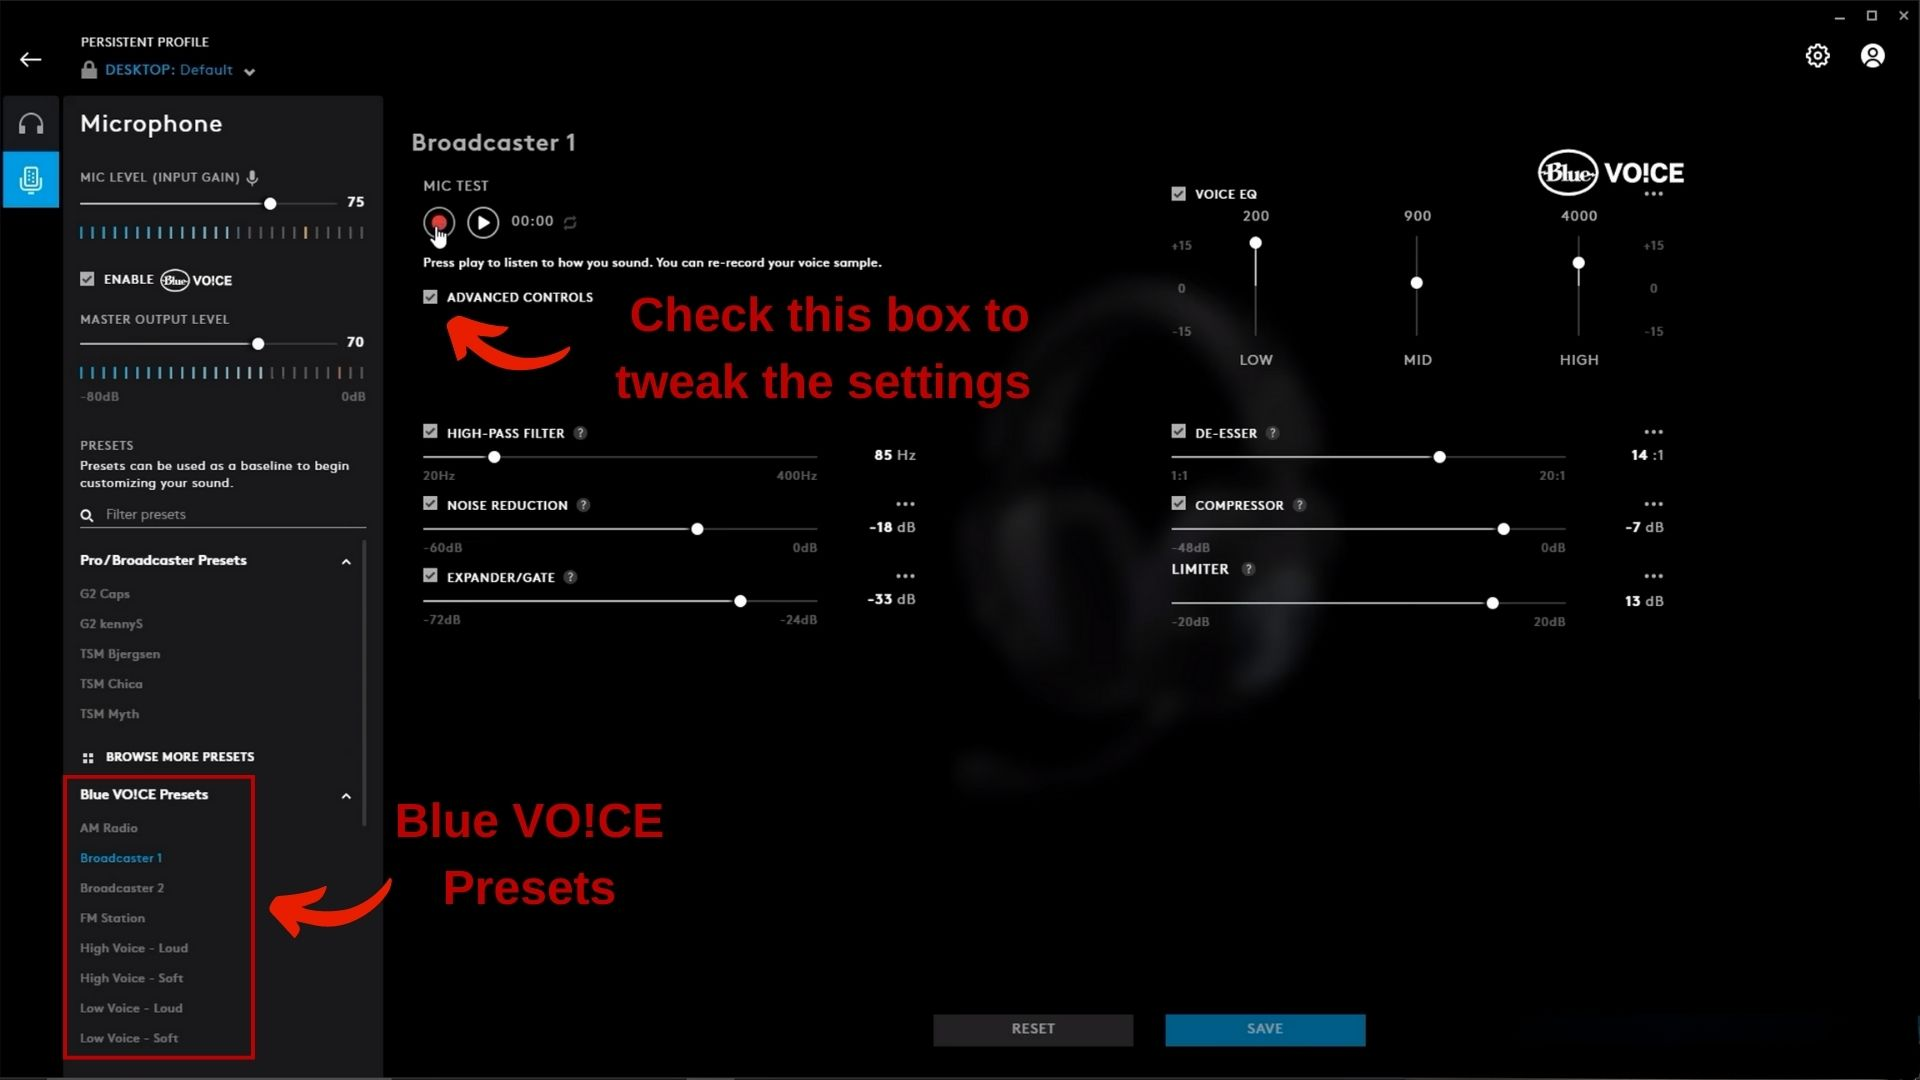
The software also includes a variety of presets, so you can quickly switch between settings for different recording situations, such as having a boomy broadcaster voice or giving yourself a bass boost. You can even tweak the settings of the presets when you check the ‘Advanced Controls’ box.
If you’re feeling adventurous, you can even create your own custom presets, download new presets, or try out some of the interesting vocal effects, like the robot or chipmunk voice.
Conclusion
We’ve gone through the ins and outs that will give you the best settings for Blue Yeti microphones, from understanding the difference between volume and gain settings to choosing the right pickup pattern, setting up for live streaming and recording instruments, and even using the Blue VO!CE software.
Remember, the Blue Yeti is a versatile microphone capable of delivering good-quality audio for a variety of applications. But like any tool, it’s only as good as the person using it. So take the time to experiment with different Blue Yeti settings, tweak things, and get to know your Blue Yeti.
And remember, every voice and every room is different. What works for one person might not work for another. So don’t be afraid to break the rules and try something new. After all, the goal is to create a sound that’s uniquely you.
Whether you’re podcasting, live streaming, recording music, or just chatting with friends, your Blue Yeti microphone is ready to capture it all. And with these tips and tricks under your belt, you’re well on your way to achieving audio greatness.


